---
title: "How to Create an Email Address on Your Plesk Hosting"
description: "Create an email address on your own domain with Winheberg Plesk web hosting, password, mailbox size, certificate, IMAP POP3 SMTP settings for Outlook, Thunderbird, phones and webmail."
category: cloud
subcategory: hebergement-web
icon: tabler:file-text
date: 2026-11-02
author: Winheberg
slug: "create-email-address-plesk"
order: 142
image: /statics/images/docs/en/hebergement-web/create-email-address-plesk.webp
tags: [Email, Plesk, IMAP, SMTP, Web Hosting]
keywords: [create email address, custom domain email, plesk email, set up outlook, imap smtp settings, roundcube webmail]
link_fr: "/docs/hebergement-web/creer-adresse-mail-plesk"
---
## Context
An email address on your own domain, such as `contact@your-domain.com`, inspires more trust than a free address and stays yours even if you change Internet provider. Your [Winheberg web hosting](https://winheberg.com/en/cloud/web-hosting) includes email, so you can create your addresses directly from Plesk.
Each address has its own mailbox, which you can read from a browser or from software such as Outlook, Thunderbird or the Mail app of your phone.
This guide covers creating the address, protecting mail with a certificate, setting up your mail clients and the most common problems.
> [!NOTE]
> The Winheberg Plesk panel is displayed in French. Menu, field and button names are quoted below exactly as they appear on screen, followed by their English meaning.
## Prerequisites
- A Winheberg web hosting plan with access to the Plesk panel
- A domain connected to the hosting, see our guide [How to Connect an External Domain to Your Plesk Hosting](https://winheberg.com/en/docs/hebergement-web/connect-external-domain-plesk)
- Mail enabled on this domain, which is the default
## 1. Open the mail section
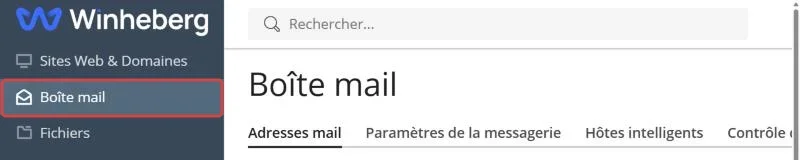
In the Plesk side menu, click **Boîte mail** (*Mail*). The **Adresses mail** (*Email Addresses*) tab lists all the addresses of your domains.
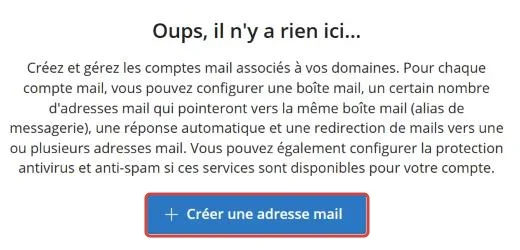
 Click **Créer une adresse mail** (*Create Email Address*). This button shows in the middle of the page as long as no address exists, then at the top of the list.
 ## 2. Create the address
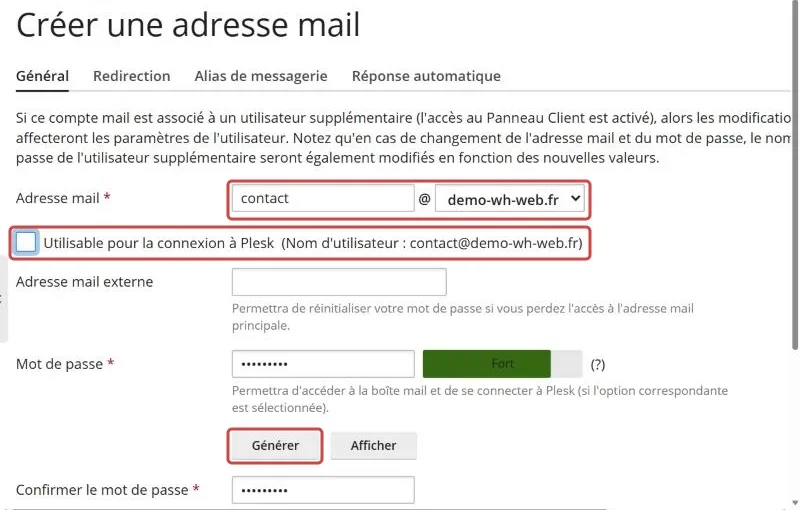
The form opens on the **Général** (*General*) tab.
 ::MdTable{caption="Fields of the General tab" variant="info" striped}
| Field | What to enter |
|---|---|
| Adresse mail (*Email address*) | The part before the `@`, for instance `contact`, then your domain in the list |
| Utilisable pour la connexion à Plesk (*Can be used to log in to Plesk*) | Untick this box, unless the address holder must also access your panel |
| Adresse mail externe (*External email address*) | Another address, used to reset the password if you lose it |
| Mot de passe (*Password*) | Click **Générer** (*Generate*) to get a strong password, then **Afficher** (*Show*) to write it down |
| Confirmer le mot de passe (*Confirm password*) | Filled in automatically after **Générer** |
::
> [!WARNING]
> The **Utilisable pour la connexion à Plesk** box is ticked by default. Left that way, it lets anyone log in to your Plesk panel with the address and its password. Untick it for every address given to a team member.
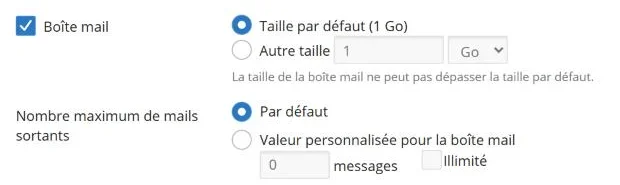
Further down, **Boîte mail** (*Mailbox*) offers your plan **Taille par défaut** (*Default size*), shown in brackets, or a smaller **Autre taille** (*Another size*). Leave **Nombre maximum de mails sortants** (*Maximum number of outgoing messages*) on **Par défaut** (*Default*).
 Confirm with **OK**. Plesk confirms the creation and shows the address in the list.
 The **Utilisation** (*Usage*) column shows the space used by the mailbox. The **Configuration du client de messagerie** (*Mail client setup*) and **Messagerie Web** (*Webmail*) links are used in steps 4 and 5.
> [!TIP]
> The **Redirection** (*Forwarding*), **Alias de messagerie** (*Email aliases*) and **Réponse automatique** (*Auto-reply*) tabs of the form can also be set later, by clicking the address in the list. An alias lets you receive the email of `info@` in the `contact@` mailbox, for instance, without creating a second mailbox.
## 3. Protect mail with a certificate
Your mail clients connect to the mail server over an encrypted link. Without a valid certificate for your domain, they show an "Untrusted certificate" warning when connecting.
Install the free Let's Encrypt certificate by following our guide [How to Generate a Let's Encrypt SSL Certificate for Your Website](https://winheberg.com/en/docs/hebergement-web/lets-encrypt-ssl-certificate-plesk) In the Let's Encrypt window, also tick **Sécuriser la messagerie sur ce domaine** (*Secure mail on this domain*) and **Assigner le certificat au domaine de messagerie** (*Assign the certificate to the mail domain*), and **Protéger la messagerie Web sur ce domaine** (*Secure webmail on this domain*) if you read your mail from the browser.
## 4. Set up your mail client
In the list, click **Configuration du client de messagerie** next to your address. The panel that opens offers a procedure for Thunderbird, Gmail, Outlook and iOS Mail, as well as **Configuration manuelle** (*Manual setup*).
### Automatic setup
Thunderbird, Gmail on Android, iOS Mail and Outlook up to version 2016 can find your mail settings on their own. Simply add an account in the software, then enter your address and its password.
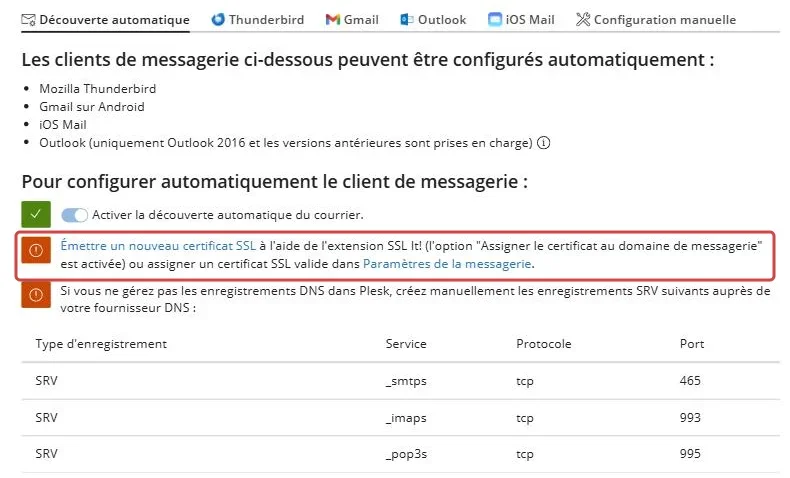 The **Découverte automatique** (*Autodiscovery*) tab lists what it requires. **Activer la découverte automatique du courrier** (*Enable mail autodiscovery*) is already on, only the certificate of step 3 remains. If your domain uses the Winheberg name servers, the SRV records listed at the bottom are already in place.
### Manual setup
For other software, or if automatic detection fails, open the **Configuration manuelle** tab and copy its values into your software.
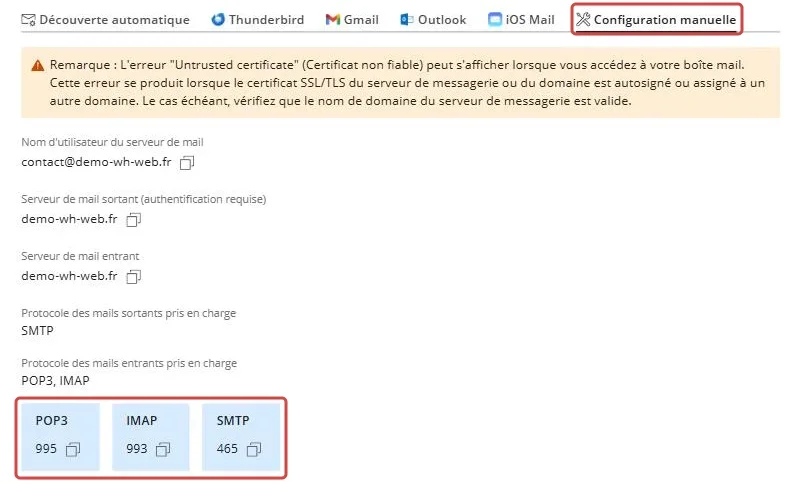 ::MdTable{caption="Settings to enter in your software" variant="info" striped footer="Replace your-domain.com with your domain and contact with the name of your address."}
| Setting | Value |
|---|---|
| User name | The full address, `contact@your-domain.com` |
| Password | The password of the address |
| IMAP incoming server | `your-domain.com`, port `993`, SSL/TLS security |
| POP3 incoming server | `your-domain.com`, port `995`, SSL/TLS security |
| SMTP outgoing server | `your-domain.com`, port `465`, SSL/TLS security, with authentication |
::
Pick IMAP rather than POP3. IMAP keeps your email on the server and syncs it between your computer and your phone, while POP3 downloads it to a single device. For the outgoing server, use the same user name and password as for the incoming server.
## 5. Read your email from a browser
In the address list, click **Messagerie Web** (*Webmail*). The Roundcube webmail opens at `webmail.your-domain.com`, log in with your full address and its password.
It is handy from a computer that is not yours, or to check that a mailbox receives its email before setting up a client.
## Troubleshooting
### ❌ The software shows "Untrusted certificate"
The mail server presents a certificate that does not match your domain.
- Check that the Let's Encrypt certificate is installed with the **Assigner le certificat au domaine de messagerie** option, as in step 3
- Check that your software uses `your-domain.com` as server, the name covered by the certificate
- If the certificate will not issue, check that your domain points to your hosting
### ❌ Email does not reach the mailbox
Your correspondents' mail servers cannot find yours, or the mailbox is full.
- Check with `dig +short MX your-domain.com @8.8.8.8` that the answer is `mail.your-domain.com`
- If your DNS is managed elsewhere, create the MX and A records described in step 5 of our guide [How to Keep Your Emails Out of Spam with SPF, DKIM and DMARC](https://winheberg.com/en/docs/hebergement-web/configure-spf-dkim-dmarc-plesk)
- Compare the **Utilisation** column of the list with the mailbox size, a full mailbox rejects new email
### ❌ Receiving works but sending fails
The outgoing server is wrongly set in your software.
- Check port `465` with SSL/TLS security
- Turn on outgoing server authentication, with the full address as user name
- Check that you have not reached the sending limit of the address, set by **Nombre maximum de mails sortants**
### ❌ Your email lands in your correspondents' spam
Your domain authentication is incomplete, often because the DNS is managed elsewhere.
- Follow our guide [How to Keep Your Emails Out of Spam with SPF, DKIM and DMARC](https://winheberg.com/en/docs/hebergement-web/configure-spf-dkim-dmarc-plesk)
- Test a message with [Mail-Tester](https://www.mail-tester.com/) to see what is penalised
## Best practices
- Untick **Utilisable pour la connexion à Plesk** for every address that does not need the panel
- Fill in an **Adresse mail externe** to be able to reset the password
- Prefer IMAP as soon as you read your email on several devices
- Use aliases rather than separate mailboxes for generic addresses such as `info@` or `contact@`
- Keep your mail passwords in a password manager
## Need help?
If your address still does not receive or send email after these checks, open a ticket with our support from your [client area](https://billing.winheberg.com), **Technical** department, filling in the **Related Product** field with the web hosting concerned. Mention the address concerned and the error message shown by your software.
Your address on your own domain is ready to send and receive 📧