---
title: "How to Host a Laravel Website on Plesk"
description: "Host your Laravel application on Winheberg Plesk web hosting with Laravel Toolkit, skeleton or Git repository, production .env, MySQL database, scheduled tasks and deployment."
category: cloud
subcategory: hebergement-web
icon: tabler:file-text
date: 2026-11-01
author: Winheberg
slug: "host-laravel-plesk"
order: 133
image: /statics/images/docs/en/hebergement-web/host-laravel-plesk.webp
tags: [Laravel, Plesk, PHP, Deployment, Web Hosting]
keywords: [host laravel, laravel plesk, laravel toolkit, deploy laravel, laravel php hosting, laravel production]
link_fr: "/docs/hebergement-web/heberger-laravel-plesk"
---
## Context
Laravel is a widely used PHP framework for building websites and web applications, from an API to a full back office. It relies on Composer for its dependencies, on Artisan for its commands and on an `.env` file for its configuration.
Your [Winheberg web hosting](https://winheberg.com/en/cloud/web-hosting) includes Laravel Toolkit, a Plesk extension dedicated to this framework. It installs a new project or fetches yours from a Git repository, installs the Composer dependencies and sets the website root to the `public` folder, so the source code and the `.env` file stay out of reach from the web.
This guide covers the installation, the switch to production, the database, scheduled tasks and the deployment of updates.
> [!NOTE]
> The Winheberg Plesk panel is displayed in French. Menu, field and button names are quoted below exactly as they appear on screen, followed by their English meaning.
## Prerequisites
- A Winheberg web hosting plan with access to the Plesk panel
- A domain or subdomain added in Plesk, see our guide [How to Connect an External Domain to Your Plesk Hosting](https://winheberg.com/en/docs/hebergement-web/connect-external-domain-plesk)
- For an existing project, its Git repository on GitHub, GitLab, Bitbucket or your own server
> [!WARNING]
> Laravel Toolkit moves the website root to the application `public` folder. Dedicate a domain or subdomain to your Laravel application, for instance `app.example.com`, rather than installing over an existing website.
## 1. Open Laravel Toolkit
In **Sites Web & Domaines** (*Websites & Domains*), open your domain, then the **Démarrer** (*Get Started*) tab. Click **Laravel**.
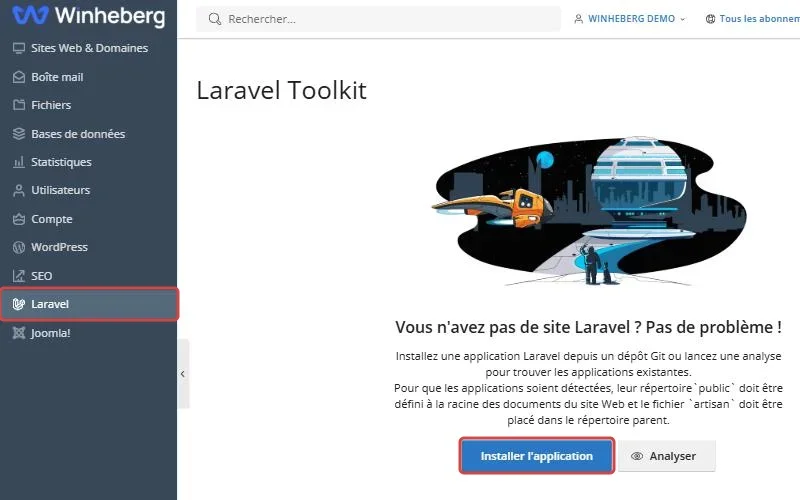
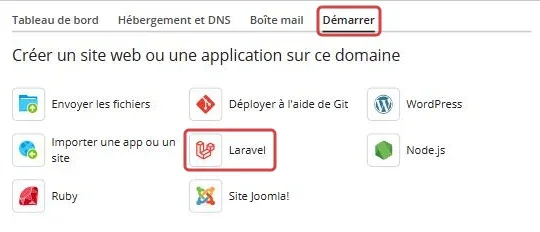 You also reach Laravel Toolkit through the **Laravel** entry of the side menu. As long as no application exists, the page offers **Installer l'application** (*Install Application*) and **Analyser** (*Scan*), the latter finding a Laravel application already present on your domains. Click **Installer l'application**.
 ## 2. Choose the application source
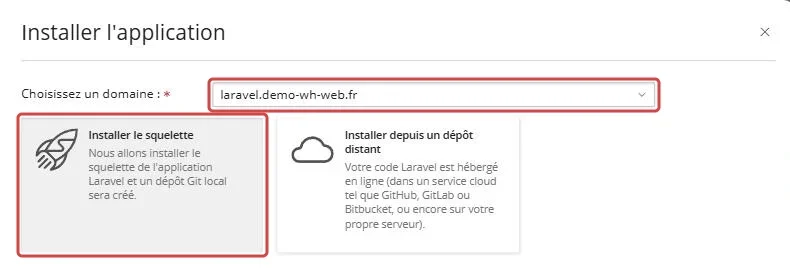
In the **Installer l'application** window, pick your domain in **Choisissez un domaine** (*Choose a domain*), then pick one of the two sources offered.
### Start a new project
**Installer le squelette** (*Install skeleton*) creates a blank Laravel application, along with a local Git repository hosted by Plesk. It is the right choice to start a project or try the framework.
 ### Deploy an existing project
**Installer depuis un dépôt distant** (*Install from a remote repository*) fetches your code from a Git service. Enter the repository address in the **Dépôt** (*Repository*) field.
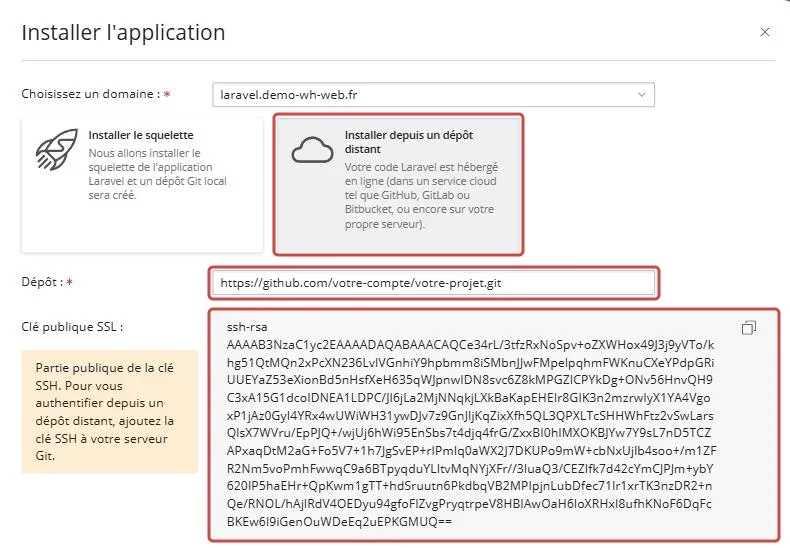 For a public repository, its HTTPS address is enough. For a private repository, enter its SSH address, such as `git@github.com:your-account/your-project.git`, then add the key shown in **Clé publique SSL** (*SSH public key*) to the repository deploy keys. On GitHub, they sit in the repository **Settings**, **Deploy keys** section, and on GitLab in **Settings**, **Repository**, **Deploy keys**.
> [!TIP]
> A deploy key grants access to a single repository, read-only by default. It is safer than adding the key to your account, which would open all your repositories.
## 3. Follow the installation
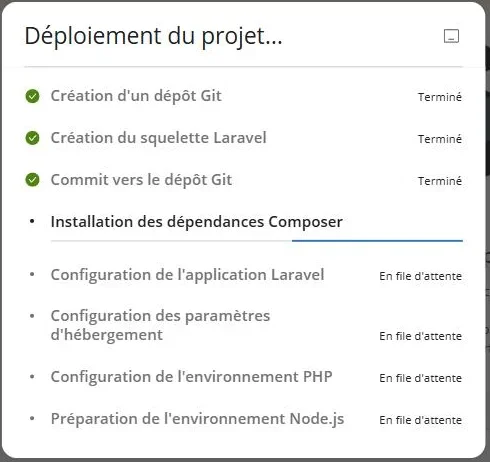
Confirm the window. Laravel Toolkit shows the progress in **Déploiement du projet** (*Project deployment*), from the Git repository creation to the Composer dependencies, then the hosting and PHP configuration. Allow a few minutes.
 > [!NOTE]
> The skeleton installs Laravel 13, which requires PHP 8.3 or later. For an existing project, check that the domain PHP version, shown in **Paramètres PHP** (*PHP Settings*), matches the one your `composer.json` file requires.
## 4. Discover the dashboard
Once the installation is done, Laravel Toolkit opens the **Application Laravel** page of your domain. The **Tableau de bord** (*Dashboard*) shows the website URL, the **Dépôt** (*Repository*) address and the **Dernier commit** (*Latest commit*). The **Artisan**, **Composer**, **Node.js**, **Déploiement** (*Deployment*) and **File d'attente** (*Queue*) tabs group the application tools.
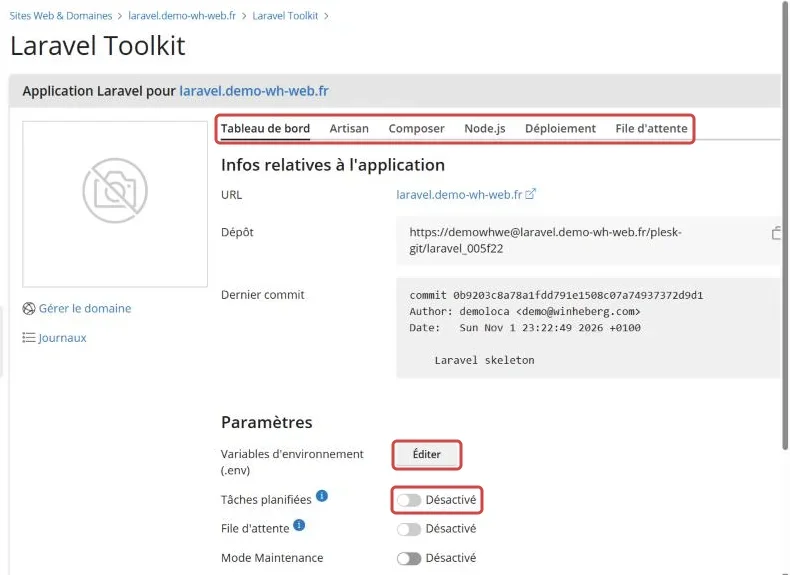 For a skeleton installation, the **Dépôt** field shows the address of the local Git repository created by Plesk, where you can push your code. The **Journaux** (*Logs*) link on the left displays the application logs.
## 5. Switch the application to production
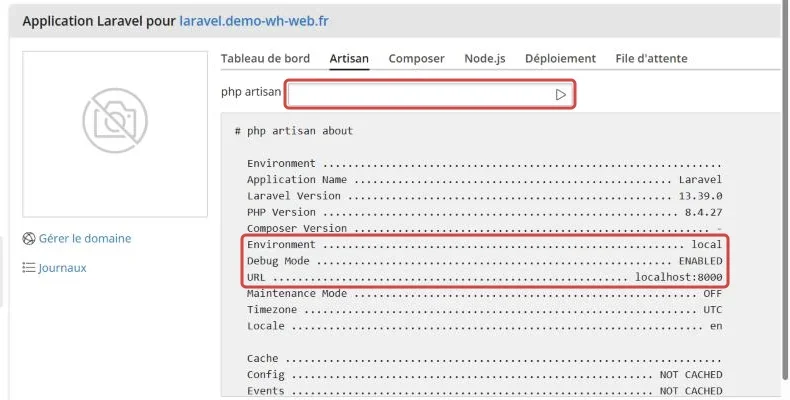
The skeleton starts in development mode. Open the **Artisan** tab, type `about` in the **php artisan** field and confirm. The command shows the **Environment** as `local`, the **Debug Mode** as `ENABLED` and a `localhost` **URL**.
 > [!CAUTION]
> In debug mode, any error shows visitors a detailed page that may reveal your code, your paths and your settings. Turn it off before opening the website to the public.
Go back to the **Tableau de bord** and click **Éditer** (*Edit*) next to **Variables d'environnement (.env)** (*Environment variables*). The **Modifier .env** (*Edit .env*) editor opens.
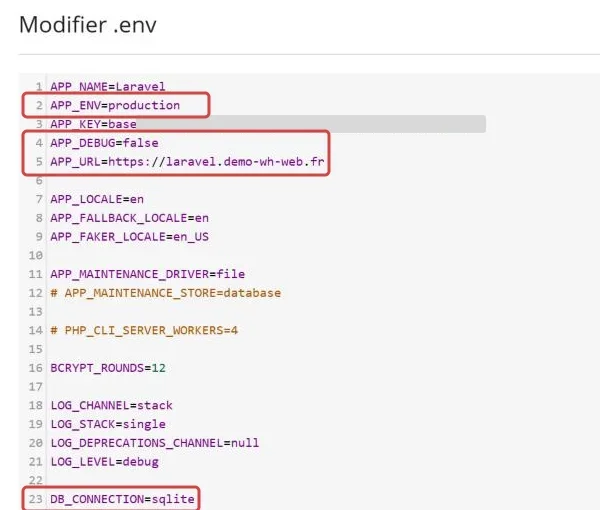 ::MdTable{caption="Values to set for production" variant="info" striped footer="Never change APP_KEY, generated during installation, or sessions and encrypted data become unreadable."}
| Variable | Value |
|---|---|
| `APP_ENV` | `production` |
| `APP_DEBUG` | `false` |
| `APP_URL` | Your website address, for instance `https://app.example.com` |
::
Save, then run `about` again in the **Artisan** tab to check that the **Environment** shows `production` and the **Debug Mode** shows `OFF`.
## 6. Connect a database
The skeleton uses SQLite, a database stored in a single project file, with `DB_CONNECTION=sqlite`. It is enough for a small website. For MySQL or MariaDB, first create a database in **Bases de données** (*Databases*), **Ajouter une base de données** (*Add Database*), noting its full name, its user and its password.
In **Modifier .env**, replace the `DB_CONNECTION=sqlite` line with the block below. If the `DB_HOST` to `DB_PASSWORD` lines are already there as comments, starting with a `#`, replace them too so they are not duplicated.
```ini
DB_CONNECTION=mysql
DB_HOST=localhost
DB_PORT=3306
DB_DATABASE=full_database_name
DB_USERNAME=database_user
DB_PASSWORD=database_password
```
Then create the tables from the **Artisan** tab with the following command. The `--force` option is required in production, otherwise Laravel refuses to run migrations without confirmation.
```bash
migrate --force
```
## 7. Schedule Laravel tasks
If your application uses the Laravel scheduler, defined in `routes/console.php`, it must be called every minute. The **Tâches planifiées** (*Scheduled tasks*) and **File d'attente** (*Queue*) switches of the dashboard require SSH access to the hosting. When it is forbidden, as the **Accès SSH** (*SSH access*) line of the **Paramètres d'hébergement** (*Hosting Settings*) shows, they stay greyed out. Create the task directly in Plesk instead, it works without SSH.
From the domain **Tableau de bord**, **Outils Dévelop.** (*Dev Tools*) section, open **Tâches planifiées** (*Scheduled Tasks*), then click **Ajouter une tâche** (*Add Task*).
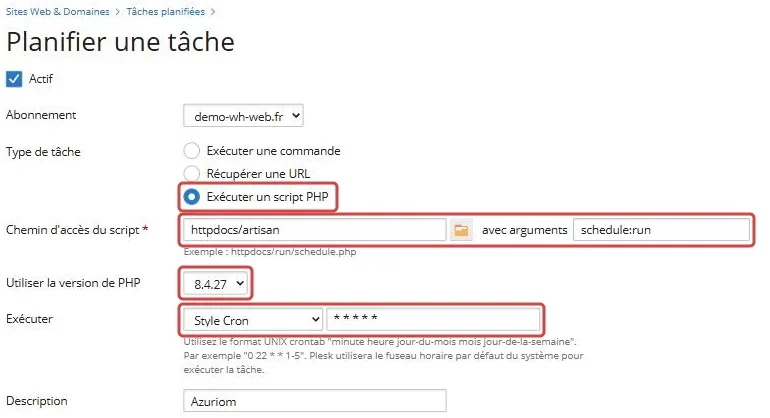 ::MdTable{caption="Scheduled task settings" variant="info" striped}
| Field on screen | Value |
|---|---|
| Type de tâche (*Task type*) | **Exécuter un script PHP** (*Run a PHP script*) |
| Chemin d'accès du script (*Script path*) | The application folder followed by `/artisan`, for instance `app.example.com/artisan` |
| avec arguments (*with arguments*) | `schedule:run` |
| Utiliser la version de PHP (*Use PHP version*) | The same version as the website |
| Exécuter (*Run*) | **Style Cron** (*Cron style*), with `* * * * *` |
::
The application folder is the one in **Racine du document** (*Document root*), without the trailing `/public`. You find it in the **Hébergement et DNS** (*Hosting & DNS*) tab, **Hébergement** (*Hosting*) entry.
> [!TIP]
> If your application pushes jobs to a queue, add a second identical task with the `queue:work --stop-when-empty` argument. It processes pending jobs every minute, then stops.
## 8. Deploy your updates
The **Déploiement** (*Deployment*) tab sets how new code reaches production. In **Manuel** (*Manual*) mode, nothing changes on the website until you click **Déployer** (*Deploy*). In **Automatique** (*Automatic*) mode, deployment starts by itself on each new push to the local repository, or when the webhook is called for a remote repository.
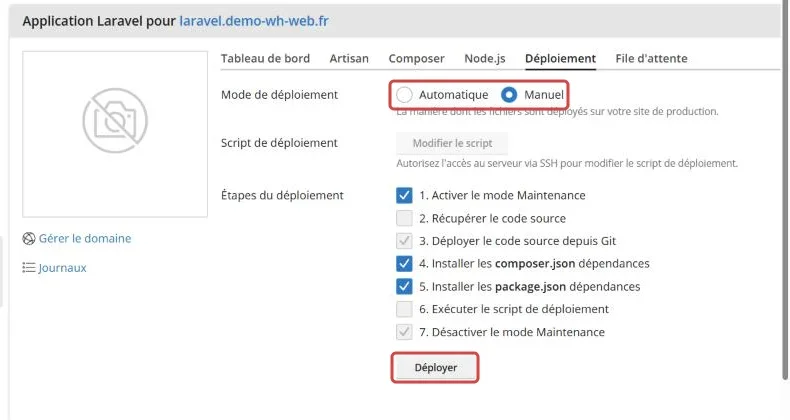 The **Étapes du déploiement** (*Deployment steps*) run in the order shown. Greyed out steps are mandatory, the others are ticked according to your project, for instance **Installer les package.json dépendances** (*Install package.json dependencies*) if your website builds its assets with npm. Editing the **Script de déploiement** (*Deployment script*) also requires SSH access.
After a deployment that adds migrations, run `migrate --force` from the **Artisan** tab.
## 9. Open your website
Open your domain in a browser. For a skeleton, the Laravel welcome page is displayed.
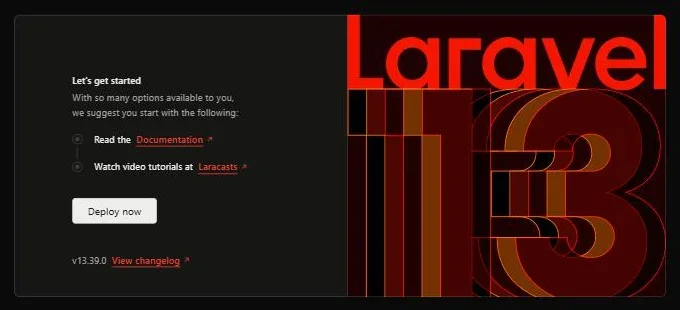 To serve the application over HTTPS, install the free certificate with our guide [How to Generate a Let's Encrypt SSL Certificate for Your Website](https://winheberg.com/en/docs/hebergement-web/lets-encrypt-ssl-certificate-plesk)
## Troubleshooting
### ❌ The website shows a 500 error without details
This is the normal behaviour in production, the error details go to the logs.
- Open the **Journaux** (*Logs*) link of Laravel Toolkit, or the `storage/logs/laravel.log` file in the file manager
- If the message says `No application encryption key has been specified.`, run `key:generate --force` from the **Artisan** tab
- If the error comes from the database, check the `DB_` lines of the `.env` file
### ❌ A change to .env is not applied
The configuration has been cached, Laravel no longer reads the `.env` file.
- Run `config:clear` from the **Artisan** tab
- If you use `optimize` during your deployments, run it again after each `.env` change
### ❌ The remote repository refuses the connection
Laravel Toolkit cannot authenticate with your Git service.
- For a private repository, check that you entered the SSH address, `git@...`, and not the HTTPS one
- Check that the key shown in **Clé publique SSL** is listed in the repository deploy keys
- Copy the whole key, from the leading `ssh-rsa` to the last character
### ❌ Migrations fail
Laravel cannot connect to the database or refuses to run the command.
- Add the `--force` option, without it migrations do not run in production
- An `Access denied` message points to a wrong user name or password in `.env`
- Check that `DB_DATABASE` holds the full database name, prefix included
## Best practices
- Keep `APP_DEBUG=false` on the public website, and test your changes on a staging subdomain
- Never commit the `.env` file, the `.gitignore` shipped with Laravel already excludes it
- Stay in **Manuel** deployment mode as long as you have no automated tests
- Keep the **Activer le mode Maintenance** (*Enable maintenance mode*) step ticked, your visitors see a waiting page rather than a half-updated website
- Export your database before any significant migration
- To give a developer access without sharing your account, follow our guide [How to Create a User in Plesk](https://winheberg.com/en/docs/hebergement-web/create-user-account-plesk)
## Need help?
If the installation fails or your application will not start on your hosting, open a ticket with our support from your [client area](https://billing.winheberg.com), **Technical** department, filling in the **Related Product** field with the web hosting concerned. For questions about the framework itself, see the [official Laravel documentation](https://laravel.com/docs).
Your Laravel application runs in production, ready to welcome its first users 🚀