---
title: "How to install a plugin on your PowerNukkitX server"
description: "Step-by-step guide to easily install plugins on your Minecraft Bedrock PowerNukkitX server using the built-in WinHeberg Plugins HUB."
category: jeux
subcategory: minecraft-bedrock
docGroup: powernukkitx
docGroupIcon: tabler:bolt
icon: tabler:file-text
date: 2026-08-01
author: Winheberg
slug: "install-powernukkitx-plugin"
order: 74
image: /statics/images/docs/en/gaming/minecraft-bedrock/install-powernukkitx-plugin.webp
tags: [powernukkitx, minecraft, bedrock, plugin, pterodactyl, hosting]
keywords: [install powernukkitx plugin, pnx plugin, minecraft bedrock server, winheberg, plugins hub]
link_fr: "/docs/minecraft-bedrock/installer-plugin-powernukkitx"
---
## Context
Want to add new features to your Minecraft Bedrock server running **PowerNukkitX (PNX)** (like economy systems, mini-games, or admin tools)?
The [Winheberg panel](https://panel.winheberg.com) includes a **PNX Plugins Hub**, a simplified library that lets you search for and install plugins in just a few clicks, with no need to manually download files or transfer them via FTP.
## Prerequisites
- A **PowerNukkitX server** at Winheberg
- A few minutes to stop and then restart the server
## Installation steps
Here's how to use the built-in catalog to add a plugin to your server.
### 1. Stop the server and access the Hub
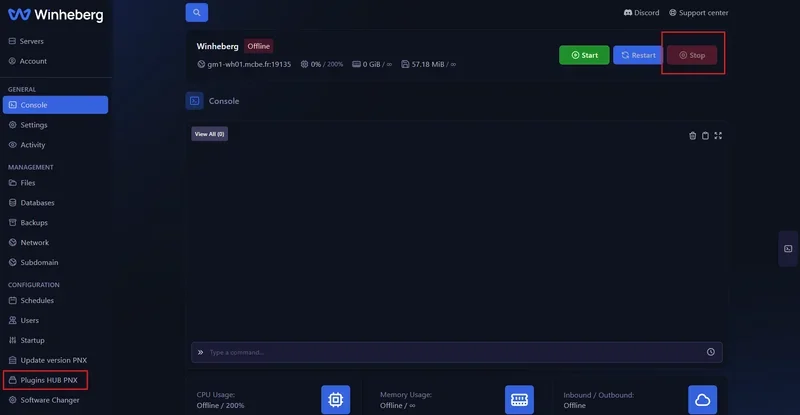
To avoid any data corruption or loading error, you need to shut down your server before installing a new plugin.
1. Log in to your [Winheberg panel](https://panel.winheberg.com) and go to your server.
2. From the **Console** tab, click the red **Stop** button to stop the server.
3. Once the server is offline, look at the left-hand menu. Under the **CONFIGURATION** section, click **PNX Plugins Hub**.
 ### 2. Search for and select a plugin
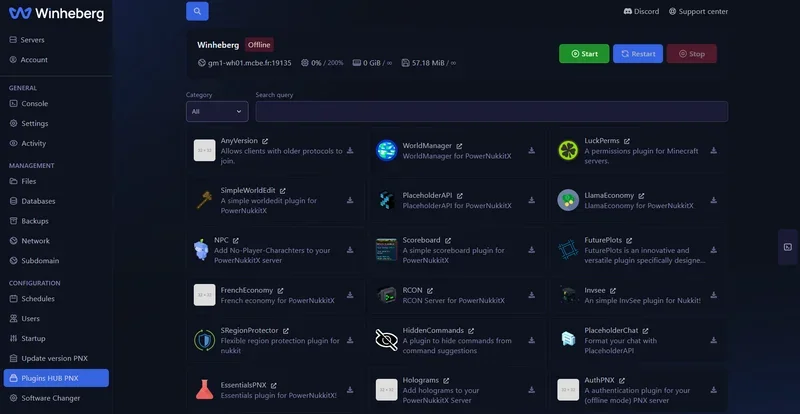
You're now in the catalog of plugins available for PowerNukkitX.
1. Browse the list or use the search bar (**Search query**) and the category filter (**Category**) to find the plugin you need (e.g. *AnyVersion*, *LuckPerms*, *WorldManager*...).
2. Click the download icon (the arrow pointing down) on the right side of the plugin's card that you want to install.
### 2. Search for and select a plugin
You're now in the catalog of plugins available for PowerNukkitX.
1. Browse the list or use the search bar (**Search query**) and the category filter (**Category**) to find the plugin you need (e.g. *AnyVersion*, *LuckPerms*, *WorldManager*...).
2. Click the download icon (the arrow pointing down) on the right side of the plugin's card that you want to install.
 ### 3. Install the version you want
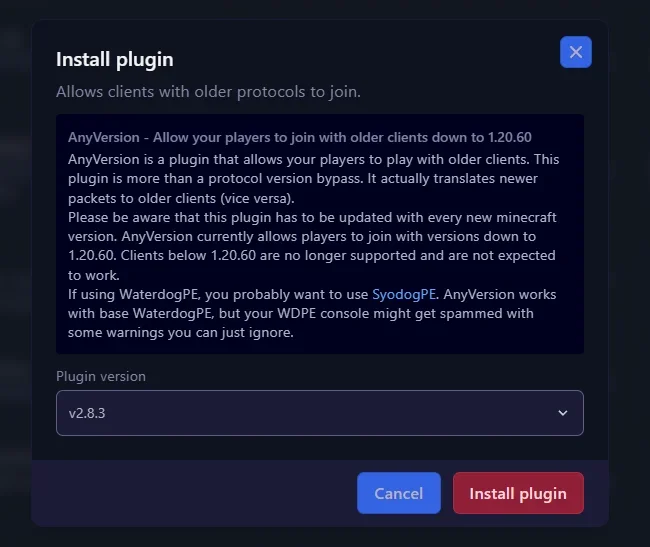
A popup window opens with the plugin's detailed description. Read this information carefully, as it often contains important instructions or requirements.
1. In the **Plugin version** dropdown, pick the version you want to install (it's generally recommended to leave the most recent version selected by default).
2. Click the red **Install plugin** button at the bottom of the window.
### 3. Install the version you want
A popup window opens with the plugin's detailed description. Read this information carefully, as it often contains important instructions or requirements.
1. In the **Plugin version** dropdown, pick the version you want to install (it's generally recommended to leave the most recent version selected by default).
2. Click the red **Install plugin** button at the bottom of the window.
 The panel automatically downloads the plugin and places it in the right folder on your server.
### 4. Restart the server
1. Go back to the **Console** tab.
2. Click **Start** to start the server.
3. Watch the console logs, you should see a message showing that your new plugin loaded and activated correctly.
## If you run into trouble
### ❌ The plugin doesn't show up or doesn't work in-game
- **Version mismatch**: Check the console for a red error message on startup. The installed plugin might not be compatible with your current PowerNukkitX version.
- **Missing dependency**: Some plugins need another plugin to work (for example, a chat plugin might need *PlaceholderAPI*). Read the description in the Hub carefully.
### ❌ The server crashes after installation
If the server refuses to start after adding a plugin, that plugin is causing a fatal error.
1. Go to the panel's **Files** tab.
2. Open the `plugins` folder.
3. Check the box next to the problem plugin's `.jar` file and delete it (Delete button).
4. Restart the server.
## Best practices
- **Read the descriptions**: Always take the time to read the explanatory text before clicking "Install plugin".
- **Install one at a time**: If you're installing several plugins, do it one at a time, restarting the server between each install. This makes it easy to immediately identify which plugin is causing a problem if the server crashes.
## Need help?
If you can't get a plugin working or you're running into errors in your console, our team is here. Open a ticket in the **Technical** department from your client area and fill in the **Related Product** field with the server in question, or go straight through [Winheberg support](https://winheberg.com/support).
Your PowerNukkitX server is now ready to welcome all the plugins you need 🔌
The panel automatically downloads the plugin and places it in the right folder on your server.
### 4. Restart the server
1. Go back to the **Console** tab.
2. Click **Start** to start the server.
3. Watch the console logs, you should see a message showing that your new plugin loaded and activated correctly.
## If you run into trouble
### ❌ The plugin doesn't show up or doesn't work in-game
- **Version mismatch**: Check the console for a red error message on startup. The installed plugin might not be compatible with your current PowerNukkitX version.
- **Missing dependency**: Some plugins need another plugin to work (for example, a chat plugin might need *PlaceholderAPI*). Read the description in the Hub carefully.
### ❌ The server crashes after installation
If the server refuses to start after adding a plugin, that plugin is causing a fatal error.
1. Go to the panel's **Files** tab.
2. Open the `plugins` folder.
3. Check the box next to the problem plugin's `.jar` file and delete it (Delete button).
4. Restart the server.
## Best practices
- **Read the descriptions**: Always take the time to read the explanatory text before clicking "Install plugin".
- **Install one at a time**: If you're installing several plugins, do it one at a time, restarting the server between each install. This makes it easy to immediately identify which plugin is causing a problem if the server crashes.
## Need help?
If you can't get a plugin working or you're running into errors in your console, our team is here. Open a ticket in the **Technical** department from your client area and fill in the **Related Product** field with the server in question, or go straight through [Winheberg support](https://winheberg.com/support).
Your PowerNukkitX server is now ready to welcome all the plugins you need 🔌