---
title: "How to Let Bedrock Players Join a Minecraft Java Server with Geyser"
description: "Install Geyser and Floodgate on your Winheberg Minecraft Java server to welcome Bedrock players, with the extra port NetherNet needs and how to connect from mobile or Windows."
category: jeux
subcategory: minecraft-java
icon: tabler:file-text
date: 2026-11-01
author: Winheberg
slug: "geyser-floodgate-bedrock-java-server"
order: 122
image: /statics/images/docs/en/gaming/minecraft-java/geyser-floodgate-bedrock-java-server.webp
tags: [minecraft, geyser, floodgate, bedrock, crossplay, gaming panel]
keywords: [geyser, floodgate, bedrock on java server, minecraft crossplay, geysermc, nethernet, geyser port, minecraft java bedrock]
link_fr: "/docs/minecraft-java/geyser-floodgate-bedrock-serveur-java"
---
## Context
Some of your friends play Minecraft Java, others play Minecraft Bedrock on mobile, Windows or console. **[Geyser](https://geysermc.org/)** brings everyone together on the same Java server by translating the connection of Bedrock players. Its companion **Floodgate** lets them join with their Microsoft Bedrock account, without having to buy Minecraft Java.
Current versions of Geyser use NetherNet, the new connection method of Minecraft Bedrock, covered in our article **[Minecraft Bedrock 26.60, RakNet Gives Way to NetherNet](https://winheberg.com/en/blog/raknet-nethernet-minecraft-bedrock-26-60)**. With Geyser's built-in signaling, used by default, NetherNet needs a port open over both TCP and UDP, and that port cannot be the one used by your Java server. This guide shows you how to get that extra port, install Geyser and Floodgate on your Winheberg Minecraft server, then connect from Bedrock.
## Prerequisites
- A [Winheberg Minecraft Java server](https://winheberg.com/en/gaming/minecraft) running Paper, Spigot or Purpur, ideally on the latest Minecraft version supported by Geyser
- Access to the [Winheberg panel](https://panel.winheberg.com/) and to your client area
- An extra port dedicated to Geyser (see step 1)
> [!NOTE]
> Geyser behaves like a Java player on the latest version. If your server runs an older version of Minecraft (1.20.5 at least for Geyser-Spigot), also add the **ViaVersion** plugin, as the official Geyser documentation explains.
## 1. Order an extra port
By default, your server has a single port, used by Minecraft Java. To get a second one, log in to your Winheberg client area and click **Manage** next to your Minecraft server.
In the **Actions** column, click **Upgrade your hosting plan**. In the **Additional Port** section, pick **1 additional port** in the **New configuration** menu, confirm with **Click to continue**, check the summary, then click **Place order**.
Once the order is confirmed, the new port shows up in the panel, in your server's **Network** tab.
> [!NOTE]
> The client area labels above are translated from the French interface. They may read slightly differently if your client area is set to English.
## 2. Find the Geyser port
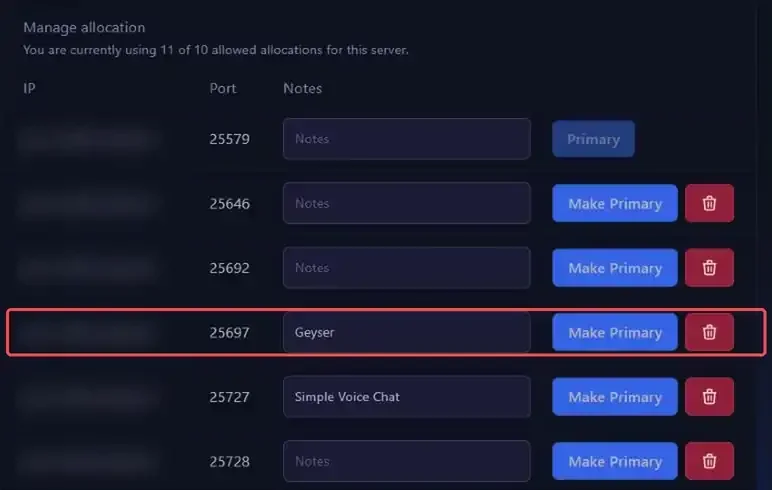
In the panel, open **Network**. The line marked **Primary** is your Java server port, the other lines are your extra ports. Write down the number of the port you are giving to Geyser.
 > [!TIP]
> Type `Geyser` in the **Notes** field of that port. If you later add other plugins that open a port (web map, voice chat), you will see right away which port is already taken.
## 3. Install Geyser
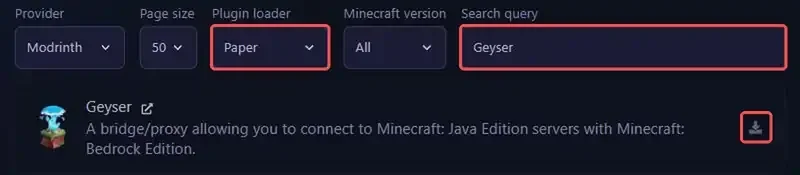
Open **Plugins** in the side menu. Set **Plugin loader** to **Paper**, type `Geyser` in **Search query**, then click the download icon on the right of the **Geyser** result.
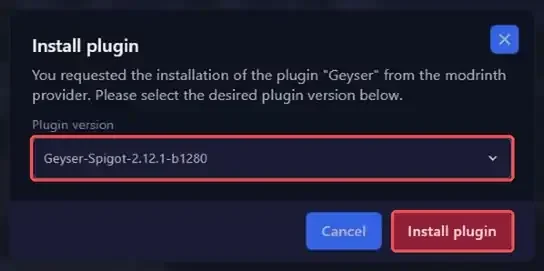
 In the **Install plugin** window, check that the suggested version starts with **Geyser-Spigot**, then click **Install plugin**.
 > [!WARNING]
> The **Geyser-Velocity** and **Geyser-Bungeecord** versions are meant for proxies and do not run on a Paper server.
## 4. Install Floodgate
The panel's **Plugins** tool cannot download Floodgate automatically, because the GeyserMC team distributes it from its own website. If you try, the panel shows the following message.
```text
Looks like we couldn't download this plugin automatically.
```
Download the **Floodgate-Spigot** file from the official page [geysermc.org/download](https://geysermc.org/download), in the Floodgate tab. In the panel, open **Files**, go into the `plugins` folder, click **Upload** and select the downloaded file.
> [!NOTE]
> As soon as Floodgate is present, Geyser automatically uses it to authenticate Bedrock players. You do not need to change anything in the Geyser configuration for that.
## 5. Set the Geyser port
Restart the server once from **Console** with **Restart**, so Geyser creates its configuration file. Then stop the server with **Stop** and open `plugins/Geyser-Spigot/config.yml` from **Files**.
In the `bedrock` section, replace the `port` value with the extra port you noted in step 2. Keep `transport: nethernet` and `clone-remote-port: false`, which are the default values.
```yaml
bedrock:
address: 0.0.0.0
port: 25697
transport: nethernet
clone-remote-port: false
```
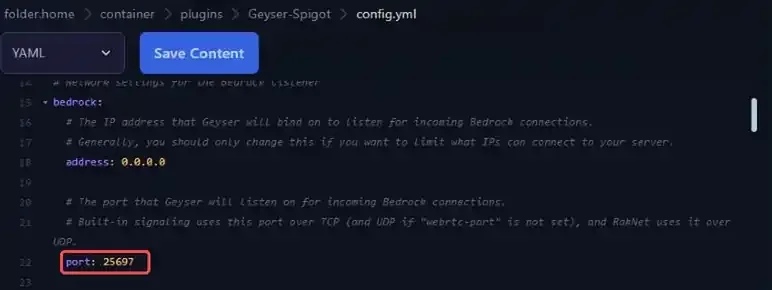 Click **Save Content**, then start the server with **Start**.
> [!CAUTION]
> Never put your Java server port in `port`, and do not switch `clone-remote-port` to `true`. The Java server already uses that port over TCP, so Geyser could not start its own connection service there.
## 6. Check that Geyser listens on the right port
On startup, the panel console should show a line like this one, with your extra port.
```text
[Geyser-Spigot] Built-in signaling started on http://0.0.0.0:25697
```
 ## 7. Connect from Minecraft Bedrock
On Windows, Android or iOS, launch Minecraft Bedrock, open **Play**, then the **Servers** tab and click **Add Server**. Fill in the fields as follows.
::MdTable{caption="Adding the server in Minecraft Bedrock" variant="info" striped}
| Field | Value |
|---|---|
| Server Name | Any name you like |
| Server Address | Your server address without the port, for example `gm1-whXX.mcjava.fr` |
| Port | The extra port reserved for Geyser |
::
On the first join, Minecraft may ask the player to trust the server. This prompt is normal with Geyser, just accept it to join the game.
Floodgate adds a dot in front of Bedrock player names and replaces spaces with `_`, for example `.Player_Name`. Use that full name in your commands (`op`, `whitelist`, LuckPerms...).
> [!NOTE]
> Consoles (Xbox, PlayStation, Switch) do not let you add an external server directly. Workarounds exist and are listed on the [official Geyser page about consoles](https://geysermc.org/wiki/geyser/using-geyser-with-consoles/), with no guarantee that they all still work since the switch to NetherNet.
## If you run into trouble
### ❌ The console says the port is already used by the Java server
```text
Built-in signaling cannot use port 25579 because the Java server already uses it.
```
The `port` in the `bedrock` section holds your Java server port. Replace it with your extra port, check that `clone-remote-port` is `false` and restart.
### ❌ "Address already in use" when Geyser starts
Another plugin already uses that port, for example a web map or a voice chat.
- Compare the ports set in your plugins with the list in the **Network** tab
- Give each plugin its own port, since a port can only serve one service
### ❌ The Bedrock player gets "Outdated Bedrock client!" or "Outdated Geyser proxy!"
- **Outdated Bedrock client!** means the player's Bedrock app is too old and needs an update
- **Outdated Geyser proxy!** means Geyser is too old for the player's Bedrock version, reinstall the latest Geyser from the **Plugins** tool, then restart
### ❌ Bedrock players cannot type in chat
The Geyser documentation asks you to turn off chat signing. Open `server.properties` from **Files**, set `enforce-secure-profile` to `false`, then restart the server.
### ❌ The player cannot find the server
- Check they entered the extra port, not the Java server port
- Check that the `Built-in signaling started on` line in the console shows that same port
- Check that the address is entered without `:port` at the end
## Best practices
- **Update Geyser and Floodgate after every new Minecraft Bedrock release**, since an outdated Geyser turns up-to-date players away
- **Keep one port per service** and write down what it is used for in the **Network** tab
- **Never share Floodgate's `key.pem` file**, as it is used to authenticate your Bedrock players
- **Take a backup from the Backups tab** before installing or updating a network plugin
- **Let your Bedrock players know** that some Java features look different for them, the list of differences is kept up to date on the Geyser website
## Need help?
If Bedrock players still cannot connect, our team can help. Open a ticket in the **Technical** department from your client area, fill in the **Related Product** field with the server in question, and include the console lines that start with `[Geyser-Spigot]`.
Your Java and Bedrock players can now play together 🎮