---
title: "How to Install Simple Voice Chat on a Minecraft Server"
description: "Install Simple Voice Chat on your Winheberg Paper Minecraft server, set its UDP port to an extra port and fix the \"Voice chat not connected\" error."
category: jeux
subcategory: minecraft-java
icon: tabler:file-text
date: 2026-11-01
author: Winheberg
slug: "install-simple-voice-chat-minecraft"
order: 123
image: /statics/images/docs/en/gaming/minecraft-java/install-simple-voice-chat-minecraft.webp
tags: [minecraft, simple voice chat, voice chat, plugin, port, gaming panel]
keywords: [simple voice chat, minecraft voice chat, voice chat not connected, minecraft udp port, voicechat plugin, paper server, proximity chat]
link_fr: "/docs/minecraft-java/installer-simple-voice-chat-minecraft"
---
## Context
**[Simple Voice Chat](https://modrepo.de/minecraft/voicechat/)** adds proximity voice chat to Minecraft Java. You hear players close to you, more and more faintly as they move away. It also offers private groups, handy for talking with friends wherever you are on the map.
Audio goes through its own UDP port, separate from the game port. A misconfigured port is behind most "Voice chat not connected" messages. This guide shows you how to get an extra port for your Winheberg Minecraft server, install Simple Voice Chat from the panel, set it to that port, then check that everything works.
## Prerequisites
- A [Winheberg Minecraft Java server](https://winheberg.com/en/gaming/minecraft) running Paper, Spigot or Purpur
- Access to the [Winheberg panel](https://panel.winheberg.com/) and to your client area
- An extra port dedicated to voice chat (see step 1)
- For each player, the Simple Voice Chat mod installed in their game with Fabric, NeoForge, Forge or Quilt
> [!NOTE]
> Simple Voice Chat only works with Minecraft Java. Bedrock players, including those who join through Geyser, cannot use it.
## 1. Order an extra port
By default, your server has a single port, used by Minecraft. The official Simple Voice Chat documentation strongly advises against reusing that port for voice chat, as doing so can crash the server. So you need a second port.
Log in to your Winheberg client area and click **Manage** next to your Minecraft server. In the **Actions** column, click **Upgrade your hosting plan**. In the **Additional Port** section, pick **1 additional port** in the **New configuration** menu, confirm with **Click to continue**, check the summary, then click **Place order**.
Once the order is confirmed, the new port shows up in the panel, in your server's **Network** tab.
> [!NOTE]
> The client area labels above are translated from the French interface. They may read slightly differently if your client area is set to English.
## 2. Find the voice chat port
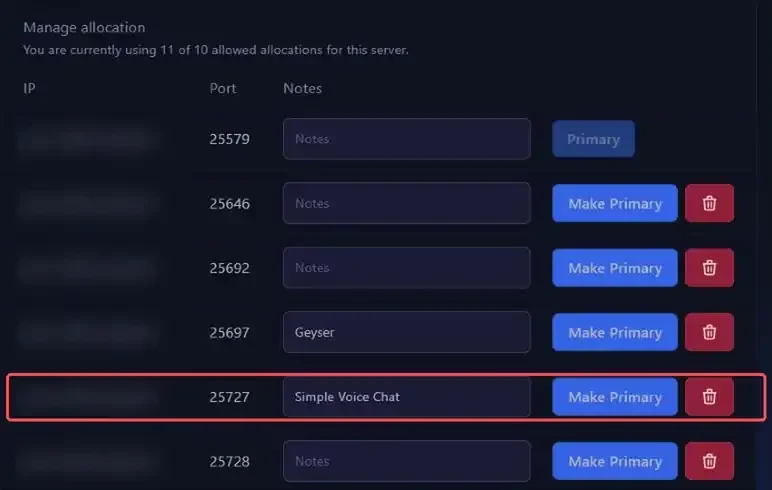
In the panel, open **Network**. The line marked **Primary** is your Minecraft server port, the other lines are your extra ports. Write down the number of the port you are giving to voice chat.
 > [!TIP]
> Type `Simple Voice Chat` in the **Notes** field of that port. A port can only serve one service, and this note stops you from giving it to another plugin such as Geyser or a web map by mistake.
## 3. Install Simple Voice Chat
Open **Plugins** in the side menu. Set **Plugin loader** to **Paper**, type `Simple Voice Chat` in **Search query**, then click the download icon on the right of the **Simple Voice Chat** result.
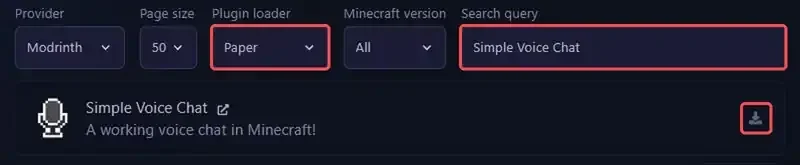 In the **Install plugin** window, keep the first version offered and click **Install plugin**. With the **Paper** filter, the panel only offers the plugin version of Simple Voice Chat, which is the one your server needs.
> [!WARNING]
> Without the **Plugin loader** filter, several lines can share the same version number, including files meant for Velocity and BungeeCord proxies. Always set the filter to **Paper** before installing.
Then restart the server from **Console** with **Restart**. On its first start, Simple Voice Chat creates its configuration file.
## 4. Set the voice chat port
Stop the server with **Stop**, then open `plugins/voicechat/voicechat-server.properties` from **Files**. Replace the `port` value with the extra port you noted in step 2.
```properties
port=25727
bind_address=
voice_host=
```
Leave `bind_address` and `voice_host` empty, as the official documentation recommends.
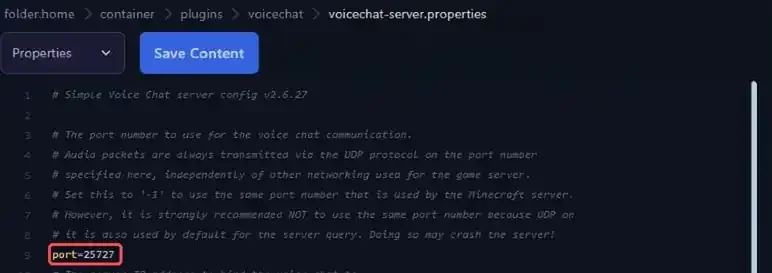 Click **Save Content**, then start the server with **Start**.
> [!CAUTION]
> Do not put `-1` in `port`. That value reuses the Minecraft server port, which the file itself strongly advises against, because that port also handles server queries over UDP.
## 5. Check that voice chat starts
On startup, the panel console should show a line like this one, with your extra port.
```text
[voicechat] Voice chat server started at 0.0.0.0:25727
```
 ## 6. Install the mod for players and connect
Every player must install the Simple Voice Chat mod in their own game, picking the version that matches their loader (Fabric, NeoForge, Forge or Quilt) and the server's Minecraft version. The first two numbers of the mod version must match those of the plugin on the server, for example `2.6`. Ask them to download it only from the [official download page](https://modrepo.de/minecraft/voicechat/downloads) or from Modrinth.
In game, press **V** to open the voice chat menu. The first time, a guide asks you to pick your microphone and activation mode (push to talk or voice activation).
::MdTable{caption="Simple Voice Chat default keys" variant="info" striped}
| Key | Action |
|---|---|
| V | Opens the voice chat menu |
| M | Mutes your microphone (voice activation mode) |
| N | Turns voice chat off completely |
| H | Hides the voice chat icons |
::
The push to talk key has no default value, so you choose it in the setup guide.
> [!TIP]
> Players who have not installed the mod can still join the server, but they cannot use voice chat. You can test a player's connection in game with the `/voicechat test PlayerName` command, which is reserved for operators who also have the mod installed.
## If you run into trouble
### ❌ The player sees "Voice chat not connected" or an unplugged plug icon
This is almost always a port issue.
- Check that `port` in `voicechat-server.properties` holds your extra port
- Check that the `Voice chat server started at` line in the console shows that same port
- Check that you restarted the server after the change
- Ask the player to test without a VPN, some networks and VPNs block UDP
### ❌ "Address already in use" or "Failed to bind to address"
The "Address already in use" message means another plugin already uses that port, for example Geyser or a web map. The "Failed to bind to address" message is usually caused by a value entered in `bind_address`.
- Compare the ports set in your plugins with the list in the **Network** tab
- Give each plugin its own port
- Leave `bind_address` empty in `voicechat-server.properties`
### ❌ The player cannot join or the mod refuses to connect
- Check that the first two version numbers match between the player's mod and the server plugin
- With Fabric, check that the player also installed the latest **Fabric API**
### ❌ Nearby players cannot hear each other
A player in a group can no longer be heard by nearby players outside it. In an isolated group, they cannot hear them either. Ask them to leave their group from the voice chat menu (**V** key).
## Best practices
- **Keep one port per service** and write down what it is used for in the **Network** tab
- **Update the plugin and the mod at the same time**, so the version stays compatible on both sides
- **Only edit the configuration while the server is stopped**, otherwise your changes can be overwritten on restart
- **Take a backup from the Backups tab** before installing or updating a plugin
- **Tell your players** which mod to install and for which Minecraft version, for example in the welcome channel of your Discord
## Need help?
If voice chat stays disconnected after these checks, our team can help. Open a ticket in the **Technical** department from your client area, fill in the **Related Product** field with the server in question, and include the console lines that start with `[voicechat]`.
Your Minecraft server now has proximity voice chat 🎮