---
title: "How to Configure Your The Isle Evrima Server"
description: "Configure your The Isle Evrima server at Winheberg, name, slots, password, RCON and queue from Startup, then advanced settings and admins in Game.ini."
category: jeux
subcategory: the-isle
docGroup: Serveurs de jeux / The Isle
icon: tabler:settings
date: 2026-11-01
author: Winheberg
slug: "configure-the-isle-evrima-server"
order: 131
image: /statics/images/docs/en/gaming/the-isle/configure-the-isle-evrima-server.webp
tags: [The Isle, Evrima, Configuration, Game.ini, Startup, Server, Gaming]
keywords: [The Isle server, The Isle Evrima, The Isle Game.ini, configure The Isle server, The Isle admin, The Isle RCON, The Isle hosting]
link_fr: "/docs/the-isle/configurer-serveur-the-isle-evrima"
---
## Context
Your [The Isle server](https://winheberg.com/en/gaming/the-isle) Evrima has been delivered by Winheberg and you want to customize it, with your own name, a password, RCON or your administrators. Configuration happens in two places on the gaming panel, the **Startup** tab for the main settings and the **`Game.ini`** file for everything else.
This guide explains what each one holds and, above all, how they interact. That is where most people get caught out, a value changed in the wrong place is reset on the next restart.
## Prerequisites
- An active The Isle Evrima server on your Winheberg gaming panel
- Access to the gaming panel (`https://panel.winheberg.com/`)
- The SteamID64 of each player you want to make an administrator, if you want to add any
## 1. Set the main settings in Startup
Open your server on the gaming panel, then the **Startup** tab in the side menu. The **Variables** section holds the server settings, as text fields or **False** / **True** switches.
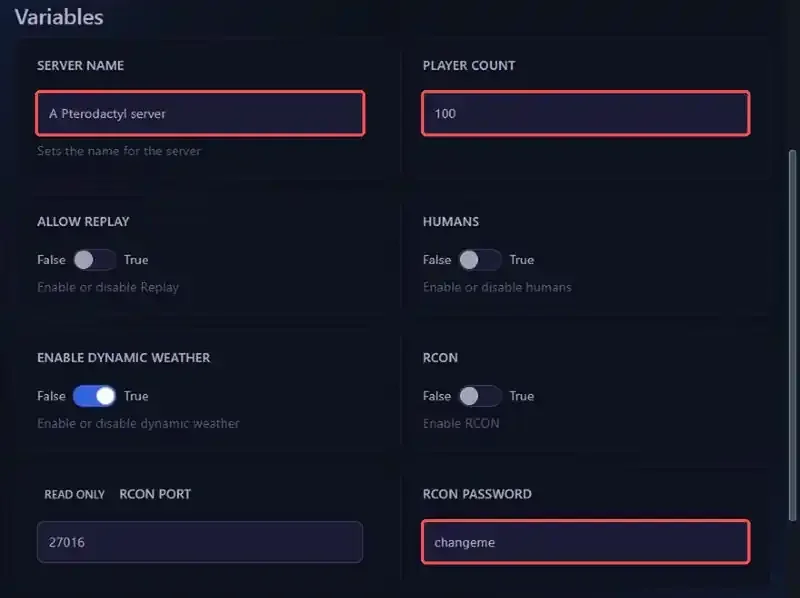 Each variable is linked to a `Game.ini` key.
::MdTable{caption="Startup variables of the The Isle server" variant="info" striped}
| Startup variable | Game.ini key | Purpose |
|---|---|---|
| `SERVER NAME` | `ServerName` | Server name, 70 characters maximum |
| `PLAYER COUNT` | `MaxPlayerCount` | Maximum number of players |
| `SERVER PASSWORD` (switch) | `bServerPassword` | Turns the password on or off |
| `SERVER PASSWORD` (text field) | `ServerPassword` | Server password, 20 characters maximum |
| `HUMANS` | `bEnableHumans` | Turns humans on or off |
| `ENABLE DYNAMIC WEATHER` | `bServerDynamicWeather` | Turns dynamic weather on or off |
| `ALLOW REPLAY` | `bAllowReplay` | Turns Replay on or off |
| `RCON` | `bRconEnabled` | Turns RCON on or off |
| `RCON PASSWORD` | `RconPassword` | RCON password |
| `RCON PORT` | `RconPort` | RCON port, assigned by the panel |
| `ENABLE QUEUE` | `bQueueEnabled` | Turns the queue on or off |
| `QUEUE PORT` | `QueuePort` | Queue port, assigned by the panel |
| `AUTO UPDATE` | none | Updates the server on every restart |
::
The password takes two steps. Set the `SERVER PASSWORD` switch to **True**, then type the password in the text field with the same name. As long as the switch stays on **False**, the text in the field is ignored.
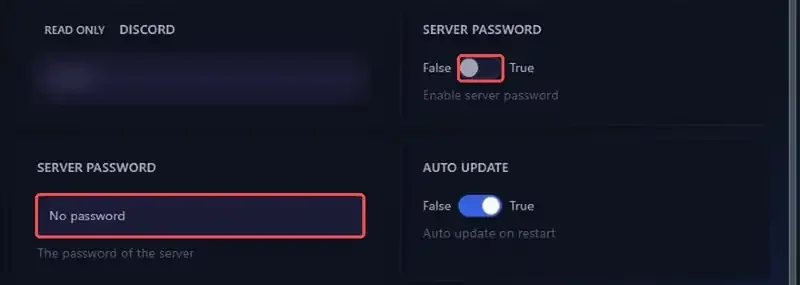 > [!IMPORTANT]
> The default RCON password is `changeme`. If you turn RCON on, replace it with a long, unique password before restarting, otherwise anyone who knows this default value can administer your server.
The RCON and queue ports are marked **READ ONLY** because they match the ports reserved for your server. You can find them in the **Network** tab.
## 2. Understand how Startup writes Game.ini
On every start, the panel writes all the keys from the table above into `Game.ini`, using the Startup values. The file is located here.
```bash
/TheIsle/Saved/Config/LinuxServer/Game.ini
```
Right after delivery, it looks like this.
```ini
[/Script/TheIsle.TIGameSession]
ServerName=A Pterodactyl server
MaxPlayerCount=100
MapName=Gateway
bRconEnabled=false
RconPort=27016
RconPassword=changeme
bServerPassword=false
ServerPassword=No password
bServerDynamicWeather=true
bAllowReplay=false
bEnableHumans=false
bQueueEnabled=true
QueuePort=44000
[/Script/TheIsle.TIGameStateBase]
AdminsSteamIDs=
```
The ports shown in this example differ from one server to another.
> [!WARNING]
> A key managed by Startup (for example `ServerName` or `MaxPlayerCount`) that you change directly in `Game.ini` goes back to the Startup value on the next restart. For these keys, always use the **Startup** tab.
On the other hand, a key that is not in Startup and that you add by hand to `Game.ini` is kept across restarts. That is the case for `AdminsSteamIDs`.
## 3. Edit Game.ini for everything else
For anything Startup does not offer, such as administrators, edit the file directly.
1. Stop the server with the **Stop** button
2. Open the **Files** tab, then the `TheIsle/Saved/Config/LinuxServer` folder
3. Click `Game.ini` to open it in the editor
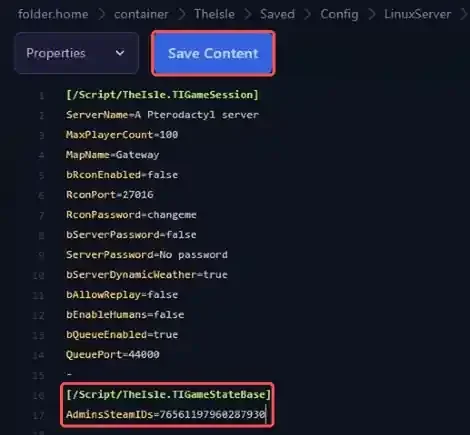
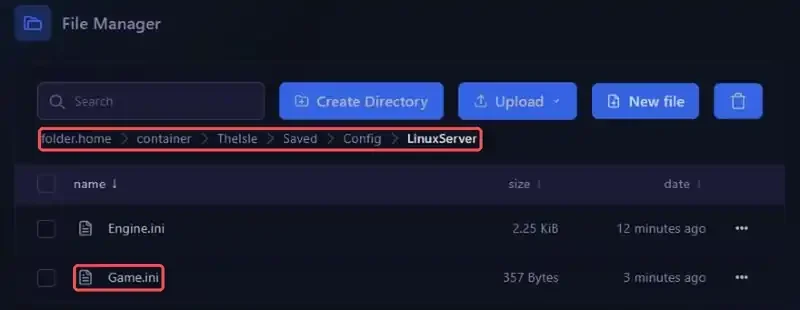 Each key must stay under its section. Game settings go under `[/Script/TheIsle.TIGameSession]`, player lists such as administrators go under `[/Script/TheIsle.TIGameStateBase]`. To make a player an administrator, enter their SteamID64 (a 17-digit number starting with `7656`).
```ini
[/Script/TheIsle.TIGameStateBase]
AdminsSteamIDs=76561197960287930
```
Then click **Save Content** and restart the server with **Start**.
 Prefer working on your PC with a text editor? See our guide [“How to Connect to Your Gaming Server via SFTP”](https://winheberg.com/en/docs/panel-gaming/sftp-gaming-server).
> [!TIP]
> Before editing the file, take a backup from the **Backups** tab. Our guide [“How to Create and Restore a Backup of Your Gaming Server”](https://winheberg.com/en/docs/panel-gaming/create-restore-backup-gaming-server) walks you through it.
The folder also contains an `Engine.ini` file. It holds the Epic Online Services credentials used by the server, leave it as it is.
## 4. Check that the configuration is applied
Once the server has restarted, open `Game.ini` again from the **Files** tab. The Startup values should be there, along with the keys you added by hand. If a value is not what you expected, the key is managed by Startup, fix it in that tab.
## If you run into trouble
### ❌ My Game.ini changes disappear on restart
- Check whether the key is in the table from step 1. If it is, Startup rewrites it on every start, change it in the **Startup** tab
- Check that you clicked **Save Content** before restarting
- Check that you edited the file in the `TheIsle/Saved/Config/LinuxServer` folder, not a file with the same name elsewhere
## Need help?
If your server no longer starts after a change, or if a setting does not behave as expected, our support team is here to help. Open a ticket from your client area `https://billing.winheberg.com`, **Technical** department, selecting your The Isle server in the **Related Product** field.
Your The Isle server is ready to welcome your players, with settings that suit you 🎮