Context
To customize the visual appearance of your Minecraft Bedrock server, installing a resource pack (texture pack) is an essential step. On your PocketMine-MP server hosted at Winheberg, you can upload your files, register them within the configuration, and choose whether their download is enforced on users upon connection.
This guide takes you step-by-step from uploading the archive to the global activation of the pack via your management panel.
Prerequisites
- An active PocketMine-MP instance initialized on your panel.winheberg.com.
- A texture pack strictly in
.zipformat. - An external SFTP client such as FileZilla or WinSCP if your archive size exceeds 100 MB.
Before making any structural modifications to your files, perform a full backup of your server using the Backups tab. Any syntax error within configuration files can prevent the instance from starting up properly.
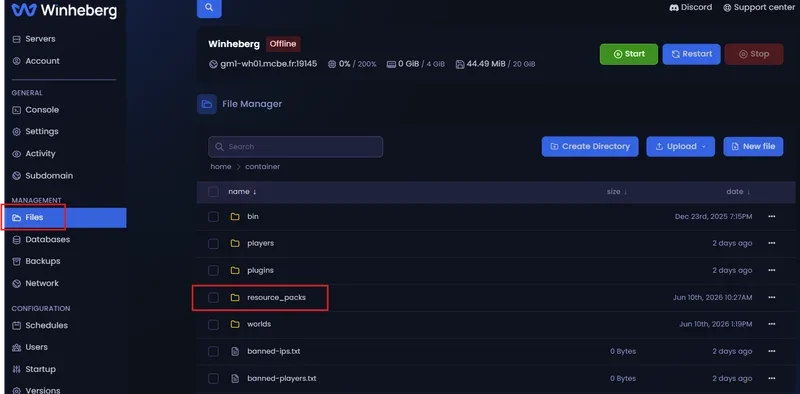
1. Accessing the File Manager
- Log in to your panel.winheberg.com.
- Select your PocketMine-MP server instance.
- In the left sidebar menu, click on the
File managertab.
2. Uploading the Resource Pack
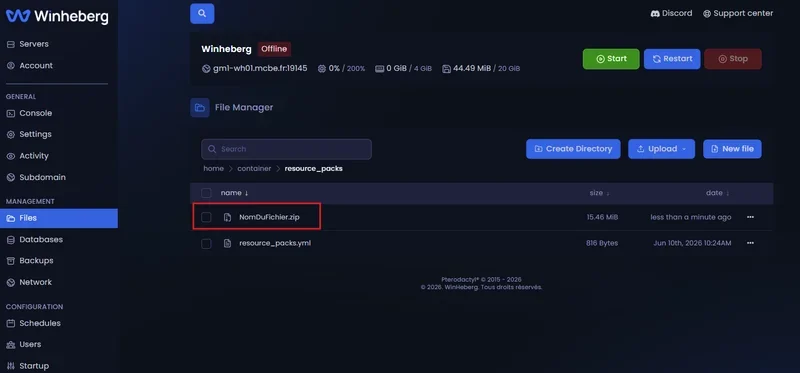
- From the root directory of your server, open the folder named
/resource_packs. - Drag and drop your
.ziparchive directly into this interface or use the dedicated upload button.
If your texture pack is exceptionally large (over 100 MB), uploading it directly through the web browser may fail. Use an external SFTP client using the connection credentials available under the Settings tab of your panel.
3. Configuring the resource_packs.yml File
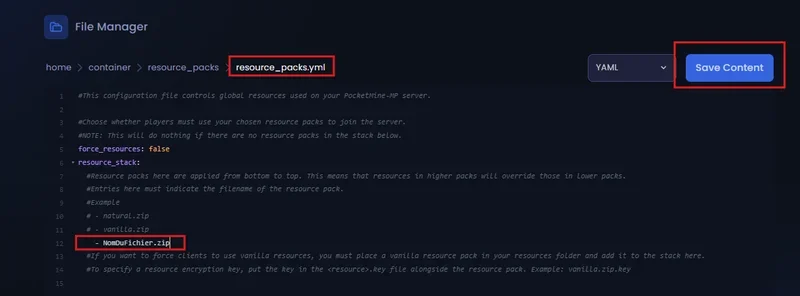
To make the PocketMine-MP engine index, load, and distribute your pack, you must explicitly declare the archive inside the designated configuration file.
- Return to the root of your server (
/) within the file manager. - Click on the
resource_packs.ymldocument to open it in the editor. - Add the exact name of your
.ziparchive under theresource_stacksection, then adjust the restriction option according to your preferences.
force_resources: false
resource_stack:
  - ExactPackName.zip
The force_resources variable determines the server's behavior during the handshake phase with the client:
| Value | Behavior Upon Connection |
|---|---|
false |
Optional download. The player can decline the pack and use their local default textures. |
true |
Mandatory download. The player is automatically disconnected if they refuse the pack. |
The name entered in the resource_stack list must match character-for-character (case-sensitive) the name of the archive file stored in /resource_packs, including the .zip extension.
4. Restarting the Server
Navigate to the Console tab in the sidebar menu, then click the Restart button. Upon startup, the system will compile the archive to make it available for the next connection attempt.
Stacking Multiple Packs
The resource_stack directive behaves like an ordered stack. You can list multiple consecutive .zip files. In case of texturing overlaps or conflicts, the order of appearance inside the file determines the in-game display priority (the first pack in the list overrides the textures of the following ones).
force_resources: false
resource_stack:
  - PriorityPack.zip
  - SecondaryPack.zip
Troubleshooting
❌ The Server Crashes or Ignores the Pack After YAML Modification
- Use of Tabs: The YAML format strictly prohibits the use of tabs. Exclusively use standard spaces to format indentation (typically 2 spaces per level).
- Wrong Name or Format: Double-check that the extension of your archive is strictly
.zipand that the file is not corrupted.
❌ Players Receive an Error During Download
- Connection Timeout: An oversized pack can saturate the client's bandwidth and cause a timeout error. Try to optimize the
.ziparchive assets or lower texture resolutions (e.g., dropping from 124x124 down to 64x64).
❌ The Pack Downloads But Does Not Show Up In-Game
- Broken Internal Directory Structure: Open your
.zipfile. Structural folders such astextures,ui, ormanifest.jsonmust be located immediately at the root of the archive, rather than enclosed within an intermediate subfolder.
Administrative Best Practices
- Manifest Verification: Ensure the
manifest.jsonfile inside the.zipfeatures valid and unique UUIDs if you are developing or modifying your own custom texture assets. - Gradual Testing: Keep the
force_resourcesvariable set tofalseduring your initial testing phase to validate proper archive deployment without locking out your player base. - Archive Optimization: Keep your compressed archives clean and lightweight by removing unused source files inside the folder to improve loading times.
Need Help?
Deploying synchronized graphical assets greatly enhances the gameplay experience but requires strict compliance regarding archive compression formats.
If your YAML configurations remain unresponsive or if your players encounter systematic connection rejections, our technical team is here to assist. Open a support ticket within our Technical department from your client area at billing.winheberg.com by linking your active PocketMine-MP subscription for tailored expert troubleshooting.
Happy administration and have a great game on your game server! 🎮