Context
Easy Anti-Cheat, usually shortened to EAC, is the anti cheat bundled with 7 Days to Die. It is enabled by default on dedicated servers and blocks unsigned code from running, which includes any mod shipping a .dll file.
In practice, as long as EAC stays on, a mod carrying compiled code will never load, and overhauls such as Darkness Falls or Undead Legacy will not run at all. Modlets made only of XML files are perfectly happy with EAC enabled and need none of this.
This guide covers turning EAC off on the server side of your Winheberg hosting, then the step most players forget, launching the game without EAC on their own machine. It applies to servers managed from panel.winheberg.com.
Disabling EAC is a configuration the game supports, not a workaround. No sanction risk is attached to it.
Requirements
- An active 7 Days to Die server on the Winheberg game panel
- A mod or overhaul containing at least one
.dllfile, otherwise this change serves no purpose - A way to reach your players, since they will have to change how they launch the game
Without EAC, the server has no automatic anti cheat protection left. On a public server, plan a whitelist or human moderation before making the switch.
1. Check whether you actually need to disable EAC
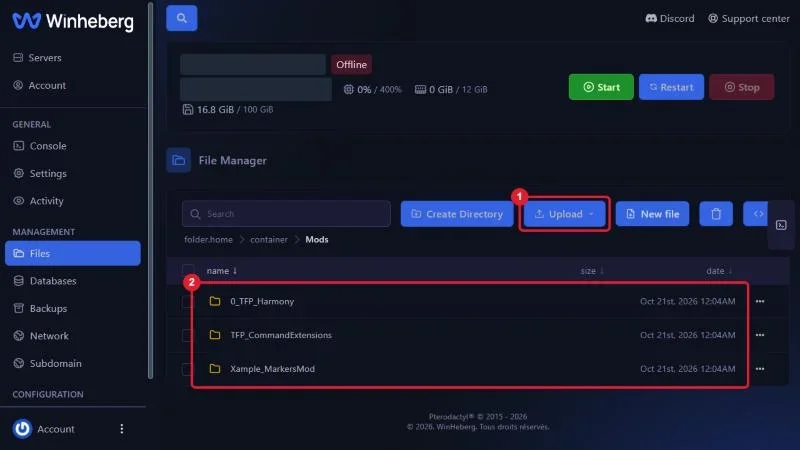
Open your mod folder in the Files tab and look at what it holds.
| Mod folder content | EAC |
|---|---|
Only .xml files, usually inside Config/ |
Can stay enabled |
One or more .dll files |
Must be disabled |
| Full overhaul such as Darkness Falls or Undead Legacy | Must be disabled |
If your mod matches the first row, stop here, nothing needs changing.
2. Stop the server
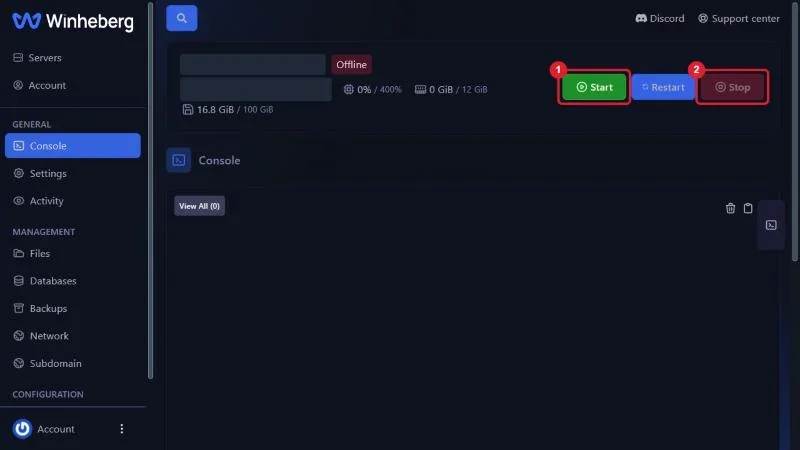
In the Console tab, click Stop and wait for the shutdown to complete. The configuration file is read at startup, so editing it mid game would have no effect until the next restart.
3. Edit serverconfig.xml
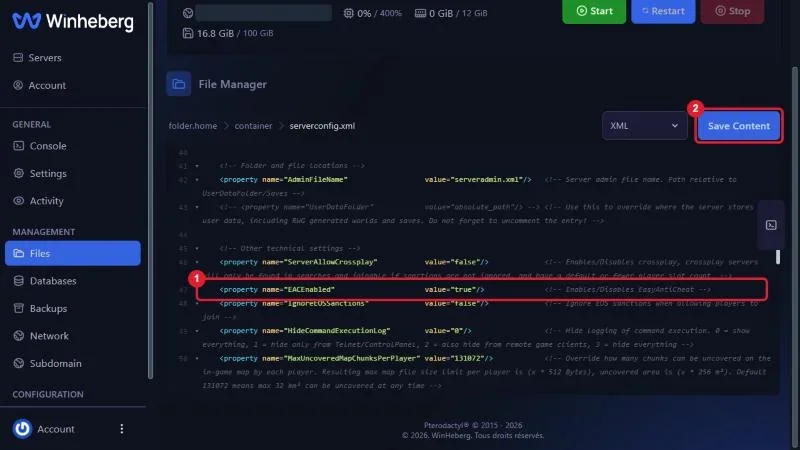
Open the Files tab, find serverconfig.xml at the server root and click it to open the editor.
Look for the line containing EACEnabled and change its value to false.
<property name="EACEnabled" value="false"/>
Save with the Save Content button, then start the server again with Start.
The file manager search box does not look inside file contents. Use your browser's find shortcut once the editor is open to jump to the line.
4. Launch the game without EAC on the player side
This is where most setups stall. A player whose client starts EAC cannot join a server running with EAC disabled, even with every mod correctly installed. Each player therefore needs to follow these steps.
- Open Steam and go to the library
- Click Play on 7 Days to Die
- Choose Launch game without EAC in the dialog that appears
If no dialog shows up, a launch option has already been remembered. Right click the game, open Properties, then under General set Selected Launch Option back to Ask when starting game. The choice will be offered again on the next launch.
This choice has to be made at every launch as long as no launch option is remembered. Spell it out for your community, in your Discord welcome message for instance.
5. Turn EAC back on
The reverse is identical. Stop the server, set the EACEnabled property back to true in serverconfig.xml, then restart.
<property name="EACEnabled" value="true"/>
Remove any mod containing .dll files from the Mods folder first, otherwise the server restarts with an anti cheat that blocks them, and you end up with console errors and no obvious cause.
Troubleshooting
❌ Players cannot connect after the switch
- Confirm every player launches the game with the no EAC option
- Check that the server was restarted after
serverconfig.xmlwas saved - Make sure the saved value is
falseand notFalseor wrapped in broken quotes - Verify players run the same mod versions as the server
❌ The serverconfig.xml change seems ignored
- Confirm you edited the file at the server root and not a copy stored elsewhere
- Check that Save Content was used before leaving the editor
- Look for a second
EACEnabledproperty in the file, only the last occurrence would apply
❌ The mod still refuses to load with EAC off
- Confirm the
0_TFP_Harmonyfolder is present inMods, it is required for compiled code - Check the mod structure,
ModInfo.xmlmust sit directly inside the mod folder - Confirm the mod targets the game version installed on the server
For the folder structure side, see our guide How to Install Mods on a 7 Days to Die Server
Best practices
- Enable a whitelist before opening an EAC free server to the public, it is the logical counterpart to the protection you gave up
- Document the no EAC launch procedure in your Discord, it will absorb most of your community support messages
- Turn EAC back on if you ever drop your compiled mods, there is no reason to leave the server unprotected
- Test the connection from your own client before announcing the server to your players
- Keep a copy of
serverconfig.xmlbefore editing, rolling back then takes seconds
Need help
If the EACEnabled property has no effect after several restarts, or if your players are refused despite a correct setup on both sides, open a ticket with our support team from your client area, Technical department, with the server filled in the Related Product field. Our team can review the startup logs with you.
Your server is ready to run compiled mods. 🎮