Context
7 Days to Die mods, known in the community as modlets, are plain folders dropped into the server's Mods directory. No installer, no command line, everything happens in the file manager of the Winheberg game panel.
That simplicity hides two traps behind the vast majority of mods that never load, a malformed folder structure after unzipping, and a mismatch between the type of mod and the server's anti cheat configuration. This guide covers both, from uploading the archive to checking the console output.
It applies to 7 Days to Die servers hosted at Winheberg and managed from panel.winheberg.com.
Requirements
- An active 7 Days to Die server on the Winheberg game panel
- The mod archive, downloaded from a trusted source such as Nexus Mods or the official The Fun Pimps forum
- An SFTP client such as FileZilla or WinSCP if the archive is larger than 100 MB, the file manager upload limit
- Your SFTP credentials, shown in the server's Settings tab
A mod built for another game version can stop the server from booting. Back up your world before adding anything.
1. Locate the Mods folder and its default content
In the Files tab, the Mods folder sits at the server root, between logs and Steam.
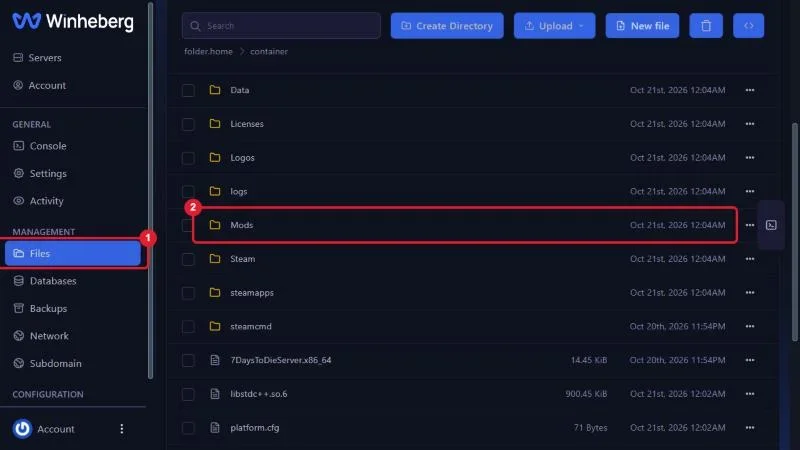
It is never empty on a fresh installation, since the 7 Days to Die dedicated server ships with three official folders.
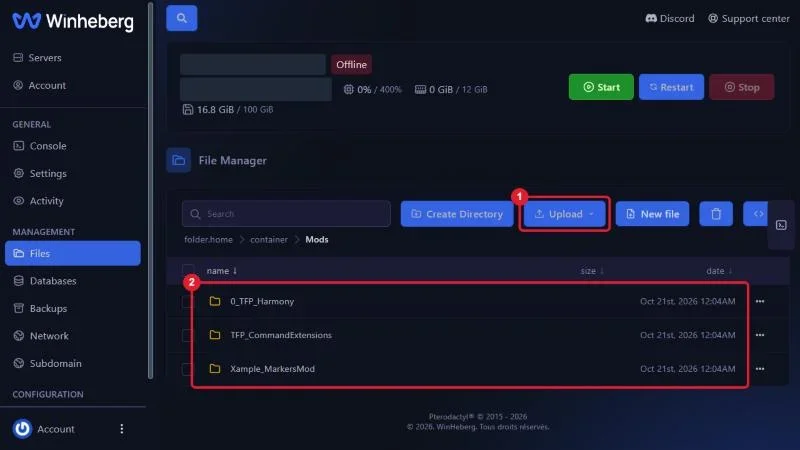
| Folder | Purpose |
|---|---|
0_TFP_Harmony |
Official Harmony loader from The Fun Pimps, used by mods that ship compiled code |
TFP_CommandExtensions |
Extra console commands bundled with the dedicated server |
Xample_MarkersMod |
Example mod tied to the dedicated server web dashboard |
Do not delete these three folders. Without 0_TFP_Harmony, no mod containing a .dll file will load.
2. Stop the server
Open the Console tab, click Stop and wait for the state to switch to Offline.
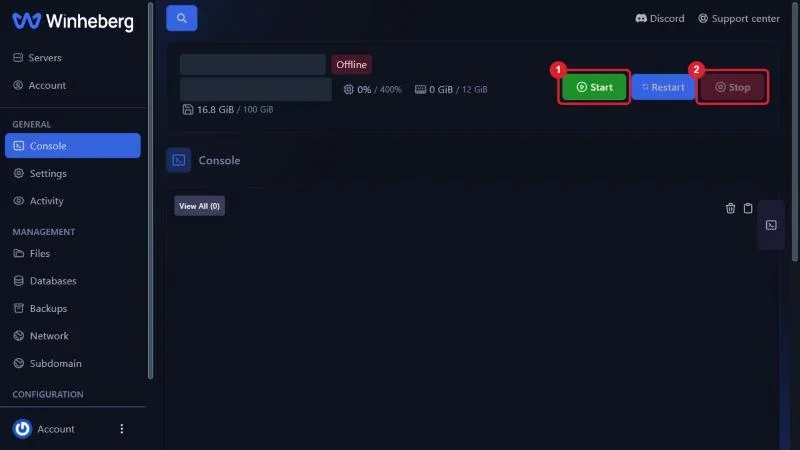
The game only reads the Mods folder during startup. A mod added to a running server stays invisible, and writing files while a save is loaded exposes it to corruption.
3. Upload the mod into the Mods folder
Open the Files tab, enter the Mods folder, then click Upload. The menu offers three ways to send the mod.
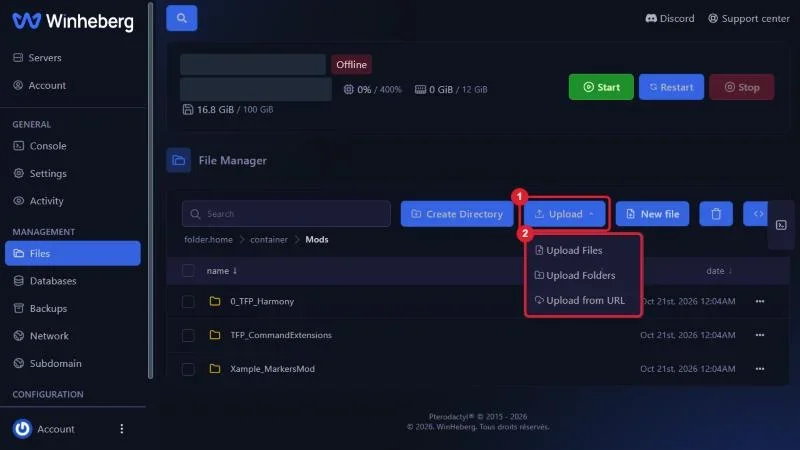
- Upload Files for the mod's
.ziparchive, the most common case - Upload Folders to send the mod folder already extracted on your PC
- Upload from URL to paste the direct download link of the archive, the server fetches it itself without going through your connection
Once the transfer finishes, the ⋯ menu at the end of the archive's row gives access to the Unarchive action, which extracts the content in place.
For large archives, overhauls in particular, use SFTP with FileZilla or WinSCP. The SFTP server address and your username are displayed in the Settings tab, the password is your panel password, and the Launch SFTP button opens your client directly.
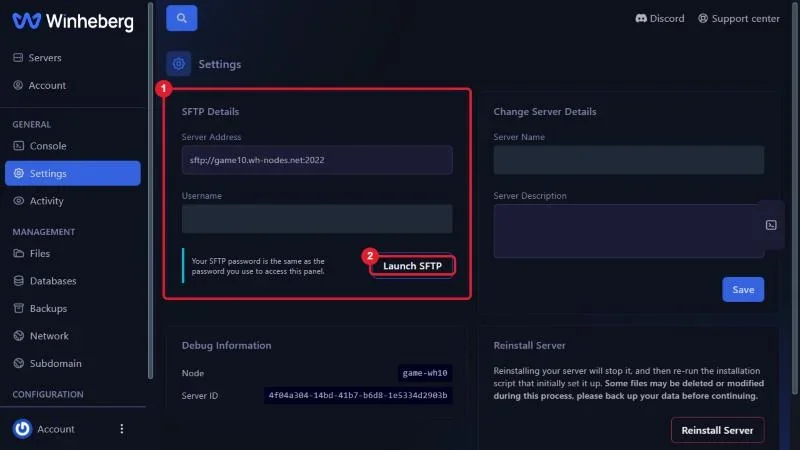
Delete the .zip archive once the mod is extracted, the game never reads it.
4. Check the mod folder structure
This is the step that matters most. Each mod lives in its own folder directly under Mods, with its ModInfo.xml file at that folder's root.
Mods/
├── 0_TFP_Harmony/
├── TFP_CommandExtensions/
├── Xample_MarkersMod/
└── MyMod/
    ├── ModInfo.xml
    └── Config/
Two mistakes come up again and again.
- The duplicated folder. If extraction produces
Mods/MyMod/MyMod/ModInfo.xml, the author zipped the parent folder. Move the content up one level so thatModInfo.xmlsits insideMods/MyMod/. - The grouping folder. Creating
Mods/MyMods/to tidy several mods together does not work, the game only looks one level belowMods.
The ModInfo.xml file follows the structure below.
<?xml version="1.0" encoding="UTF-8" ?>
<xml>
    <Name value="MyMod" />
    <DisplayName value="My Mod" />
    <Version value="1.0.0" />
    <Description value="Mod description" />
    <Author value="Mod author" />
    <Website value="" />
</xml>
A folder without ModInfo.xml is silently ignored by the game, with no error in the console.
5. Match the configuration to the mod type
Mods do not all need the same treatment. The folder content tells you immediately which case you are in.
| Mod type | Folder content | What to do |
|---|---|---|
| XML modlet | Only .xml files inside Config/ |
Nothing extra, EAC can stay enabled |
| Mod with compiled code | One or more .dll files |
Set EACEnabled to false in serverconfig.xml |
| Full overhaul | Config, assets, icons, compiled code | Same EAC change, plus an identical install on every client |
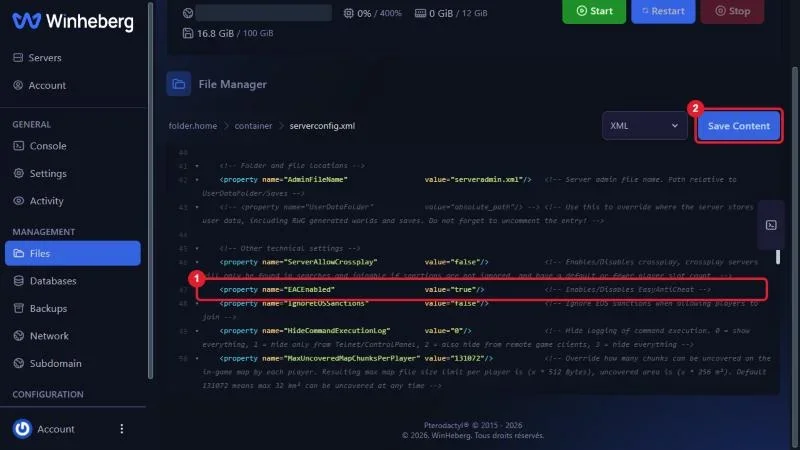
To turn the anti cheat off, open serverconfig.xml at the server root from the Files tab, find the EACEnabled property around line 46, set its value to false, then click Save Content. The full procedure, server side and player side, is in How to Disable EAC on a 7 Days to Die Server.
7 Days to Die does not push mods to players. A modlet that only changes server side values such as loot or spawns can stay installed on the server alone. As soon as a mod adds or changes items, blocks, recipes, UI or localisation, every player has to install exactly the same folder on their machine.
6. Restart and confirm the mod loads
Go back to the Console tab and click Start. During the startup sequence, the server prints the list of mods it loads. Yours should appear with the name declared in its ModInfo.xml.
If the server reaches the game ready state and your mod shows up in that list, the installation is done.
Troubleshooting
❌ The mod never appears in the startup console
- Confirm that
ModInfo.xmlsits inMods/ModName/and not one level deeper - Make sure no intermediate folder was created under
Mods - Check that the archive was actually extracted and is not still a
.zip - Confirm the server was fully restarted, not just reloaded
❌ The server no longer starts after adding a mod
- Rename
ModstoMods_oldand restart to confirm the mod is the cause - Add the mods back one at a time to identify the culprit
- Check that the mod version matches the game version installed on the server
- Read the last console lines before the shutdown, they usually name the failing mod
❌ Players can no longer join the server
- The mod most likely changes client side content, share the same archive with them
- Make sure everyone runs the same mod version, a single version gap is enough to refuse the connection
- If the mod ships a
.dll, players must launch the game with the anti cheat disabled
❌ Harmony errors show up in the console
- Confirm that the
0_TFP_Harmonyfolder is still present inMods - Check that the mod was built for the game version you run, a major version gap produces this kind of error
- Remove any duplicate copy of the same mod sitting in two different folders
Best practices
- Add mods one at a time and restart in between, conflicts surface far more quickly that way
- Keep a local copy of every archive you install, it saves hunting for the right versions after a reinstall
- Write down the exact version of each mod, that is always the missing detail when a game update lands
- After a major 7 Days to Die update, treat every mod as needing revalidation before reopening the server to players
- Stick to well known sources, a mod grabbed anywhere can ship code that runs on your machine
- Warn your players before adding a content mod, they will need to install it on their side to keep playing
Need help
If the server refuses to start after a mod is added, or if what you observe does not match this guide, open a ticket with our support team from your client area, selecting the Technical department and filling the Related Product field with the server involved. Our team can go through the startup logs with you.
Your modlets are in place, all that is left is to load the game. 📦