Context
Want to add features to your BeamMP server at Winheberg, such as a welcome message, admin commands or a racing system? All of that runs through server-side Lua plugins, which execute on your server rather than on your players' machines.
This guide explains where to put a plugin, how to check that it loads and what to do if the console shows an error like this one.
[LUA ERROR] Failed: "Resources/Server/MyPlugin/main.lua": [string "Resources/Server/MyPlugin/main.lua"]:3: ')' expected (to close '(' at line 2) near 'end'
Prerequisites
Before you start, make sure you have the following.
- An active BeamMP server on your Winheberg gaming panel
- The plugin you want to install, as
.luafiles or as an archive extracted on your computer
A server plugin runs code on your server. Only download plugins from trusted sources (official BeamMP forum, the GitHub repository of a well-known creator) and read the README that comes with the plugin before installing it.
Server plugin or client mod?
BeamMP splits resources into two kinds, each in its own folder.
| Folder | Content | Run by |
|---|---|---|
Resources/Client |
.zip mods (cars, maps) |
Each player's game, which downloads them on connect |
Resources/Server |
Lua plugins, one subfolder per plugin | Your server only |
This guide only covers the Resources/Server folder. For mods, see our guides "How to add modded cars to your BeamMP server" and "How to Install a Modded Map on Your BeamMP Server".
1. Create the plugin folder
Each plugin needs its own folder inside Resources/Server.
- Log in to your Winheberg gaming panel and select your BeamMP server
- In the side menu, click Files
- Open the
Resourcesfolder, thenServer - Click Create Directory and name the folder after the plugin, for example
WelcomeMessage
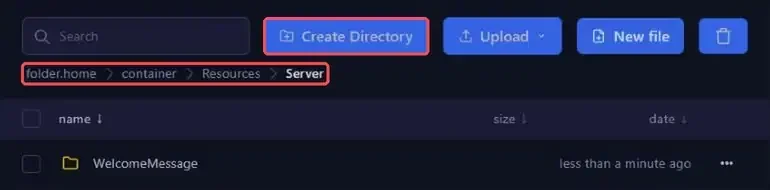
2. Add the plugin files
Open the folder you just created and send the plugin's .lua files into it with the Upload button. If the plugin has several files or subfolders, keep exactly the layout its creator provided.
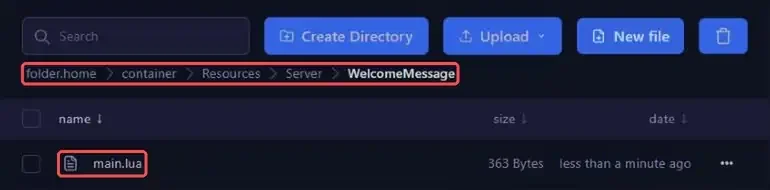
The final path should look like this.
Resources/Server/WelcomeMessage/main.lua
BeamMP automatically loads the .lua files placed directly in the plugin folder, in alphabetical order. Files in a subfolder are only loaded if the plugin pulls them in itself with require(). A main.lua stored in Resources/Server/WelcomeMessage/WelcomeMessage/ will therefore never run.
3. Restart and check the console
A new plugin is only picked up when the server starts.
- Go back to your server's main page
- Click Restart
- Watch the console during startup
Messages written by your plugins show up with the [LUA] prefix. If the plugin prints a message when it loads, you will see it right after the PluginMonitor started line.

Example, a welcome plugin
To try it out without downloading anything, you can write a small plugin yourself. In the Resources/Server/WelcomeMessage folder, click New file, paste the following code and save it as main.lua.
-- WelcomeMessage: greets every player who joins the server

function onInit()
    print("WelcomeMessage plugin loaded")
end

function onPlayerJoin(player_id)
    local name = MP.GetPlayerName(player_id)
    MP.SendChatMessage(-1, "Welcome " .. name .. " to the server!")
end

MP.RegisterEvent("onInit", "onInit")
MP.RegisterEvent("onPlayerJoin", "onPlayerJoin")
After a restart, the console shows [LUA] WelcomeMessage plugin loaded, and every player who joins is greeted in the chat. The full list of available functions and events is in BeamMP's official documentation, in the server scripting section.
If you run into trouble
Here are the most common situations with Lua plugins.
❌ The console shows LUA ERROR Failed
The file mentioned contains a Lua syntax error. The message gives the file, the line number and what is missing.

- Open the file mentioned and go to the line given (here line 3, with an unclosed parenthesis on line 2)
- If you did not write the plugin, download it again, the file may have been damaged during the upload
- Check that the plugin is compatible with your BeamMP version, shown in the console at startup (
BeamMP Server v3.9.3for example)
An error in a plugin does not stop the server. It keeps running and the other plugins load normally, which is why reading the console after each install matters.
❌ No LUA line shows up for my plugin
- Check that the plugin is in
Resources/Serverand not inResources/Client - Check that it has its own subfolder and that its
.luafiles are not stored one level too deep - Keep in mind that some plugins print nothing at startup, check their README to see how to confirm they work
❌ The plugin also needs a client-side file
Some plugins ship with a .zip archive meant for players (interface, sounds, etc.). That archive goes into Resources/Client, and the Lua part into Resources/Server. Follow the instructions in the plugin's README.
Best practices
- Install one plugin at a time and read the console after each restart, you will know right away which one causes trouble
- Create a backup from the Backups tab before installing a plugin that changes your server's data
- Delete the folder of a plugin you no longer use instead of leaving it in place
- Keep a copy of your plugins' configuration files before updating them
Need help?
If your plugin does not load despite these checks, our team is here to help. Open a ticket with the Technical department from your client area, fill in the Related Product field with the server concerned and attach the startup logs.
Your BeamMP server is ready for your plugins, enjoy the ride 🛣️