Context
EssentialsX is one of the foundational plugins for any Spigot, Paper, or Purpur Minecraft server infrastructure. It combines over a hundred core utilities missing from vanilla gameplay, including player teleports (homes, warps, tpa), a complete economy system, kit management, moderation toolsets (ban, mute, kick), and customizable system messaging.
Rather than stacking dozens of single-purpose plugins, EssentialsX provides a unified, performance-optimized suite designed for modern servers. This technical guide explains how to install, configure, and manage EssentialsX through your Winheberg panel.
Prerequisites
- An active Java Minecraft server (Spigot, Paper, or Purpur) hosted on your Winheberg panel
- A permission manager plugin such as LuckPerms to assign node access to players
- The Vault plugin installed if you plan to hook EssentialsX economy into third-party plugins
Stop your server before performing the initial installation to avoid file locking and configuration generation issues.
Step 1: Install EssentialsX via Panel
The Winheberg panel simplifies plugin management. You can choose between automatic installation and manual deployment.
Method A: Automatic Installation (Recommended)
- Log into your Winheberg panel
- Stop your server instance to avoid write conflicts during initial setup
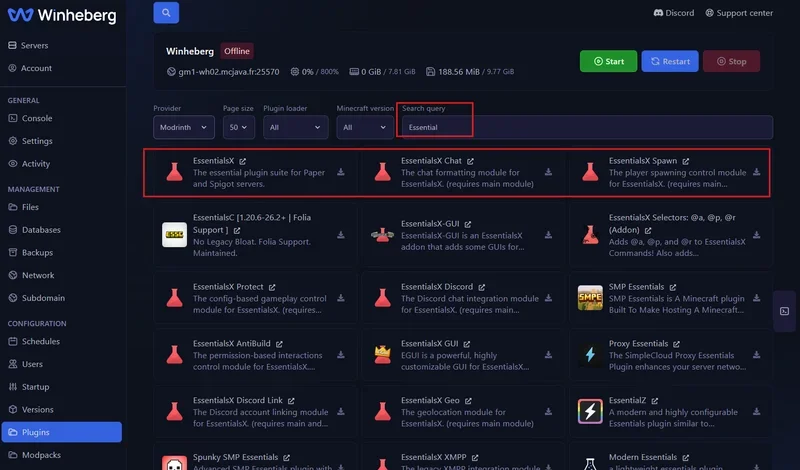
- Navigation bar: click the Plugins button
- Use the search bar to locate
EssentialsX - Click the install button beside EssentialsX (Core), then add
EssentialsXChatfor chat formatting andEssentialsXSpawnfor spawn handling as required - Restart your server so the panel deploys the required files and dependencies
Method B: Manual Installation via File Manager
- Download the required
.jarfiles from the official EssentialsX site - Access your panel and navigate to the File manager tab
- Open the
/plugins/directory - Click the Upload button at the top right and select your
.jarfiles, or drag-and-drop them into the interface - Start your server to generate the configuration directories
Step 2: Configure Core Features (config.yml)
After restarting, a /plugins/Essentials/ directory is generated. It contains the primary configuration file, config.yml, which can be edited directly inside the panel's File manager. Below are key settings to adapt.
1. Maximum Homes per Rank
Locate the sethome-multiple section to set home quotas for different permission groups.
sethome-multiple:
  default: 3
  vip: 5
  staff: 20
For the VIP group to claim 5 homes, assign them the permission node essentials.sethome.multiple.vip using your permission manager like LuckPerms.
2. Chat Formatting (Requires EssentialsXChat)
Locate the chat section to format chat tags and rank prefixes.
chat:
  radius: 0
  format: '<{DISPLAYNAME}> {MESSAGE}'
  group-formats:
    default: '&7[Player] {DISPLAYNAME}&7> &f{MESSAGE}'
    vip: '&e[VIP] {DISPLAYNAME}&f> &a{MESSAGE}'
3. Economy Setup
EssentialsX features a built-in currency engine. Adjust default values to match your server's balance.
starting-balance: 100
currency-symbol: '$'
max-money: 10000000
Step 3: Essential Commands and Permissions
Below is a summary of widely used commands for server admins and players.
| Command | Description | Permission Node |
|---|---|---|
/v or /vanish |
Toggles administrator invisibility | essentials.vanish |
/fly |
Toggles flight mode | essentials.fly |
/setwarp [name] |
Creates a public warp location | essentials.setwarp |
/warp [name] |
Teleports player to a warp | essentials.warp |
/kit [name] |
Grants a predefined item kit | essentials.kit.[name] |
/ess reload |
Reloads configuration files | Console or Operator |
By default, server operators (/op) bypass permission checks. For standard players, use a permission plugin like LuckPerms to delegate command access securely.
Step 4: Create and Distribute Kits
Kits allow you to give item packages to players, such as starter gear or daily rewards. Define them under the kits section in config.yml.
kits:
  welcome:
    delay: 86400
    items:
      - diamond_sword 1
      - bread 16
      - iron_helmet 1
The delay value is measured in seconds. In this example, 86400 seconds equals a 24-hour cooldown before the kit can be claimed again.
Troubleshooting
❌ Players cannot use /spawn or /home
- EssentialsX restricts most commands for non-operators by default.
- Assign the
essentials.spawnandessentials.homepermission nodes to the target group in LuckPerms. - Confirm that players are properly assigned to the rank receiving the nodes.
❌ Changes to config.yml do not take effect
- Reload the plugin configuration using
/ess reload. - Execute the command via the panel console or in-game if logged in as an operator.
- Check your YAML syntax: indentation errors prevent configuration files from loading.
❌ Other plugins do not detect the economy engine
- Install the Vault plugin to act as an economy bridge between EssentialsX and external plugins.
- Restart the server after uploading Vault.
- Review server startup logs to ensure Vault registers EssentialsX as the economy provider.
Best Practices
- Create Backups: Take a full server snapshot via the Backups tab on your panel before performing major configuration edits.
- Use Hot Reloads: Run
/ess reloadafter modifying YAML settings rather than restarting the entire server instance. - Use Granular Permissions: Manage access control through LuckPerms instead of granting full operator privileges (
/op) to staff members. - Validate Setup: Test kits, warps, and permissions in-game using a non-operator test account to verify actual player permissions.
Need Assistance?
If you encounter plugin conflicts, syntax errors, or permission issues that persist after following this guide, our technical support team is ready to help.
Submit a support ticket through support Winheberg. Our team will help you review your logs and resolve any setup problems! 🎮