Context
A vanilla Rust server runs perfectly well as it is, but most communities want starter kits, teleportation, clans or a shop. All of this comes from plugins, and plugins need a modding framework, Oxide (uMod) or Carbon.
On your Winheberg Rust server, there is no need to install this framework by hand. The gaming panel downloads it for you at startup, you just have to pick it. This guide shows you how to enable Oxide or Carbon, install a plugin from uMod, then check that it is running.
Prerequisites
- An active Rust server on your Winheberg gaming panel
- The download link of the plugin you want, for example on umod.org
- A recent backup from the Backups tab, before any framework change
1. Choose the framework in Startup
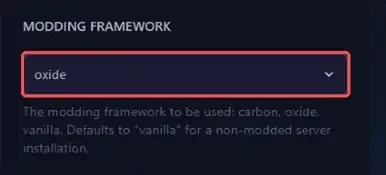
In the side menu, open Startup and scroll down to the MODDING FRAMEWORK variable. Three values are available.
| Value | Result |
|---|---|
vanilla |
Server without mods, default value |
oxide |
Installs Oxide (uMod), the original Rust framework |
carbon |
Installs Carbon, compatible with most Oxide plugins |
Select oxide or carbon. The choice is saved as soon as you change the value, there is no save button.
Oxide and Carbon cannot run side by side. Pick only one. Plugins are written the same way for both, but Carbon stores its files in a carbon folder instead of oxide.
2. Restart and check that it loads
Go back to the Console and click Restart. On every startup, the server updates Rust and then downloads the latest version of the chosen framework. So you never have to update Oxide yourself.
The first startup with a framework takes a few extra minutes. When Oxide loads, the console shows these lines.
Loading Oxide Core v2.0.4143...
Loading extensions...
Loaded extension Rust v2.0.7839 by Oxide Team and Contributors
Loading plugins...
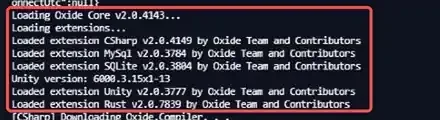
Version numbers change with every update, that is normal. Once the server has started, an oxide folder appears at the root of the server, with the plugins, config, data, lang and logs subfolders.
3. Install a plugin from a URL
An Oxide plugin is a simple .cs file. The panel file manager can download it directly, without going through your PC.
- Open Files, then the
oxidefolder, thenplugins(with Carbon,carbonthenplugins) - Click Upload, then Upload from URL
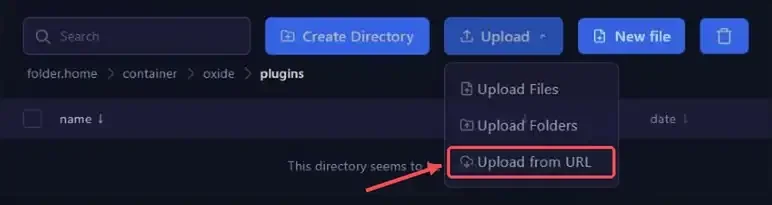
- Paste the direct link to the
.csfile into the URL field. On uMod, it looks likehttps://umod.org/plugins/PluginName.cs - Check the Filename field. It fills itself in from the URL and must contain only the file name, here
Kits.cs - Click Upload
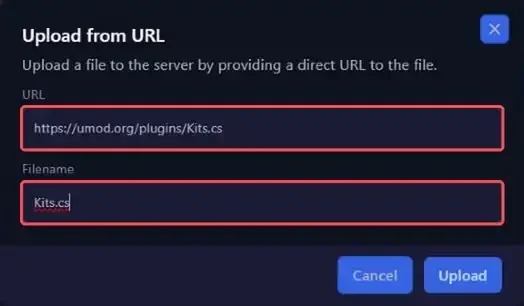
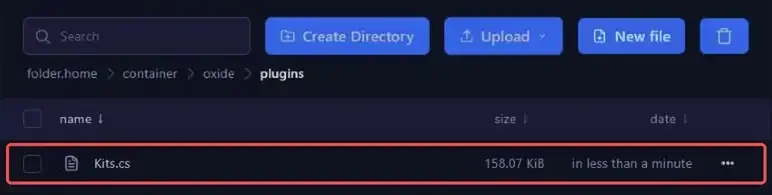
The file shows up in the folder a few seconds later.
Downloaded the plugin to your PC? Use Upload Files instead, or SFTP for large files, as explained in our guide How to Connect to Your Gaming Server via SFTP.
4. Check that the plugin is loaded
Oxide watches the plugins folder and automatically loads a plugin as soon as its file is added or modified, with no restart. On first load, the plugin creates its configuration file in oxide/config (with Carbon, carbon/configs).
To list the active plugins, type this command in the console, without a / in front.
o.plugins
Here are the handy commands for managing your plugins.
| Oxide | Carbon | Purpose |
|---|---|---|
o.plugins |
c.plugins |
Lists loaded plugins |
o.reload Kits |
c.reload Kits |
Reloads a plugin, for example after changing its configuration |
o.unload Kits |
c.unload Kits |
Unloads a plugin without deleting its file |
o.load Kits |
c.load Kits |
Loads an unloaded plugin |
The panel console sends commands to the server over RCON. During startup, it replies Unable to run "o.plugins" due to RCON not being connected yet. Wait for the server status to switch to Online and try again. If the message persists after startup, replace the default CHANGEME password in the RCON PASSWORD variable in Startup, then restart.
5. Grant the plugin permissions
Most plugins restrict their commands to players who have the right permission. The plugin page on uMod lists its permissions. Oxide creates two groups by default, default for all players and admin for administrators.
| Command | Effect |
|---|---|
o.grant group default <permission> |
Grants the permission to all players |
o.grant user <name or SteamID64> <permission> |
Grants the permission to a single player |
o.revoke user <name or SteamID64> <permission> |
Removes the permission |
o.show user <name> |
Shows a player's permissions and groups |
With Carbon, replace o. with c., for example c.grant. Players set as owner on the server are automatically added to the Oxide admin group. To become an owner, follow our guide "How to Become an Admin on a Rust Server".
If you run into trouble
❌ The plugin does not show up in o.plugins
- Check that the file is really in
oxide/plugins(orcarbon/plugins) and that it ends with.cs - Check its name. If the console shows an error like this one, the Filename field contained the name twice, rename the file to
Kits.cs
Could not load plugin 'Kits.csKits' (no plugin found with that file name)
- Open the latest file in
oxide/logs, plugin compilation errors are detailed there
❌ A plugin stopped working after the monthly wipe
Every mandatory Rust update can break a plugin. The framework itself updates on its own at restart. Check the plugin page for a new version, download it over the old one, then read the console to confirm it loads.
❌ The server crashes after a framework change
Oxide modifies some game files, which stay in place if you switch back to vanilla or move to carbon. Make a backup, then run Reinstall Server from Settings so that SteamCMD restores the original Rust files.
Best practices
- Add your plugins one at a time and read the console after each one, any conflict is then easy to spot
- Edit a plugin's configuration in
oxide/config, then apply it witho.reload PluginName - Only download plugins from known sources such as uMod. A
.csplugin runs code on your server - Back up the
oxidefolder before a wipe or a major update, it holds your configurations and your players' data
Need help?
If a plugin still refuses to load after these checks, our team is here to help. Open a ticket in the Technical department from your client area, fill in the Related Product field with your Rust server and attach the error message from the console.
Check out our plans on the Rust Hosting page. Your server is ready for its first plugins 📦