Context
On a 7 Days to Die server, owning the server grants no in game privilege. Admin rights are declared in a dedicated file, serveradmin.xml, and until your account appears in it, the in game console will refuse most commands.
Two details usually catch people out. First, the identifier used is not necessarily your SteamID, the game relies on platform identifiers including EOS. Second, the permission scale runs the opposite way to intuition, 0 is the highest level of rights and 1000 is the ordinary player.
This guide covers the method the game itself recommends, going through console commands from the Winheberg game panel, along with the file structure for those who want to understand what happens behind the scenes.
Requirements
- An active 7 Days to Die server on the Winheberg game panel
- The player to promote must have connected to the server at least once
- Access to the server's Console tab on panel.winheberg.com
The serveradmin.xml file itself states that it should be modified only through the matching console commands rather than by hand. That is the method used in this guide.
1. Find the player identifier
The game identifies a player by a platform and identifier pair. For a PC player connected through Steam, the identifier used server side is most often their EOS ID.
A player cannot read their own EOS ID from the game. They therefore need to connect to the server once, after which you can read the identifier server side.
In the panel's Console tab, with the server running, run the following command.
listplayers
The output lists connected players. The identifier appears as crossid=EOS_0002a2eacfff46808543ffdab9380672, and it is the part after the EOS_ prefix that acts as the identifier.
Two related commands are useful.
| Command | Result |
|---|---|
listplayers or lp |
Lists connected players with identifiers, positions and status |
listplayerids or lpi |
Lists players and their identifiers, shorter output |
pplist |
Prints persistent player data, including offline players |
The identifier is also written to the server log on every connection. If the player is no longer online, the panel console or the log file remain usable.
2. Add the admin from the console
The admin command handles rights. Its syntax accepts a player name, an entity id or a platform identifier, followed by the permission level.
admin add <player> <level>
To grant full rights to a connected player, going through their name is simplest.
admin add Maxime 0
If the name contains spaces, wrap it in quotes.
admin add "My Name With Spaces" 0
Removal follows the same pattern.
admin remove Maxime
And the list of declared admins comes from the following command.
admin list
Commands are typed without a leading slash in the panel console, unlike the in game chat.
3. Understand permission levels
This is what trips up most people. The scale runs from 0 to 1000, and a lower number means more rights.
| Value | Meaning |
|---|---|
0 |
Highest level, access to every command |
| Intermediate values | Yours to define, a moderation tier for instance |
1000 |
Level given by default to any player not declared in the file |
The principle is this. Each command carries a required level, and a player can run any command whose level is equal to or above their own. A player at 0 can therefore do everything, a player at 1000 can only run commands open to everyone.
Commands not listed in the file default to level 0, meaning they are reserved for full admins.
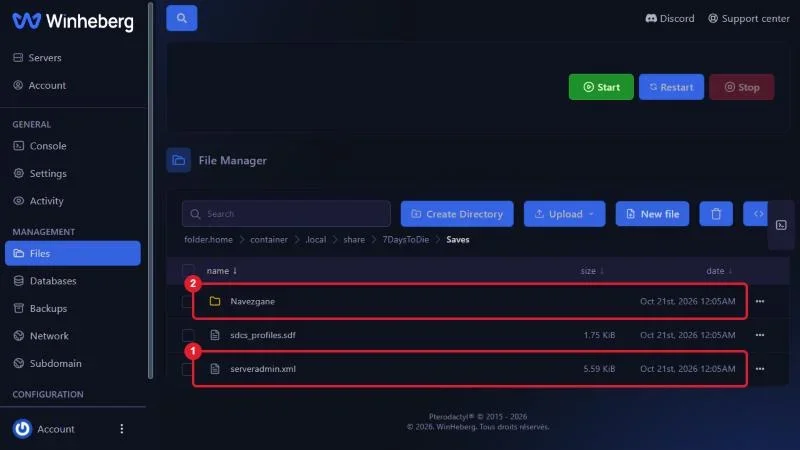
4. Check the result in serveradmin.xml
After an addition, serveradmin.xml holds an entry in the <users> section, in this form.
<adminTools>
  <users>
    <user platform="EOS" userid="0002a2eacfff46808543ffdab9380672" name="Maxime" permission_level="0" />
  </users>
</adminTools>
The platform attribute accepts EOS, Steam, XBL and PSN. The name attribute is purely cosmetic, it only reminds you who the entry belongs to.
Many tutorials still online show a <user steamID="..." /> syntax inside an <admins> section. That form belongs to an older game version and no longer works. The current form uses platform and userid inside a <users> section.
To locate the file, the most reliable route is the UserDataFolder line printed at the top of the server startup log, the file living in the Saves subfolder of that directory. You can also use the panel file manager search on the name serveradmin.xml.
On Winheberg servers, that folder is .local/share/7DaysToDie/Saves, reachable from the Files tab with hidden folders shown.
Troubleshooting
❌ Commands are refused despite the entry
- Check that the player disconnected and reconnected after being added
- Confirm the level given is
0and not1000, the scale is inverted - Check the identifier matches the right player by comparing it with the
lpioutput
❌ The identifier is not recognised
- Drop the
EOS_prefix, only the identifier that follows should be entered - Avoid copying the identifier from a screenshot, one wrong character is enough
- Use the player name while they are connected instead, it is the safest route
❌ serveradmin.xml stays empty
- The file is only filled in on the first use of the
admincommand - Check you are reading the file in the server save folder and not a copy elsewhere
- Confirm the server was stopped before you read it, changes may only be written on shutdown
Best practices
Grant level
0sparingly, it opens commands that can permanently alter the worldDefine an intermediate level for moderators rather than handing them full powers
Keep a separate note mapping names to identifiers, names change, identifiers do not
Use console commands rather than editing the file by hand, as the game itself recommends
Copy
serveradmin.xmlbefore any manual edit, a single XML syntax error can stop it loadingCombine admin rights with the whitelist if you open the server to strangers, see How to Enable the Whitelist on a 7 Days to Die Server
Need help
If rights do not apply despite a correct entry in the file, open a ticket with our support team from your client area, Technical department, with the server in the Related Product field. Our team can check the file content and the connection logs with you.
You are now in control of your server. 🎮