Context
A Discord bot only responds while its program is running. When it runs on your own computer, it goes offline as soon as you shut the computer down or your connection drops. Winheberg Discord bot hosting runs your bot on a server built for this purpose, which you manage from the panel, with a live console, a file manager and a choice of Node.js versions.
This guide takes as its example a bot written in Node.js with the discord.js library. You will create the bot on the Discord developer portal, invite it to your Discord server, upload its code to the panel with its token stored in a .env file, choose the Node.js version, then start the bot and check in the console that it is connected.
Is your bot written in Python? See our guide How to Host Your Discord Bot with Python (discord.py) instead.
Prerequisites
- An active Winheberg Discord Bot service, reachable from the panel at
https://panel.winheberg.com/ - A Discord account and a Discord server where you have the Manage Server permission
- Your bot's code with its
package.jsonfile, or the example provided in this guide
1. Create the application and get the token
Go to the Discord developer portal at https://discord.com/developers/applications and log in with your Discord account. Click New Application, give your bot a name, then confirm with Create.
Next, open the application's Bot page. In the Token section, click Reset Token and confirm. Discord then shows your bot's token. Copy it right away, because it is no longer visible once you leave the page, and you would then have to generate a new one.
The token gives full control of your bot. Anyone who has it can use your bot as if it were theirs. Never publish it, whether in a screenshot, a message or a Git repository. If it has leaked, click Reset Token to invalidate it and put the new one in your .env file.
Enable privileged intents if your bot needs them
Still on the Bot page, the Privileged Gateway Intents section groups three kinds of access that Discord does not grant by default. The example bot in this guide only uses GatewayIntentBits.Guilds, which is not privileged. If you use it as is, skip straight to step 2.
| Intent in discord.js | What it allows |
|---|---|
GatewayIntentBits.MessageContent |
Read message content, for example for prefix commands such as !ping |
GatewayIntentBits.GuildMembers |
Receive the server's member list and member updates |
GatewayIntentBits.GuildPresences |
See members' status and activity |
Only enable the ones your code declares. As long as your application has fewer than 10,000 users, the toggle in the portal is enough.
2. Invite the bot to your Discord server
In the portal, open your application's Installation page. Tick Guild Install under Installation Contexts, then choose Discord Provided Link under Install Link.
Under Default Install Settings, add the applications.commands and bot scopes to Guild Install. The Permissions menu then appears. Select the permissions your bot needs, for example Send Messages and View Channels.
Copy the install link shown on the page, open it in your browser, pick your Discord server and confirm. The bot shows up in the member list, offline until its program runs.
The link generator on the OAuth2 page, in the OAuth2 URL Generator section, works too. Tick the same bot and applications.commands scopes, then copy the generated URL at the bottom of the page.
3. Prepare the bot's files
A minimal discord.js bot fits in three files, all placed at the root of the server.
| File | Purpose |
|---|---|
package.json |
Lists the libraries the bot needs |
index.js |
The bot's code, run at startup |
.env |
The token, kept apart from the code |
The package.json file declares discord.js and dotenv, the library that reads the .env file.
{
  "name": "my-discord-bot",
  "version": "1.0.0",
  "main": "index.js",
  "dependencies": {
    "discord.js": "^14.28.0",
    "dotenv": "^18.0.9"
  }
}
The index.js file loads the token, connects the bot and writes a line to the console once the connection is up.
require('dotenv').config();
const { Client, Events, GatewayIntentBits } = require('discord.js');

const client = new Client({ intents: [GatewayIntentBits.Guilds] });

client.once(Events.ClientReady, (readyClient) => {
  console.log(`Ready! Logged in as ${readyClient.user.tag}`);
});

client.login(process.env.DISCORD_TOKEN);
The .env file holds a single line, with the token copied in step 1 in place of the sample text.
DISCORD_TOKEN=PASTE_YOUR_BOT_TOKEN_HERE
Do not upload the node_modules folder. At every start, the server runs npm install if it finds a package.json at the root and installs the listed libraries itself.
4. Upload the files to the server
Log in to the Winheberg panel and select your Discord Bot service. In the side menu, click Files.
The Upload button offers Upload Files to send files from your computer and Upload Folders to send a whole folder. Drop package.json, index.js and any other files at the root, meaning directly in the folder Files opens on, not in a subfolder.
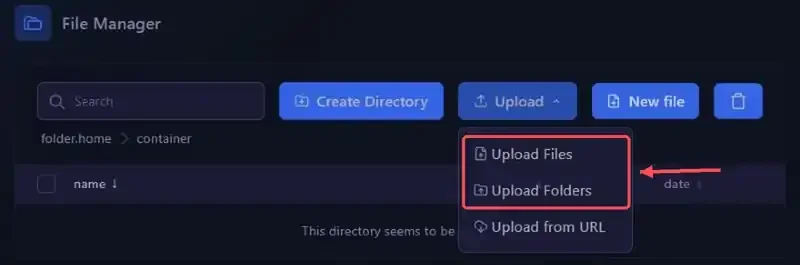
You can upload the .env file the same way or create it directly on the server. To create it on the server, click New file. Paste the DISCORD_TOKEN= line followed by your token into the editor, click Create File, then name the file .env.

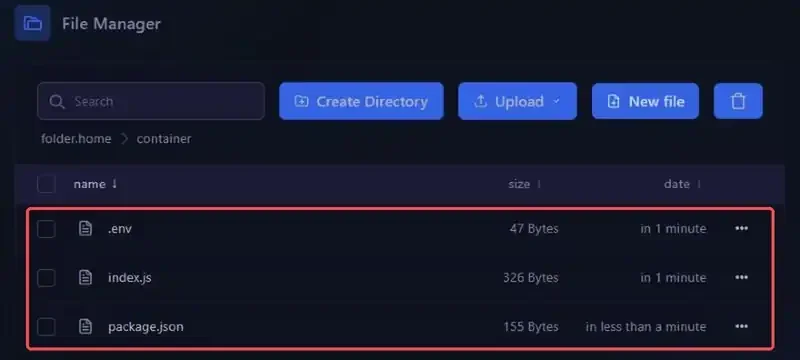
The three files then show up in the file manager.
For a large project or many files, use SFTP. Our guide How to Connect to Your Gaming Server via SFTP covers the connection with FileZilla or WinSCP, and it works the same way for a Discord Bot service.
5. Choose the Node.js version and the main file
In the side menu, click Startup. The Docker Image menu sets the Node.js version the bot runs on. It offers images from Nodejs 12 to Nodejs 25.
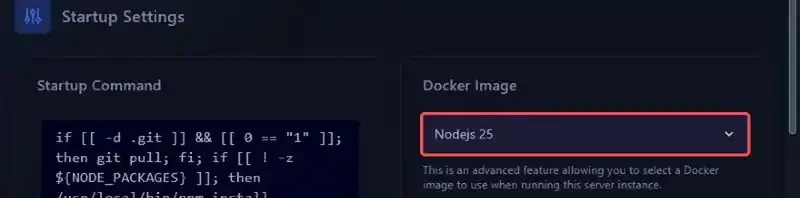
Since discord.js 14 requires Node.js 18 or newer, choose an image from Nodejs 18 upwards. If your bot uses other libraries, also check which Node.js versions they support.
Further down, the Variables section holds the startup settings.
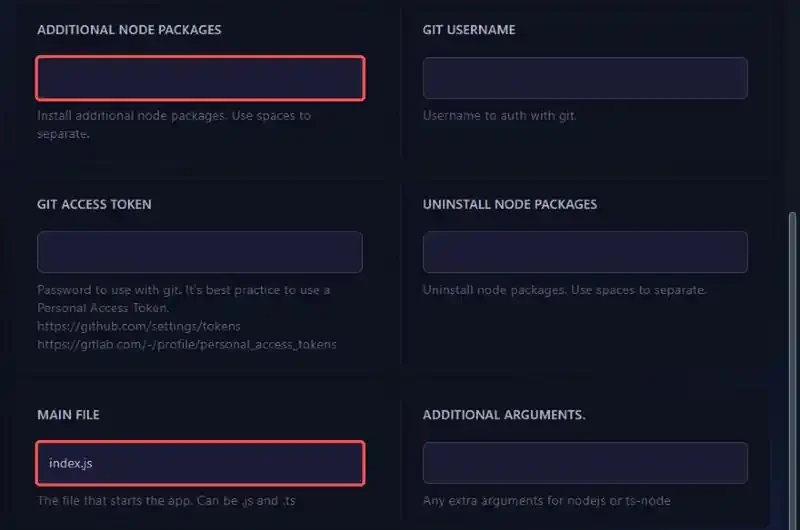
| Variable | Purpose |
|---|---|
| MAIN FILE | The file run at startup, index.js by default, 16 characters at most |
| ADDITIONAL NODE PACKAGES | Extra libraries installed at every start, separated by spaces |
| UNINSTALL NODE PACKAGES | Libraries to uninstall at startup, separated by spaces |
If your bot's entry point has another name, bot.js or main.js for example, enter it in MAIN FILE. Declare your libraries in package.json and keep ADDITIONAL NODE PACKAGES for one-off fixes.
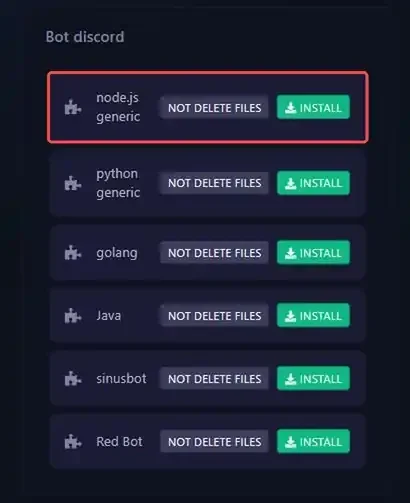
The panel's Software Changer menu lets you switch the service to another environment, such as Python, Go or Java, or to a ready-made bot such as SinusBot or Red Bot. Make a backup before switching environments.
6. Start the bot and check the console
In the side menu, click Console, then Start. The server shows the Node.js version, installs the libraries from package.json, then runs index.js. Along the way, dotenv reports that it loaded one variable from .env.
Node.js Version: v25.9.0
added 26 packages, and audited 27 packages in 7s
◇ injected env (1) from .env
Once the connection to Discord is up, the example bot writes the following line, with your bot's name. The bot then shows as online in your Discord server's member list.
Ready! Logged in as MyBot#1234
With recent Node.js versions, the line [DEP0180] DeprecationWarning: fs.Stats constructor is deprecated. may appear at startup. It does not stop the bot from starting.
On the next start, npm install simply answers up to date if nothing changed in package.json.
If you run into trouble
❌ DiscordjsError [TokenInvalid]: An invalid token was provided.

- Check that the file is named exactly
.envand sits at the root, next toindex.js - Check that the variable name is the same in
.envand in the code,DISCORD_TOKENin the example - Copy the whole token again, with no space before or after it
- If you have clicked Reset Token since then, put the new token in
.env, the old one no longer works
❌ Error: Used disallowed intents
- Your code asks for a privileged intent that is not enabled on the developer portal's Bot page
- Enable the matching intent under Privileged Gateway Intents,
MessageContent,GuildMembersorGuildPresences - Or remove the intent your bot does not need from the code, then restart
❌ Error: Cannot find module 'discord.js'
- Check that
package.jsonis at the root and lists discord.js underdependencies - Check that
package.jsondid not end up in a subfolder after uploading an archive or a folder - Restart the server so that
npm installinstalls the missing library
❌ The bot stops and does not restart on its own
- After a crash, the server restarts the bot automatically, unless the previous crash happened less than 60 seconds earlier
- The console says so with the line
Aborting automatic restart, last crash occurred less than 60 seconds ago. - Scroll up in the console to the first error message, fix its cause, then click Start
Best practices
- Keep the token in
.env, never inindex.js, and add.envto your.gitignoreif your code is on Git - Do not upload
node_modules, the server installs the libraries itself at startup - Make a backup before a major update of the bot or of discord.js, our guide How to Create and Restore a Backup of Your Gaming Server explains how
- Use a MySQL database if your bot needs to keep data, our guide How to Create a MySQL Database from the Gaming Panel applies to the Discord Bot service too
- Give helpers a sub-user account rather than sharing your password, as explained in our guide How to Add a Sub-User to Your Gaming Panel
Need help?
If your bot refuses to start or does not connect to Discord despite these checks, our team is here to help. Open a ticket in the Technical department from your client area, fill in the Related Product field with your Discord Bot service and include the error message shown in the console, without ever adding the token.
Your Discord bot is now running on Winheberg 🤖