Context
Plugins are the easiest way to extend a Minecraft Java server without touching your players' game client. Permissions, teleportation, economy, land protection or mini-games, it all comes down to a .jar file placed in the server's plugins folder. Since Paper is based on Spigot, the vast majority of Bukkit and Spigot plugins work on both.
On a Winheberg Minecraft server, the panel includes a plugin installer that searches the main providers directly and drops the file in the right place. This guide shows you how to use it, then how to add a plugin by hand when it isn't listed.
Prerequisites
- A Winheberg Minecraft Java server running Paper or Spigot
- Access to the Winheberg panel
- Your server's Minecraft version, so you can pick a compatible plugin
If your server still runs Vanilla, the Versions tab in the CONFIGURATION section lets you install Paper or Spigot. Leave the Wipe Server Files option turned off, otherwise every file on the server is deleted before the install.
A plugin runs with full access to your server. Only install well-known plugins, published by recognized providers or on their author's official page.
1. Open the plugin installer
Log in to the Winheberg panel and select your server. In the side menu, under CONFIGURATION, click Plugins.
The page shows a list of plugins with several filters at the top.
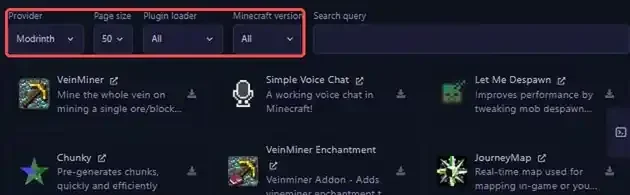
| Filter | Purpose |
|---|---|
| Provider | Where to search, among CurseForge, Hangar, Modrinth, Polymart and SpigotMC (Modrinth by default) |
| Page size | Number of results shown (10, 25 or 50) |
| Plugin loader | Target software, for example Paper, Spigot, Bukkit or Purpur |
| Minecraft version | Your server's game version |
| Search query | Name of the plugin you're looking for |
2. Search for the plugin
Set Plugin loader to your server's software, for example Paper, pick your version in Minecraft version, then type the plugin name in Search query. In the example below, we search for LuckPerms for a Paper 26.3 server.
Then click the download icon on the plugin's card.
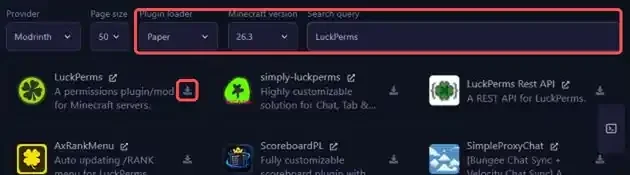
If a plugin doesn't show up, switch to another provider in Provider. A plugin isn't necessarily published everywhere.
3. Pick the version and install
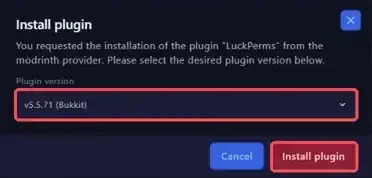
The Install plugin window opens. Select the version you want in the Plugin version list, usually the latest one, then click Install plugin.
A notification confirms the file was placed in the server's plugins folder.
Plugin "LuckPerms" successfully installed in /home/container/plugins.
The list may offer a version tagged (Bukkit). Bukkit plugins also load on Paper and Spigot.
4. Restart the server and check
The plugin is only loaded at startup. In Console, restart the server with the Restart button and watch the logs, a line confirms it was enabled.
[LuckPerms] Successfully enabled. (took 2167ms)
Once the server is up, type the following command in the panel console, without a / in front.
plugins
It lists the loaded plugins. In game, the equivalent is /plugins, where a plugin shown in green is enabled and a plugin shown in red could not be enabled.

After adding or removing a plugin, fully restart the server instead of using /reload. Paper itself displays a warning about this command, which can cause bugs and memory leaks.
Alternative method, upload the .jar file by hand
If the plugin isn't offered by any of the installer's providers, or if you have a file supplied by its author, you can add it yourself.
- Download the
.jarfile from a trustworthy source, for example Hangar, Modrinth or SpigotMC, and check that it matches your Minecraft version - In the panel, open Files then the
pluginsfolder - Click Upload and select the
.jarfile - Restart the server and check with the
pluginscommand
The file must sit directly in plugins, a .jar placed in a subfolder is not read. If the plugin ships as a .zip archive, extract it on your computer and upload only the .jar.
Uploads through the panel file manager are limited to 100 MB per file. Beyond that, use SFTP with FileZilla or WinSCP by following our guide How to Connect to Your Gaming Server via SFTP. Your credentials are in Settings, and the password is the one for your panel account.
If you run into trouble
Your first step is to open the logs/latest.log file from Files. Plugin loading messages appear near the beginning of the file.
❌ The plugin doesn't show up in the list after installing it
- Check that the server was restarted after the install
- For a manual upload, check that the file sits directly in
pluginsand that its name ends in.jar - Search for the plugin name in
logs/latest.logto spot any error
❌ A dependency is missing
The plugin needs another plugin to work. The console shows a line like this one.
Unknown/missing dependency plugins: [Vault]
- Install the plugin named in brackets with the Plugins installer or from its official page
- Restart the server
❌ The plugin isn't compatible with the server version
An Unsupported API version message means the plugin was built for a newer Minecraft version than the one your server runs.
- Reinstall the plugin with the Minecraft version filter set to your server's version
- Check the plugin page for the list of supported versions
❌ The plugin.yml file is invalid
- The file may be a Forge or Fabric mod, which doesn't run on Paper or Spigot
- The download may be corrupted, reinstall the plugin
❌ Two versions of the same plugin are installed
An Ambiguous plugin name warning means two files contain the same plugin, often after an update.
- Delete the old
.jarinpluginsfrom Files and keep only the newest one - Restart the server
Best practices
- Create a backup from the Backups tab before installing or updating a plugin, as explained in our guide How to Create and Restore a Backup of Your Gaming Server
- Add plugins one at a time and restart between each one, which makes it much easier to spot the one causing trouble
- Keep a list of your plugins with their version and provider, handy when updating Minecraft
- Remove unused plugins, since every loaded plugin uses resources at startup and in game
- Test your permissions with a non-operator account, as shown in our guide How to install and configure EssentialsX on a Minecraft server
Need help?
If a plugin still refuses to load after these checks, our team can help you read the logs. Open a ticket in the Technical department from your client area, fill in the Related Product field with the server in question, and include the plugin name, its version and the error shown in logs/latest.log.
Your Minecraft server is ready for its first plugins 📦