Context
On a Project Zomboid server, the administrator can kick or ban players, give rights to their team, broadcast messages to the whole server or decide who is allowed to connect. On your Winheberg Project Zomboid server, an administrator account is created automatically on startup from the panel variables.
This guide shows you how to log in with that account, which commands to use from the panel console and how to make the server private, with a password or a whitelist.
Prerequisites
- An active Project Zomboid server at Winheberg
- Access to the gaming panel
https://panel.winheberg.com/ - Project Zomboid on your computer to connect as administrator
1. Get the administrator account
In the panel, open the Startup tab of your server. The ADMIN USERNAME and ADMIN PASSWORD variables define the server administrator account.
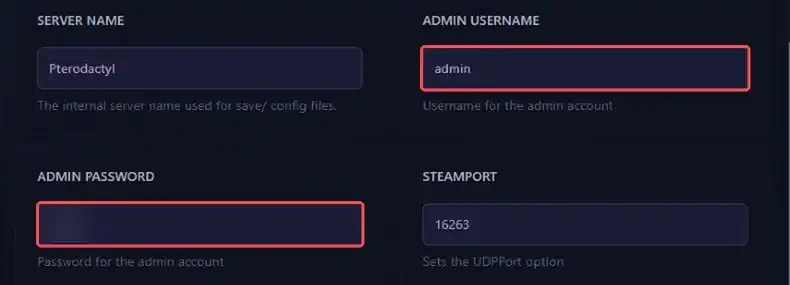
On every startup, the server creates this account if it does not exist yet, then applies the password from the variable. The console shows these lines.
Administrator account 'admin' created.
admin password changed via -adminpassword option
Replace the password with a long and unique one before opening your server to players. Anyone who knows it has full powers in game. The change applies on the next restart.
2. Connect in game as administrator
Launch Project Zomboid, open the multiplayer menu and add your server with its address and port, shown at the top of your server page in the panel. Then log in with the username and password set in ADMIN USERNAME and ADMIN PASSWORD.
Once in game, you have administrator rights. Commands are then typed in the chat, starting with a slash, for example /players.
3. Use commands from the panel console
You can also manage the server without launching the game. Open the Console tab of the panel, with the server running, and type commands in the field at the bottom of the page, without a leading slash.
players
The help command lists every command available on your game version. Here are the most useful ones.
| Command | Effect |
|---|---|
players |
Lists connected players |
setaccesslevel "username" "admin" |
Gives an access level to a player, among admin, moderator, gm, observer, priority and user |
servermsg "message" |
Broadcasts a message to all connected players |
banuser "username" |
Bans a player, add -ip to also ban their IP address |
unbanuser "username" |
Lifts a player's ban |
save |
Saves the world right away |
quit |
Saves and stops the server cleanly |
For example, to give administrator rights to a team member already registered on the server, type this command. The console confirms with User Survivant is now admin.
setaccesslevel "Survivant" "admin"
To remove rights, use the same command with the user level, the console then answers User Survivant is now user. Prefer the moderator level for team members who do not need full powers.
4. Protect the server with a password
The simplest way to restrict access is to require a password on connection. Stop the server, open the Files tab, then the .cache/Server/Pterodactyl.ini file (the file name follows the SERVER NAME variable). Fill in the Password= line.
Password=ServerPassword
Save with Save Content and restart. Players will now need this password to connect.
5. Switch the server to a whitelist
With a whitelist, only the accounts you created can connect. It is set with the Open option, near the top of the .ini file. By default it is true and anyone can create an account by connecting.
The fastest way is to change it from the console, with the server running. The option applies immediately and is saved to the .ini file.
changeoption Open "false"

You can also stop the server and edit the line directly in the file.
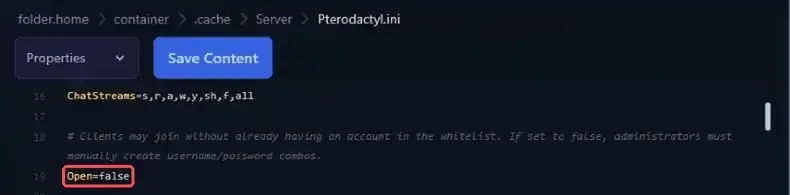
Then create an account for each allowed player. The player will connect with this username and password.
adduser "Survivant" "PlayerPassword"
The console confirms with User Survivant created with password. To remove a player from the whitelist, use removeuserfromwhitelist "Survivant".
Troubleshooting
❌ The admin account does not work in game
- Check that you use exactly the name and password from the ADMIN USERNAME and ADMIN PASSWORD variables.
- Restart the server after changing these variables, they only apply on startup.
- Look in the console for the
admin password changed via -adminpassword optionline.
❌ A command does nothing in the panel console
- Remove the slash in front of the command, it is only used in the in-game chat.
- Put usernames and values between straight quotes, as in the examples.
- Check that the server is running, the console accepts no command while the server is stopped.
❌ The console answers "Access Level unknown"
The requested level does not exist. The console then lists the accepted levels.
list of access level: banned, user, priority, observer, gm, moderator, admin
Run the command again with one of these levels, spelled as shown.
Need help?
If you run into an issue with rights or access to your server, our team can help. Open a ticket from your client area https://billing.winheberg.com with the Technical department, selecting your server in the Related Product field. To go further, also read our guide How to Install Mods on Your Project Zomboid Server.
Your server is now in good hands 🎮