Context
Project Zomboid now comes in two major versions. Build 42 is the main branch, installed by default on your Winheberg Project Zomboid server. Build 41 is still available on Steam for communities that want to keep their habits or mods that have not been ported to Build 42 yet.
The panel lets you pick the version installed on your server with a single variable. This guide shows you how to switch to Build 41, how to go back to Build 42 and how to handle your world, which is not compatible from one version to the other.
Prerequisites
- An active Project Zomboid server at Winheberg
- Access to the gaming panel
https://panel.winheberg.com/ - A recent backup of your server
A world created on Build 42 cannot be loaded on Build 41, and the other way around. Switching versions therefore means playing on another world. Back up your server from the Backups tab before anything else.
1. Stop the server and pick the branch
- In the panel, stop the server with the Stop button.
- Open the Startup tab and find the STEAM BETA BRANCH [REQUIRES REINSTALL] variable.
- Enter the branch you want from the table below.
| Desired version | Variable value |
|---|---|
| Build 41 | legacy41 |
| Build 42 (main branch) | public |
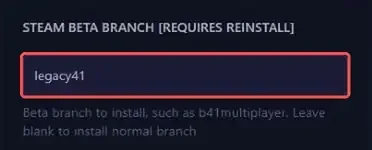
To go back to Build 42, make sure to enter public rather than just emptying the field. Steam remembers the last installed branch, and an empty field reinstalls Build 41.
The variable description mentions b41multiplayer as an example. That is the old branch name, from the time Build 41 was itself in testing. Use legacy41.
2. Reinstall the server
As its name says, the variable only takes effect after a reinstall.
- Open the Settings tab.
- Click Reinstall Server then confirm with Yes, reinstall server.
- Wait during the Running Installer screen. The server downloads the chosen version from Steam, which takes from a few minutes to around twenty minutes.
The reinstall replaces the game files but keeps the .cache folder, which holds your settings (Pterodactyl.ini) and your worlds.
3. Start and check the version
Start the server with the Start button and open the Console tab. In the first lines, the server prints its version.
version=41.78.21 demo=false
A version starting with 41. confirms your server runs Build 41, a version starting with 42. that it is on Build 42.
4. Start over on a compatible world
If a world from the other version is still there, the server refuses to load it and stops right away.
The server savefile appears to be from a newer version of the game and cannot be loaded.

To start a new world without losing the old one, simply rename its folder.
- With the server stopped, open the Files tab and go to
.cache/Saves/Multiplayer/. - Rename the folder named after your server, for example
PterodactyltoPterodactyl_b42. - Start the server. It generates a new world and the console shows
*** SERVER STARTED ****once ready.
The day you return to the previous version, rename the current world (for example Pterodactyl to Pterodactyl_b41), then give the old folder its original name back, with the server stopped. The server reloads it as you left it.
5. Adapt your mods
Steam Workshop mods are published separately for each version. On a mod's Workshop page, the Build 41 and Build 42 tags show the supported versions. After a version switch, check every mod in your Mods= and WorkshopItems= lines and remove the incompatible ones.
An incompatible mod can prevent the world from loading. The console then shows this message.
zombie.world.WorldDictionaryException: World loading could not proceed, there are script load errors.
Our guide How to Install Mods on Your Project Zomboid Server covers mod setup and how to solve this error.
Need help?
If the server does not start after a version switch, our team can help. Open a ticket from your client area https://billing.winheberg.com with the Technical department, selecting your server in the Related Product field and stating the version you want.
Good luck surviving, whatever your Build 🎮