Context
Steam Workshop mods are the best way to keep a Project Zomboid world fresh, whether you want new vehicles, new survival mechanics or entire towns to explore. On your Winheberg Project Zomboid server, the server downloads the mods itself on startup, so you never have to upload them by hand.
Everything happens in the server's .ini configuration file, where each mod must be declared twice with two different identifiers. This guide shows you where to find those identifiers, how to fill them in and how to add a custom map.
Prerequisites
- An active Project Zomboid server at Winheberg
- Access to the gaming panel
https://panel.winheberg.com/ - The list of mods you want, found on the Project Zomboid Steam Workshop
Before changing an ongoing game, download a copy of your save. A removed or incompatible mod can make some items or areas unusable.
1. Understand the two identifiers of a mod
Project Zomboid uses two identifiers for every Workshop mod, and both are required.
| Identifier | Role | Format |
|---|---|---|
| Workshop ID | Tells the server what to download from Steam | A string of digits, for example 2875848298 |
| Mod ID | Tells the game which mod to load in the world | A name without spaces, set by the mod author |
A single Workshop page can hold several Mod IDs, for example a full and a lite version. Only enable the one you want, two variants of the same mod usually conflict.
2. Get the identifiers
Open the mod's page on the Steam Workshop. The Workshop ID is the number after ?id= in the page address.
https://steamcommunity.com/sharedfiles/filedetails/?id=2875848298
The Mod ID is given by the author in the description, usually at the very bottom of the page, often next to the Workshop ID.

Also note any required mods, listed in the Required items box of the page, as they must be installed too.
Keep a list with the Workshop ID and Mod ID of each mod. You will use it every time you add or remove a mod, and it makes troubleshooting much easier.
3. Open the configuration file
- Log in to the gaming panel and select your server.
- Stop the server with the Stop button, so it does not overwrite your changes when it shuts down later.
- Open the Files tab and go to the
.cache/Server/folder. - Click the
.inifile named after your server,Pterodactyl.iniby default.
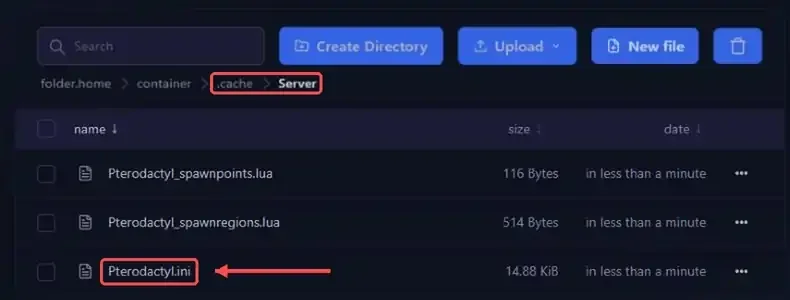
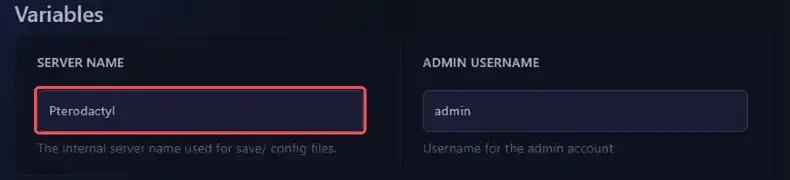
This file name matches the SERVER NAME variable in the Startup tab. If you change that variable, the server creates a new blank .ini file and a new world.
For more comfortable editing, you can also use an SFTP client, as explained in our guide How to Connect to Your Gaming Server via SFTP.
4. Declare the mods
Find the Mods= line, near the top of the file, and add the Mod IDs separated by semicolons with no spaces.
Mods=RequiredMod;MainMod;OtherMod
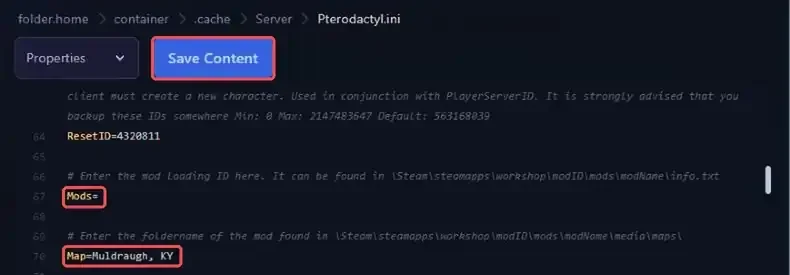
Then scroll down to the WorkshopItems= line, further in the file, and add the matching Workshop IDs with the same syntax.
WorkshopItems=1111111111;2222222222;3333333333
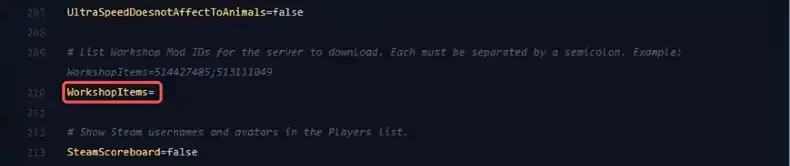
A mod listed in WorkshopItems= but missing from Mods= is downloaded but never loaded, and a Mod ID without its Workshop ID will never be found by the server.
Order matters in the Mods= line. A mod required by another one (a shared library, for example) must come before the mods that depend on it.
Some early Build 42 multiplayer versions expected a backslash before each Mod ID (Mods=\ModA;\ModB). On version 42.21 installed by our panel, the plain syntax above works.
5. Add a custom map
Map mods need one more step. Right below Mods=, find the Map= line and add the map folder name, given by its author, at the start of the list. Muldraugh, KY, the base map, must always stay last.
Map=MapName;Muldraugh, KY
The map must of course also be declared in WorkshopItems= and Mods=, like any other mod.
On an ongoing game, areas players have already explored are saved and are not regenerated. A map added in those places may not appear or may look inconsistent. For a large map, starting a new world remains the most reliable option.
6. Save and restart
Click Save Content to save the file, then start the server with the Start button. Watch the Console tab during startup, the server shows the download progress of each mod there.
Workshop: item state CheckItemState -> DownloadPending ID=2875848298
Workshop: download 1136/2411360 ID=2875848298
The first startup takes longer than usual, depending on the number and size of the mods. The server is ready when the console shows *** SERVER STARTED ****.
When players connect, their game automatically downloads the mods required by the server from the Workshop.
When an author updates a mod, restart the server so it fetches the new version. Until you do, players who already have the new version may be refused on connection because of a version mismatch.
Troubleshooting
❌ The server stops on startup after adding a mod
A mod that is not up to date for your game version can block world loading. The console then shows this message, followed by Server Terminated.
zombie.world.WorldDictionaryException: World loading could not proceed, there are script load errors.

- Scroll up in the console, the real error is printed earlier, often with the mod name in brackets, for example
Lua((MOD:Mod name)). - Remove that mod from
Mods=andWorkshopItems=, then restart to confirm it is the cause. - Check on its Workshop page that it supports Build 42 and read the recent comments.
- Make sure every required mod is installed and placed earlier in
Mods=.
❌ The mod is downloaded but does not show up in game
- Check that its Mod ID is in the
Mods=line, with exactly the same case. - Make sure you copied the Mod ID and not the title shown on the Workshop page.
- Confirm you edited the
.inifile matching the SERVER NAME variable.
❌ Players cannot connect after a mod update
- Restart the server so it downloads the latest version of the mod.
- Ask the affected players to restart their game to force a sync with the Workshop.
Best practices
- Add mods in small batches and restart between each batch, an issue is then much easier to pinpoint.
- Back up your world before every mod change.
- Avoid removing a mod mid-game, the items and buildings it added may disappear or cause errors.
- Read the recent comments on the Workshop page, they often flag incompatibilities and mods broken by a game update.
Need help?
If a mod still refuses to load after these checks, our team can help. Open a ticket from your client area https://billing.winheberg.com with the Technical department, select your server in the Related Product field and attach your mod list.
Enjoy surviving Knox County with your new mods 🎮