Context
Joining your Valheim server hosted on your Winheberg panel is easier than ever. Whether you prefer searching for your server by name, adding it directly via its IP address in-game, or using Steam favorites, this guide shows you the most efficient ways to connect and start your adventure.
Prerequisites
- An active and running Valheim server on your Winheberg panel
- Valheim installed on your Steam client
Wait until your server is fully started (online status on the panel) before attempting to connect to avoid timeout errors.
Step 1: Retrieve Connection Details
Depending on your preferred method, you will need two pieces of information from your panel:
- IP Address and Port (for IP connection): Available on your server's main dashboard page.
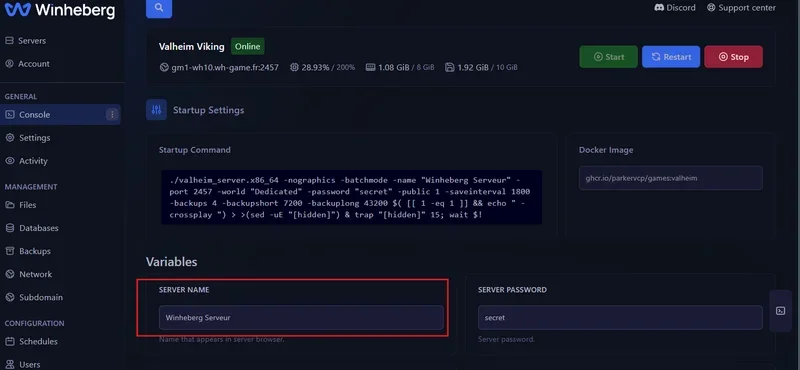
- Server Name (for name search): Go to the Startup tab of your panel to view or edit the SERVER NAME field.
Step 2: Connect to the Server
You can use one of the three methods below to join your game.
Method A: Via Name Search (Community)
This is the fastest method if you know your server's name.
- Launch Valheim and click Join Game.
- Click on the Community tab.
- In the search bar, type the exact name of your server as shown in the Startup section of your panel.
- Select your server from the list and click Join.
During the very first startup of your server, it is perfectly normal that it does not appear immediately in the 'Community' list. Valheim needs time to index your server in its public list. If you don't see it, wait a few minutes or use the IP method below.
Method B: Via Direct IP Addition (In-game)
This method allows you to save the server permanently to your in-game favorites.
- Launch Valheim and click Join Game.
- Click the Add Server button at the bottom right.
- Enter your server's IP address and port (format:
IP:PORT) as provided on your panel. - Confirm. The server will now be saved in your in-game list.
Method C: Via Steam Favorites (Recommended)
This method is often the most reliable to ensure your server appears correctly.
- Open the Steam application on your computer.
- In the top menu, click View > Game Servers.
- Go to the Favorites tab.
- Click the + (Add Server) button at the bottom right.
- Enter your server's IP address and port, then click OK.
- Launch Valheim: the server will now appear in your in-game favorites list.
Best Practices
- Back up regularly: Use the Backups tab on your panel to create frequent backups of your world. It is your only protection against data corruption.
- Manage updates: Whenever there is a major Valheim update, check that your server is up to date (via the panel) to avoid version mismatch errors between your client and the server.
- Proper Shutdown: Always stop the server from the panel before performing file edits or restarting. Avoid forced stops ("Kill") to protect your data.
- Security: Never share your connection passwords or administrator access with anyone you don't fully trust.
Troubleshooting
❌ The server does not show up in the "Community" search
- Ensure the server name is exactly as configured in the Startup tab.
- Verify that the server status is "Online" on your panel.
- If the server was just started, it may take a few minutes to be indexed by Steam. Use the IP or Steam Favorites method in the meantime.
❌ "Connection Failed" Error
- Double-check that the IP address and port are correct (ensure there is a colon
:between the IP and the port). - Make sure your game client is up to date.
Need Assistance?
If you encounter any issues despite these steps, our support team is ready to help.
Submit a support ticket through support Winheberg. Our team will review your server configuration to assist you! 🎮