Context
A server password gets shared, copied and always ends up circulating. When you want to keep a 7 Days to Die server to a specific group, friends, a closed community or a test server, the whitelist is a stronger control, since it relies on each player's identifier rather than a shared secret.
How it works holds one surprise. There is no option to tick to enable it, and no matching property in serverconfig.xml. The whitelist turns itself on as soon as it holds at least one entry, and turns itself off as soon as it is emptied.
This guide covers enabling it from the Winheberg game panel, managing entries, and the classic mistakes that lock everyone out.
Requirements
- An active 7 Days to Die server on the Winheberg game panel
- The players to authorise must have connected at least once, so you can read their identifier
- Access to the server's Console tab on panel.winheberg.com
From the very first entry added, nobody else can join the server. Add your regular players before considering the switch done, or you will find yourself alone online.
1. Understand how it activates
The serveradmin.xml file holds a <whitelist> section, empty by default. Its internal comment is unambiguous, as soon as an item appears in it, whitelist only mode is enabled, and nobody can join outside of the listed players and the admins.
| Section content | Server behaviour |
|---|---|
| No entry | Server open to everyone, whitelist inactive |
| At least one entry | Access reserved for listed players and admins |
Admins declared in the <users> section keep access even when they are not in the whitelist. That is your safety net if you lock yourself out, provided you declared your account as an admin beforehand.
2. Read the player identifiers
As with admin rights, the game identifies a player by a platform and identifier pair, the EOS ID for most PC players.
Ask each player to connect once to the server, then run the following command from the panel's Console tab.
listplayerids
The identifier appears in the output as crossid=EOS_0002a2eacfff46808543ffdab9380672. Only the part after the EOS_ prefix is to be kept.
For the detailed procedure, see our guide How to Become an Admin on a 7 Days to Die Server
3. Add players to the whitelist
Management goes through console commands, without a leading slash.
whitelist add <player>
While a player is connected, their name is enough.
whitelist add Maxime
Removal and listing follow the same pattern.
| Command | Effect |
|---|---|
whitelist add |
Adds a player to the whitelist |
whitelist remove |
Removes a player from the whitelist |
whitelist list |
Prints the list of allowed players |
Start by adding yourself, then check with whitelist list before adding the rest of the group. You confirm the command behaves as expected before the restriction applies to everyone.
4. Check the file content
The matching section of serveradmin.xml looks like this once filled in.
<adminTools>
  <whitelist>
    <user platform="EOS" userid="0002a2eacfff46808543ffdab9380672" name="Maxime" />
  </whitelist>
</adminTools>
The name attribute is optional and purely cosmetic. <group> entries allow a whole Steam group, identified by its group steamID.
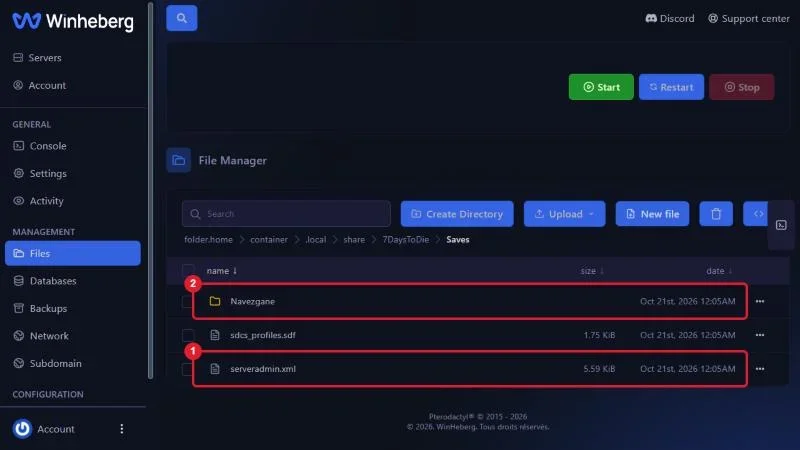
To locate the file, read the UserDataFolder line at the top of the server startup log, the file living in the Saves subfolder of that directory.
On Winheberg servers, that folder is .local/share/7DaysToDie/Saves, reachable from the Files tab with hidden folders shown.
5. Disable the whitelist
There is nothing to untick. Empty the section of all its entries and the server becomes open to everyone again at the next restart.
whitelist remove <player>
Repeat for each entry, then confirm with whitelist list that the list is empty.
Troubleshooting
❌ Nobody can join the server any more, including me
- Check that your account is declared as an admin in the
<users>section, admins bypass the whitelist - If you have no admin access, empty the
<whitelist>section from the panel's Files tab with the server stopped - Restart the server after the change, the file is read at startup
❌ An authorised player is still refused
- Compare their identifier with the
lpioutput, one wrong character breaks the match - Check that the
EOS_prefix was removed from the stored identifier - Confirm the entry sits in the
<whitelist>section and not elsewhere in the file
❌ The whitelist does not seem to apply
- Check the section really holds an active entry and not only the commented out examples shipped with the file
- Lines between XML comment markers are not taken into account
- Restart the server to force the file to be read again
Best practices
- Declare yourself as an admin before enabling the whitelist, it is the only way to keep access after a mistake
- Maintain a mapping between names and identifiers, names change over time
- Add players in small batches and check with
whitelist listafter each round - Warn your community before enabling it, a player refused without explanation assumes a server problem
- Keep a copy of
serveradmin.xmlbefore any manual edit, a single XML syntax error can stop it loading
Need help
If a correctly listed player is still refused, or if you lost access to your own server, open a ticket with our support team from your client area, Technical department, with the server in the Related Product field. Our team can work on the file with you.
Your server now welcomes only the players you chose. 🔒