Context
A Winheberg web hosting plan ships with a single Plesk login, the one belonging to the subscription owner. As soon as several people work on the same website, sharing that single login becomes uncomfortable. Everyone sees everything, and the password ends up travelling from inbox to inbox.
Plesk lets you create additional user accounts. Each account is given a role that decides what the person can do once logged in, such as managing files, administering databases, creating mailboxes or simply reading statistics. A freelance developer can upload files and nothing else, without ever touching the mailboxes or the other accounts. That is the right way to let them follow our guide How to Deploy a Node.js Application on Plesk without handing over the owner login.
This guide covers creating a user account in Plesk, picking the right role, and building a custom role when the predefined ones do not match how your team works.
The Winheberg Plesk panel is displayed in French. Menu, field and button names are quoted below exactly as they appear on screen, followed by their English meaning.
Prerequisites
- A Winheberg web hosting plan with access to the Plesk panel
- A Plesk account allowed to manage users and roles, which is the case for the subscription owner account
- A valid email address for the person you are granting access to
The account created here grants access to the Plesk panel. It is neither a mailbox, nor an additional FTP account, nor a database user, each of which is created from its own section.
1. Open the Users section
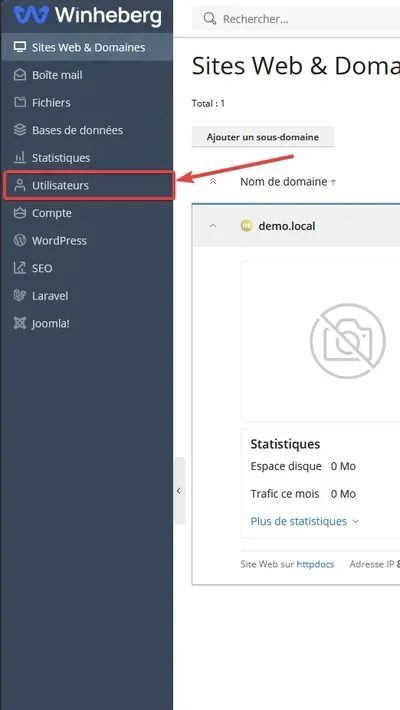
Log in to your Plesk panel, then open Utilisateurs (Users) in the side menu. You land on the Comptes utilisateur (User Accounts) tab, which lists the logins already in place on your subscription.
2. Fill in the general information
Click Créer un compte utilisateur (Create User Account). The first part of the form, Informations générales (General Information), identifies the person and sets their scope.
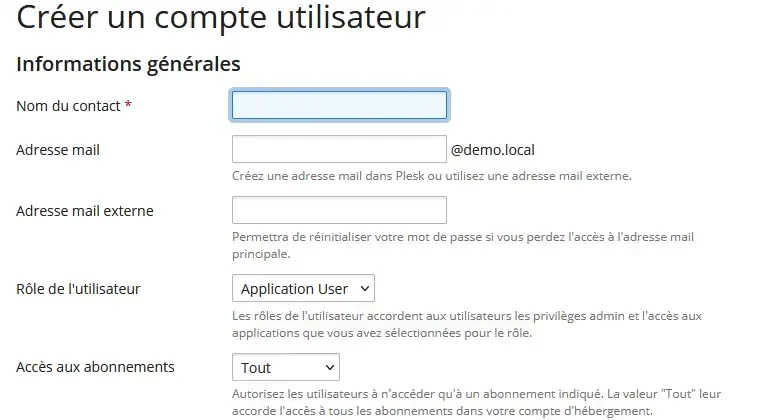
| Field on screen | What it expects |
|---|---|
| Nom du contact (Contact name) | The name displayed in the user list, mandatory |
| Adresse mail (Email address) | An address on one of your hosted domains, which Plesk can create, or an external one |
| Adresse mail externe (External email address) | The backup address used to reset the password |
| Rôle de l'utilisateur (User role) | The role that sets the permissions, covered in the next step |
| Accès aux abonnements (Access to subscriptions) | The subscription the person will manage, the Tout (All) value covers every one of them |
The external email address must stay reachable even when the hosting is down. An address hosted on the very domain the user administers does not serve that purpose during an outage.
3. Pick the right role
The role is what this page is really about, it decides what the person sees after logging in. Plesk ships with four ready made roles.
| Role on screen | Default scope |
|---|---|
| Propriétaire (Owner) | Every permission, including managing other users and roles. This role cannot be edited |
| WebMaster | Every permission except managing users and roles |
| Application User | No Plesk service permission, the role is meant for access to applications only |
| Comptable (Accountant) | No Plesk service permission, to be completed as needed |
The WebMaster, Application User and Comptable roles can be edited like a custom role. If none of them fits, jump to step 5 to build one, then come back and finish creating the account.
4. Set the credentials and activate the account
The second part of the form, Préférences de Plesk (Plesk Preferences), holds the login credentials. Contrary to a common assumption, it is the Nom d'utilisateur (Username) that is used to log in, not the email address.
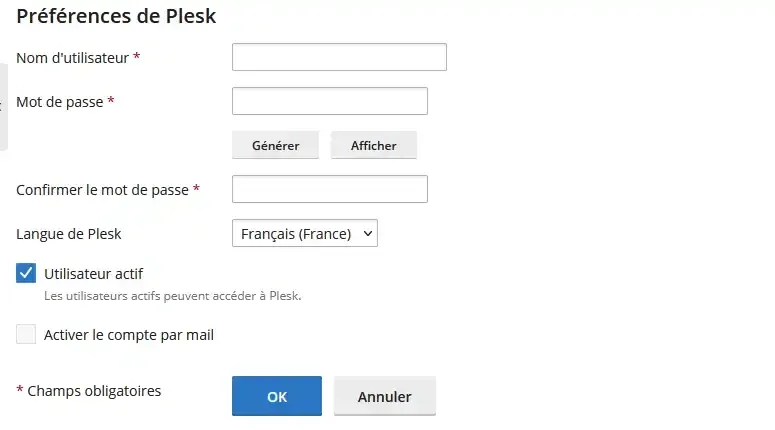
| Field on screen | What it expects |
|---|---|
| Nom d'utilisateur (Username) | The panel login name, mandatory |
| Mot de passe (Password) | The initial password, mandatory, with a Générer (Generate) button to produce a random one |
| Confirmer le mot de passe (Confirm password) | The same value, typed again |
| Langue de Plesk (Plesk language) | The panel display language for this person |
The Utilisateur actif (User is active) checkbox is ticked by default and makes the account usable right away. Clear it when you are preparing access ahead of time and want to open it later.
The Activer le compte par mail (Activate account by email) checkbox keeps the account inactive until the person confirms it from the message received on their external email address. The password still has to be set in the form, but you know the access is only used once the address has been validated.
Confirm with OK. The account shows up in the list and the person can log in at the usual panel address.
5. Create a custom role
The predefined roles cover common cases, not necessarily yours. From Utilisateurs, open the Rôle de l'utilisateur (User Roles) tab, then click Créer un rôle d'utilisateur (Create User Role).
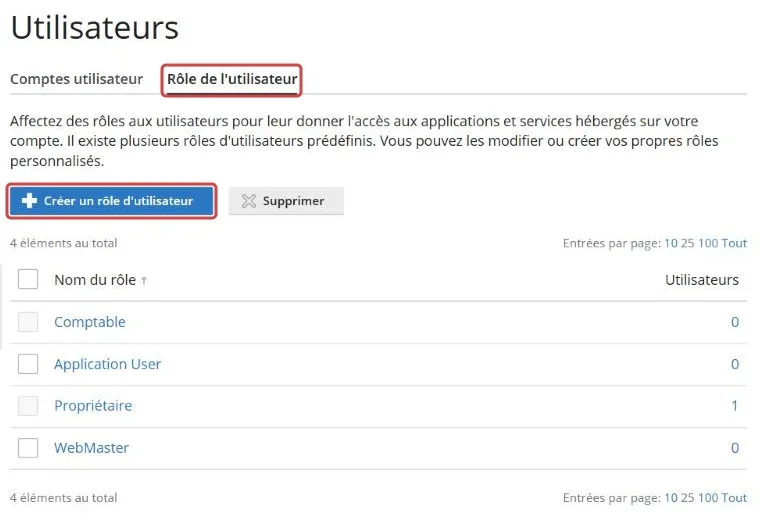
Give the role a self explanatory name in Nom du rôle de l'utilisateur (User role name). Every permission in the Accès aux services de Plesk (Access to Plesk services) section is set to Refusé (Denied) by default, switch to Accordé (Granted) only the ones the person needs.
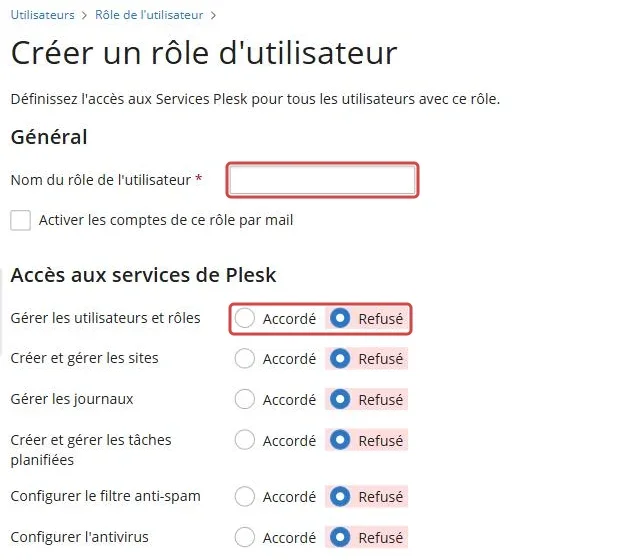
| Permission on screen | What it allows |
|---|---|
| Gérer les utilisateurs et rôles | Create and edit other user accounts and roles, keep it for trusted people |
| Créer et gérer les sites | Add domains and change hosting settings |
| Gérer les journaux | Set the website log rotation |
| Créer et gérer les tâches planifiées | Schedule automated tasks |
| Configurer le filtre anti-spam | Set the mail spam filter |
| Configurer l'antivirus | Set the mail antivirus |
| Créer et gérer les bases de données | Create databases and their users |
| Configurer et exécuter les fonctions de sauvegarde et restauration des données | Run a backup and restore data |
| Afficher les statistiques | Read consumption and traffic reports |
| Concevoir des sites dans Presence Builder | Use the Presence Builder site builder |
| Envoyer et gérer les fichiers | Use the panel file manager |
| Créer et gérer les comptes FTP supplémentaires | Open a dedicated FTP access for a contractor |
| Gérer les paramètres DNS | Edit the DNS zone of the subscription domains |
| Créer et gérer les comptes mail | Add and remove mailboxes on the domain |
| Créer et gérer les listes de diffusion | Manage the domain mailing lists |
The Gérer les utilisateurs et rôles (Manage users and roles) permission lets its holder widen their own rights by creating a more permissive role. Grant it sparingly.
A contractor in charge of connecting your domain name needs the Gérer les paramètres DNS (Manage DNS settings) permission, the full procedure is described in our guide How to Connect an External Domain to Your Plesk Hosting
Confirm with OK. The role then appears in the Rôle de l'utilisateur menu of the account creation form.
Troubleshooting
❌ The account creation button is missing
This action depends on subscription permissions, not only on your panel.
- Check that you are logged in with the subscription owner account
- If you are using a secondary account, its role must grant Gérer les utilisateurs et rôles
- Open Compte (Account), then your subscription, Droits (Permissions) tab, and check that Gestion des comptes utilisateur supplémentaires (Management of additional user accounts) reads Activé (Enabled)
- If in doubt, open a ticket with the Technical department and fill in the Related Product field
❌ The user never receives the activation email
The message is sent to the external email address, and the Activer le compte par mail box must have been ticked before confirming.
- Reopen the user page and check the spelling of the external email address
- Ask the person to check their spam folder, the message looks like an automated transactional email
- If that address belongs to the hosted domain and the domain is not live yet, the message cannot arrive, use a third party address instead
❌ Login is refused although the account exists
The expected identifier is not always the one people assume.
- The field to fill in is the Nom d'utilisateur, not the email address entered in the general information
- Check that the Utilisateur actif box is ticked on the person page
- If the password was generated automatically, make sure it was copied in full, with no space added on paste
❌ The user logs in but sees almost nothing
The account works, its role is too restrictive or its scope too narrow.
- Open the role from the Rôle de l'utilisateur tab and check which permissions are actually granted, the Comptable and Application User roles grant none by default
- Check the Accès aux abonnements field, a user limited to one subscription will not see the others
- Ask the person to log out and back in after their role has been changed
Best practices
- Create one account per person rather than one shared team account, revoking a single access then becomes possible without disturbing anyone else
- Start from the most restrictive role that works, adding a missing permission is easier than discovering an accidental deletion afterwards
- Use the Générer button rather than a hand picked password, it produces a value nobody will reuse elsewhere
- Name custom roles after the job rather than after the person, the role will outlive the contractor
- Review the user list whenever an assignment ends, a forgotten access is still an open access
Need help?
If an access stays blocked or the panel does not behave as described here, open a ticket with our support from your client area, Technical department, filling in the Related Product field with the web hosting concerned. Our team will check the permissions on the subscription side.
Access split the right way means a website you can share without wondering what the other person might break 🔒