Context
Winheberg web hosting runs on Plesk and supports Node.js applications, whether an API, a backend or a Next.js project. Deployment differs from a classic PHP website, because the application runs in its own process managed by Phusion Passenger, not as a set of files served directly by the web server.
As soon as your files are in place, Plesk reads your package.json, recognises the application type and offers an automatic configuration. It generates the startup file Passenger expects and shows you the list of changes before applying them.
This guide follows that automatic path, then details the manual configuration for cases where detection does not succeed.
The Winheberg Plesk panel is displayed in French. Menu, field and button names are quoted below exactly as they appear on screen, followed by their English meaning.
Prerequisites
- An active Winheberg web hosting plan
- Access to your Plesk interface
- Your application sources, with their
package.jsonfile - A domain or subdomain already attached to the hosting, for example by following our guide How to Connect an External Domain to Your Plesk Hosting
SSH access is not available on web hosting plans. Every operation described here is done from the Plesk interface, npm commands included.
1. Test the project locally
Before uploading anything, check that your application builds and starts on your machine.
npm install
npm run build
npm run start
If any of these commands fails locally, it will fail on the server too. Fix it before going further, troubleshooting is far easier on your own machine. If your project has no build step, only the first and last commands apply.
2. Upload the application files
Compress your sources into a .zip archive, without the node_modules and .next folders. They will be regenerated on the server, and uploading them causes platform incompatibilities on top of a needlessly long transfer.
Open Fichiers (Files) in the side menu, go into httpdocs, click + then Téléverser le fichier (Upload file). Once the archive is uploaded, select it and extract it in place from the Archive menu.
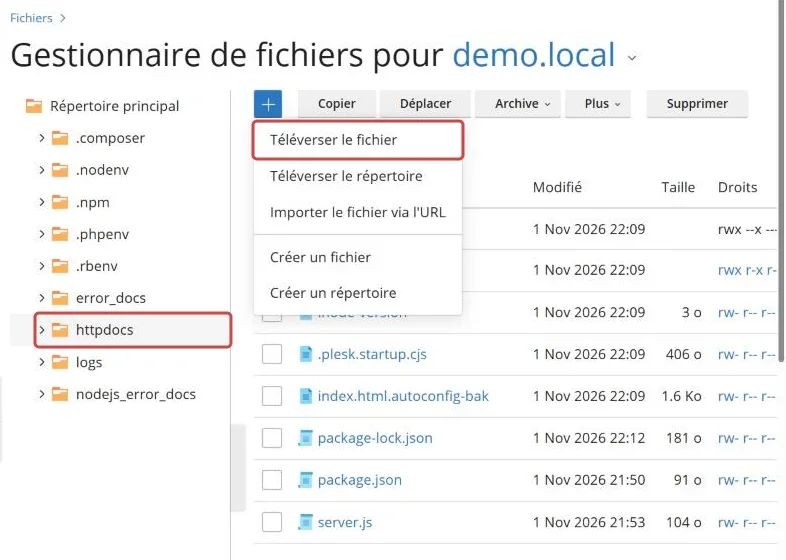
After extraction, check that the package.json file sits directly in httpdocs and not in an intermediate subfolder.
The order of these steps matters. Plesk only detects the application type and offers automatic configuration when package.json is already in place. On an empty domain, you will have to fill everything in by hand.
3. Run the automatic configuration
From Sites Web & Domaines (Websites & Domains), open your domain, the Démarrer (Get started) tab, then Node.js. Plesk displays the Type d'application (Application type) detected from package.json and the Configurer automatiquement (Configure automatically) button.
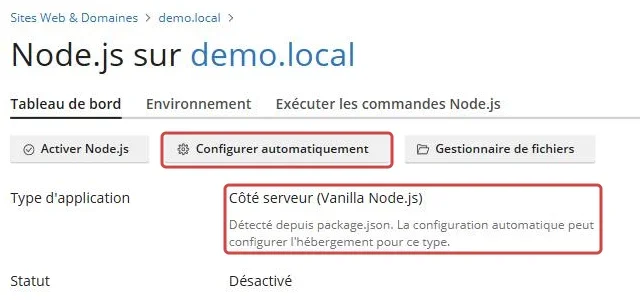
Click Configurer automatiquement. Plesk lists what it is about to change before applying anything, for instance the creation of the .plesk.startup.cjs startup file that loads your entry point, and setting aside a static index.html that would otherwise be served instead of your application.
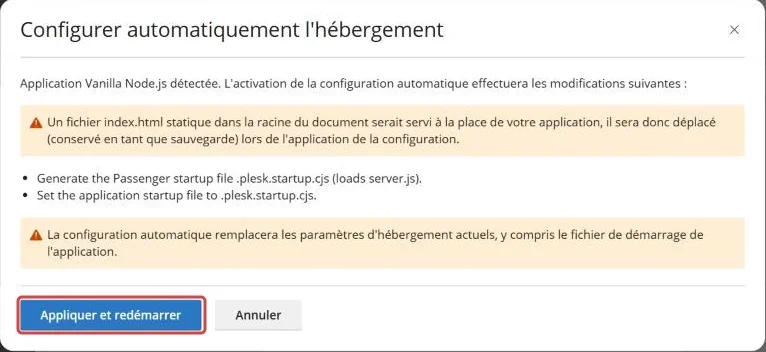
Review that list, then click Appliquer et redémarrer (Apply and restart). The original index.html file is kept as index.html.autoconfig-bak.
There is no need to change the port written in your code. Passenger intercepts your application's listen() call and binds it to its own channel, whatever port is set. The .plesk.startup.cjs file says so in a comment, do not edit or delete it.
4. Protect your source files
With the automatic configuration, the Racine du document (Document root) often stays the same as the Root d'application (Application root), namely /httpdocs. The web server then serves any file in that folder directly, including package.json and your application code, which anyone can download by knowing its name.
Plesk itself points this out on the dashboard as long as Node.js is not enabled, recommending a document root set to a subfolder of the application root, such as public/.
Create a public folder inside httpdocs from the file manager. On the Node.js dashboard, then click the folder icon next to Racine du document, select public under httpdocs in the tree, and click Enregistrer (Save). Only put in that folder the files meant to be served as they are, such as images or stylesheets.
Never hard code a password or an API key in your code. Use the Secrets of the Environnement (Environment) tab, covered in step 8.
5. Check the version and application mode
Once the configuration is applied, the dashboard shows the Redémarrer l'app (Restart app), Arrêter l'app (Stop app) and Désactiver Node.js (Disable Node.js) buttons. If the Activer Node.js (Enable Node.js) button is still there, click it.
Then click the pencil next to Version de Node.js (Node.js version), pick the version your project needs, and Enregistrer. While you are there, check that Mode d'application (Application mode) is set to production, this setting drives your application's NODE_ENV and PASSENGER_APP_ENV variables.
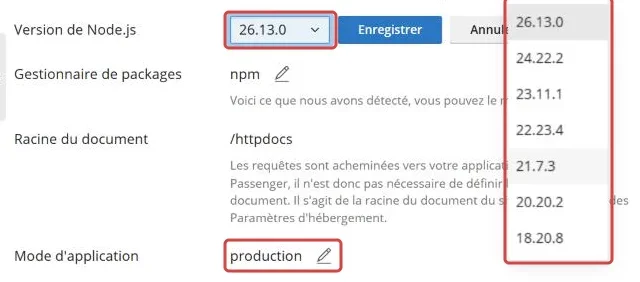
Which version to pick
The versions on offer are not equal. An LTS version receives security fixes for several years, whereas odd versions such as 23.x or 21.x never became LTS and are no longer maintained.
| Version | Status | End of support |
|---|---|---|
| 26.x | Active LTS since October 28, 2026 | April 30, 2029 |
| 24.x | Maintenance LTS since October 20, 2026 | April 30, 2028 |
| 23.x | No longer maintained | June 1, 2025 |
| 22.x | Maintenance LTS | April 30, 2027 |
| 21.x | No longer maintained | June 1, 2024 |
| 20.x | No longer maintained | April 30, 2026 |
| 18.x | No longer maintained | April 30, 2025 |
Go for 26.x on a new project, it is the active LTS branch. Keep 24.x if one of your dependencies is not compatible yet, it keeps receiving fixes until April 2028.
The 23.x, 21.x, 20.x and 18.x branches no longer receive security fixes. Avoid them for an application exposed to the Internet, even if your code runs on them.
A version that is too old also makes most recent frameworks fail to build, with a message that does not always name the culprit version. Next.js 16, for instance, requires at least Node.js 20.9.
6. Install the dependencies
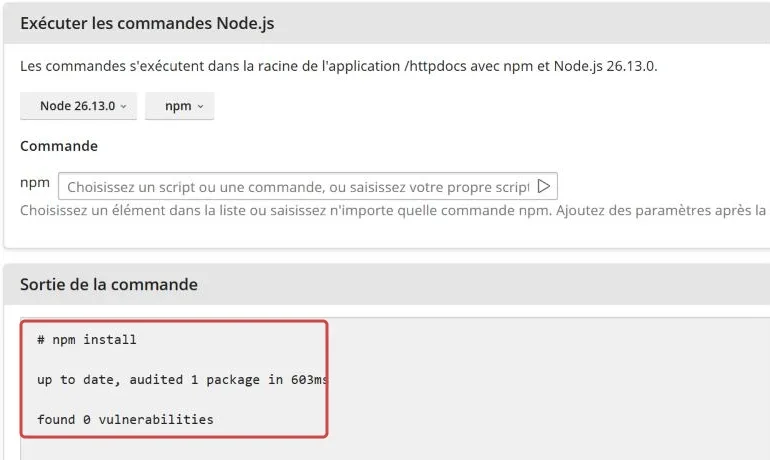
Click Installer NPM (NPM install), or open the Exécuter les commandes Node.js (Run Node.js commands) tab and pick install from the list. Plesk reads your package.json and rebuilds the node_modules folder on the server.
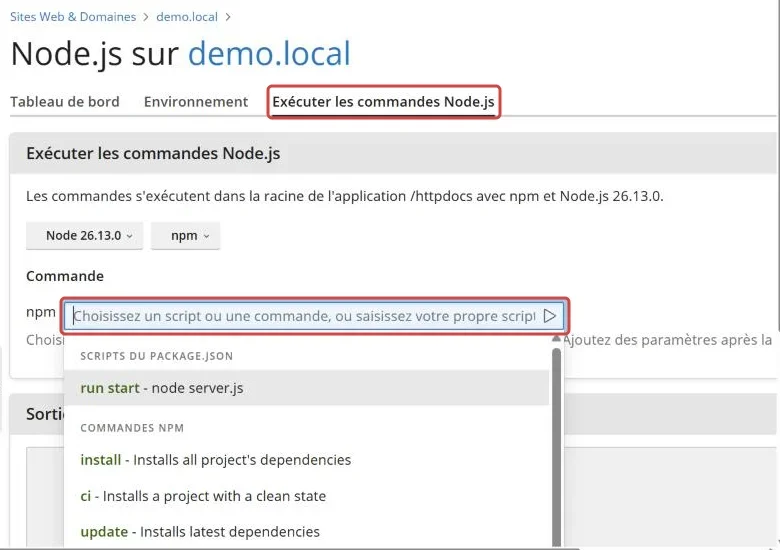
The Sortie de la commande (Command output) shows the result. Wait for the operation to finish before moving on, on a large project the installation takes several minutes.
Plesk also supports Yarn and pnpm. Click the pencil next to Gestionnaire de packages (Package manager) on the dashboard to pick npm, yarn or pnpm.
7. Run the build
Click Démarrer le script (Run script). Plesk opens the Exécuter les commandes Node.js tab, whose Scripts du package.json (package.json scripts) list shows your project scripts. Pick run build.
For a Next.js project, this step generates the .next folder, the one you deliberately did not upload. Building on the server rather than uploading a build made on your machine avoids architecture incompatibilities.
For Next.js, this step is mandatory. Starting the application without a build produces the error Could not find a production build in the '.next' directory.
8. Declare the environment variables
Open the Environnement tab. It separates two kinds of values passed to your application.
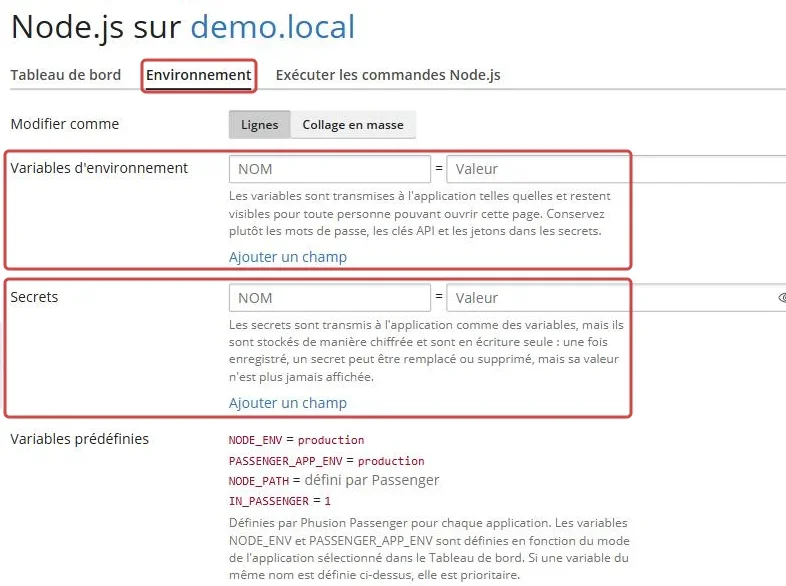
| Section on screen | Use |
|---|---|
| Variables d'environnement (Environment variables) | Non sensitive settings, visible to anyone who opens this page |
| Secrets | Passwords, API keys and tokens, stored encrypted and write only, their value is never displayed again once saved |
| Variables prédéfinies (Predefined variables) | NODE_ENV, PASSENGER_APP_ENV, NODE_PATH and IN_PASSENGER, set by Passenger, a variable with the same name declared above takes precedence |
Add your values with Ajouter un champ (Add field), click Enregistrer, then Redémarrer l'app from the dashboard so the application picks them up.
With Next.js, variables prefixed with NEXT_PUBLIC_ are embedded in the code at build time. Put them in a .env.production file at the application root before running step 7, and only keep there values you accept to make public.
9. Start the application
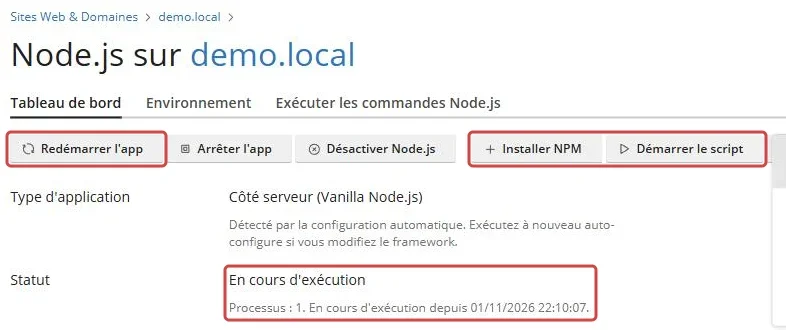
Click Redémarrer l'app, then open your domain in a browser. As long as nobody has visited it, the Statut (Status) reads Inactif (Idle), the application starts on the first request. It then switches to En cours d'exécution (Running), with the process count and the start time.
Manual configuration
If your package.json was not in place when you opened the Node.js page, or if detection did not recognise your project, fill in the fields yourself from the Node.js dashboard.
| Field on screen | Value | Role |
|---|---|---|
| Root d'application | /httpdocs |
The folder holding package.json |
| Racine du document | /httpdocs/public |
The folder of files served as they are, kept apart from your sources |
| Fichier de démarrage d'application (Application startup file) | The file Passenger runs, app.js by default |
Your application entry point |
Passenger starts a JavaScript file, it does not run npm start. When an application is usually launched through an npm command, open package.json and find the file passed to node, that is the one to declare. For an Express application or any hand written Node.js code, that file already exists, often app.js, server.js or index.js.
For Next.js, it does not exist. The next start command calls a framework binary, not a file from your project. Create a start.js file at your application root with the following content.
process.env.NODE_ENV = 'production';

const app = require('next/dist/cli/next-start');

app.nextStart({
  port: process.env.PORT || 3000,
});
Then declare start.js in Fichier de démarrage d'application and click Redémarrer l'app.
If your package.json contains "type": "module", the require statement above fails. Name your file start.cjs instead of start.js, the .cjs extension forces CommonJS interpretation, then declare that name in the startup file field.
Troubleshooting
❌ Could not find a production build in the '.next' directory
The build was not run, or it failed without you noticing.
- Run
run buildagain from Démarrer le script and read the Sortie de la commande to the end - Check that the
.nextfolder exists in the application root - Make sure Root d'application points to the folder holding
package.json
❌ require() of ES Module is not supported
Your project is declared as an ES module, which makes the require statement unusable in a .js startup file.
- Rename your startup file with the
.cjsextension - Report that new name in Fichier de démarrage d'application
- Restart the application with Redémarrer l'app
❌ The application process exited prematurely
The process failed to start.
- Check that the startup file really exists at the application root
- Make sure the dependencies were installed, the
installSortie de la commande must show no error - Look for a missing environment variable or secret in the Environnement tab
- Confirm that Mode d'application is set to
production
❌ Your source files show up in the browser
The Racine du document is the same as the Root d'application, so the web server serves your sources directly.
- Create a
publicfolder in the application root - Set
/httpdocs/publicas Racine du document from the Node.js dashboard - Restart the application, then open your website with
/package.jsonadded at the end of its address, the file must no longer show up
Best practices
- Upload your files before opening the Node.js page, that is what enables detection and automatic configuration
- Always validate
npm run buildlocally before uploading anything - Keep
node_modulesand.nextout of your uploads, they are regenerated on the server - Run the build again then Redémarrer l'app after every code update
- Stay on an LTS version of Node.js and switch branch before its end of support
- Store passwords and API keys in the Secrets, never in the code nor in a file served by the website
- If you change framework, run Configurer automatiquement again so Plesk regenerates the startup file
- Serve your application over HTTPS with the free certificate described in our guide How to Generate a Let's Encrypt SSL Certificate for Your Website
- To hand the deployment over to a developer without opening your whole account, give them a dedicated access with our guide How to Create a User in Plesk
Need help?
If your application still does not start after these checks, open a ticket with our support from your client area, Technical department, filling in the Related Product field with the hosting concerned.
Attach the full error message along with the build output. Our team can also read the Passenger log on the server side, which often holds the exact cause of a failed start.
Your application is live 🚀