Context
An SSL certificate encrypts the traffic between your website and its visitors. Without one, browsers display "Not secure" in front of the address, and contact or login forms travel over the network in clear text.
On your Winheberg web hosting, the Plesk panel issues free Let's Encrypt certificates, a certificate authority trusted by every browser. Plesk also takes care of their renewal, so you only do this once per domain.
This guide covers the certificate request, what it protects, the HTTPS redirect check, subdomains and the most common errors.
The Winheberg Plesk panel is displayed in French. Menu, field and button names are quoted below exactly as they appear on screen, followed by their English meaning.
Prerequisites
- A Winheberg web hosting plan with access to the Plesk panel
- A domain added in Plesk and already pointing to your hosting, see our guide How to Connect an External Domain to Your Plesk Hosting
- For a wildcard certificate, a domain that uses the Winheberg name servers
Let's Encrypt checks that the domain points to your hosting before issuing the certificate. A request sent during DNS propagation fails, so wait until your domain leads to your hosting before starting.
1. Open the domain certificates
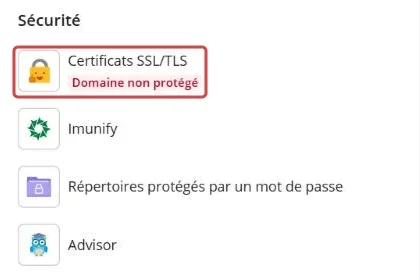
In Sites Web & Domaines (Websites & Domains), open your domain. In the Tableau de bord (Dashboard), Sécurité (Security) section, the Certificats SSL/TLS (SSL/TLS Certificates) entry shows Domaine non protégé (Domain not secured) as long as no certificate is installed. Click it.
2. Start the Let's Encrypt request
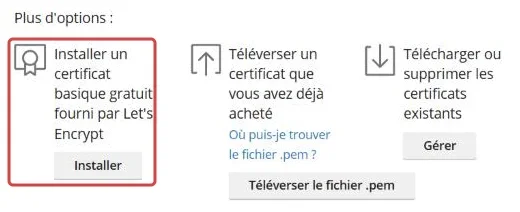
Scroll down to Plus d'options (More options), then click Installer (Install) under Installer un certificat basique gratuit fourni par Let's Encrypt (Install a free basic certificate provided by Let's Encrypt).
3. Choose what the certificate protects
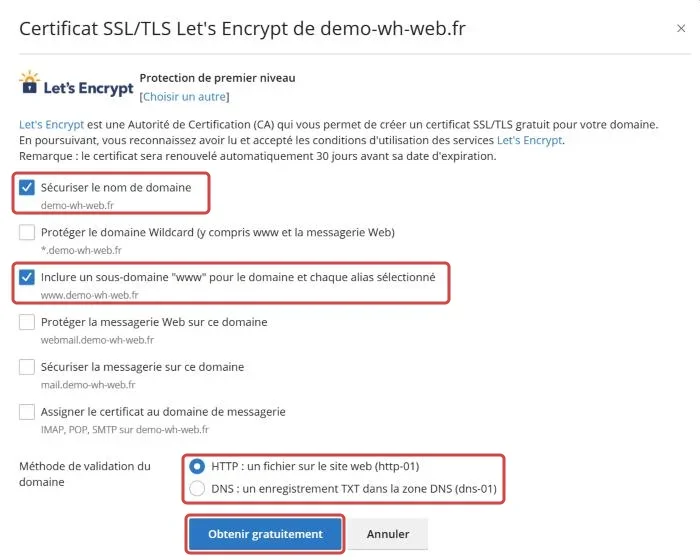
Plesk opens the Certificat SSL/TLS Let's Encrypt window of your domain. Tick at least Sécuriser le nom de domaine (Secure the domain name) and Inclure un sous-domaine "www" pour le domaine et chaque alias sélectionné (Include a "www" subdomain for the domain and each selected alias), so your website answers over HTTPS with and without www.
| Option | What it protects |
|---|---|
| Sécuriser le nom de domaine (Secure the domain name) | The domain itself, example.com |
| Protéger le domaine Wildcard (Secure the wildcard domain, including www and webmail) | Every direct subdomain, such as blog.example.com, see step 5 |
| Inclure un sous-domaine "www" (Include a "www" subdomain) | The www.example.com address and the www of each ticked alias |
| Protéger la messagerie Web sur ce domaine (Secure webmail on this domain) | The webmail, webmail.example.com |
| Sécuriser la messagerie sur ce domaine (Secure mail on this domain) | The mail.example.com address |
| Assigner le certificat au domaine de messagerie (Assign the certificate to the mail domain) | IMAP, POP and SMTP connections of your mail clients on this domain |
In Méthode de validation du domaine (Domain validation method), keep HTTP, a file on the website (http-01). Let's Encrypt then checks a temporary file that Plesk places on your website by itself. Then click Obtenir gratuitement (Get it free). Once the certificate is issued, Plesk installs it and assigns it to your domain.
As the window states, the certificate is renewed automatically 30 days before its expiry date. There is nothing more to do as long as the domain points to your hosting.
4. Check the HTTPS redirect
Open the Hébergement et DNS (Hosting & DNS) tab of the domain, then the Hébergement (Hosting) entry, which shows the Paramètres d'hébergement (Hosting Settings). In the Prise en charge SSL/TLS (SSL/TLS support) section, the Certificat (Certificate) field should now show your Let's Encrypt certificate instead of Non sélectionné (Not selected).
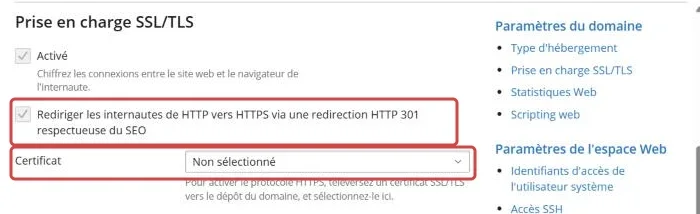
The Rediriger les internautes de HTTP vers HTTPS via une redirection HTTP 301 respectueuse du SEO (Permanent SEO-safe 301 redirect from HTTP to HTTPS) box is ticked and greyed out, it is enforced on our plans. All your visitors therefore switch to HTTPS without any setting on your side.
Finally, open your website with https:// in a browser, the padlock should appear in front of the address.
5. Protect your subdomains
Each subdomain added in Plesk has its own dashboard, with its own Certificats SSL/TLS entry. For one or two subdomains, simply repeat steps 1 to 3 from each of them.
To cover every subdomain at once, tick Protéger le domaine Wildcard in the Let's Encrypt window of the main domain. Let's Encrypt then only accepts DNS validation, a TXT record in the DNS zone (dns-01), which Plesk creates by itself when the zone is served by the Winheberg name servers.
If your domain uses another provider's name servers, Plesk cannot publish the validation record and the wildcard certificate cannot be issued. Protect each subdomain separately with HTTP validation instead.
Troubleshooting
❌ The request fails with a validation error
Let's Encrypt could not reach your website at the requested address.
- Check that the domain leads to your hosting with
dig +short A example.com @8.8.8.8, the address must be the Adresse IP (IP address) shown at the bottom of your domain page in Plesk - Run the same check for
www.example.comif you ticked the www option - If an AAAA record exists for the domain, it must point to your hosting too, Let's Encrypt contacts the IPv6 address first
- If your domain goes through an external proxy, turn it off for the time of the request
❌ The browser still shows "Not secure"
The certificate is installed, but the page does not meet the browser conditions.
- Check that the certificate covers the visited address, a
wwwaddress is only protected if the www option was ticked - Look for resources loaded over
http://in your pages, images, scripts or stylesheets, they are enough to lose the padlock - Reload the page without cache with Ctrl+F5, or test from a private browsing window
❌ Let's Encrypt rejects new requests
Let's Encrypt limits the number of requests accepted for the same domain over a given period, failures included.
- Do not send the request over and over, first fix the cause of the failure with the first case above
- Wait a few hours before a new attempt if the rejection persists
Best practices
- Always tick the www option, some of your visitors will type the address with it
- Protect the webmail too if you read your mail from the browser
- Keep the domain pointing to your hosting, each renewal goes through the same check
- Keep the wildcard for domains with many subdomains, one certificate per subdomain stays easier to follow
- Once the padlock shows, install your website with our guides How to Host a WordPress Website on Plesk and How to Host a Laravel Website on Plesk
Need help?
If the certificate will not issue although your domain points to your hosting, open a ticket with our support from your client area, Technical department, filling in the Related Product field with the web hosting concerned. Mention the domain and the error message shown by Plesk.
Your website shows its padlock, free of charge and with no renewal to watch 🔒