Context
Laravel is a widely used PHP framework for building websites and web applications, from an API to a full back office. It relies on Composer for its dependencies, on Artisan for its commands and on an .env file for its configuration.
Your Winheberg web hosting includes Laravel Toolkit, a Plesk extension dedicated to this framework. It installs a new project or fetches yours from a Git repository, installs the Composer dependencies and sets the website root to the public folder, so the source code and the .env file stay out of reach from the web.
This guide covers the installation, the switch to production, the database, scheduled tasks and the deployment of updates.
The Winheberg Plesk panel is displayed in French. Menu, field and button names are quoted below exactly as they appear on screen, followed by their English meaning.
Prerequisites
- A Winheberg web hosting plan with access to the Plesk panel
- A domain or subdomain added in Plesk, see our guide How to Connect an External Domain to Your Plesk Hosting
- For an existing project, its Git repository on GitHub, GitLab, Bitbucket or your own server
Laravel Toolkit moves the website root to the application public folder. Dedicate a domain or subdomain to your Laravel application, for instance app.example.com, rather than installing over an existing website.
1. Open Laravel Toolkit
In Sites Web & Domaines (Websites & Domains), open your domain, then the Démarrer (Get Started) tab. Click Laravel.
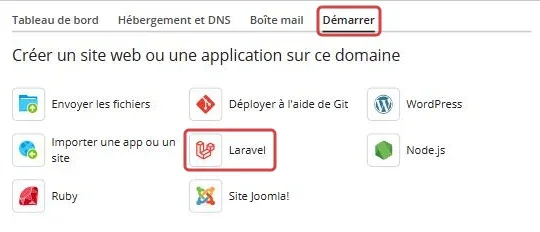
You also reach Laravel Toolkit through the Laravel entry of the side menu. As long as no application exists, the page offers Installer l'application (Install Application) and Analyser (Scan), the latter finding a Laravel application already present on your domains. Click Installer l'application.
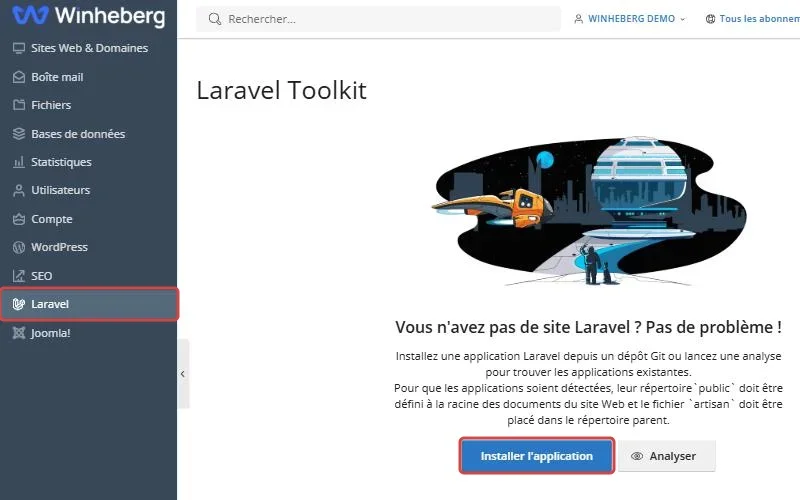
2. Choose the application source
In the Installer l'application window, pick your domain in Choisissez un domaine (Choose a domain), then pick one of the two sources offered.
Start a new project
Installer le squelette (Install skeleton) creates a blank Laravel application, along with a local Git repository hosted by Plesk. It is the right choice to start a project or try the framework.
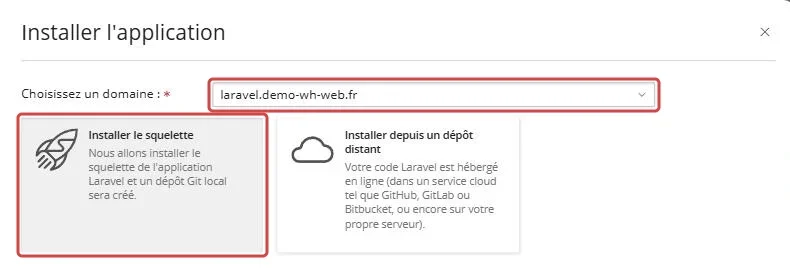
Deploy an existing project
Installer depuis un dépôt distant (Install from a remote repository) fetches your code from a Git service. Enter the repository address in the Dépôt (Repository) field.
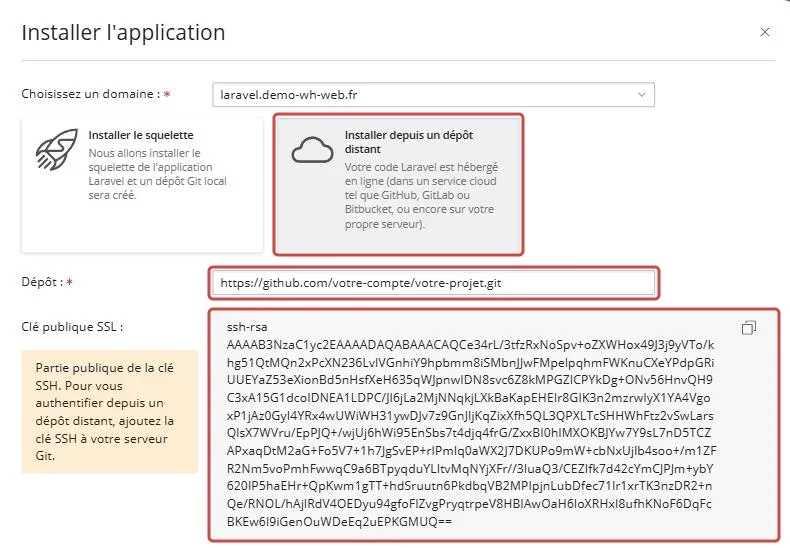
For a public repository, its HTTPS address is enough. For a private repository, enter its SSH address, such as git@github.com:your-account/your-project.git, then add the key shown in Clé publique SSL (SSH public key) to the repository deploy keys. On GitHub, they sit in the repository Settings, Deploy keys section, and on GitLab in Settings, Repository, Deploy keys.
A deploy key grants access to a single repository, read-only by default. It is safer than adding the key to your account, which would open all your repositories.
3. Follow the installation
Confirm the window. Laravel Toolkit shows the progress in Déploiement du projet (Project deployment), from the Git repository creation to the Composer dependencies, then the hosting and PHP configuration. Allow a few minutes.
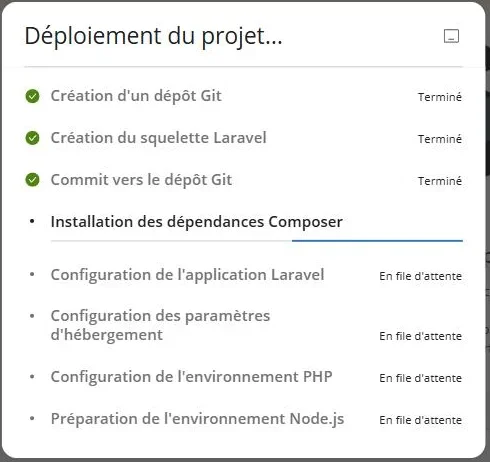
The skeleton installs Laravel 13, which requires PHP 8.3 or later. For an existing project, check that the domain PHP version, shown in Paramètres PHP (PHP Settings), matches the one your composer.json file requires.
4. Discover the dashboard
Once the installation is done, Laravel Toolkit opens the Application Laravel page of your domain. The Tableau de bord (Dashboard) shows the website URL, the Dépôt (Repository) address and the Dernier commit (Latest commit). The Artisan, Composer, Node.js, Déploiement (Deployment) and File d'attente (Queue) tabs group the application tools.
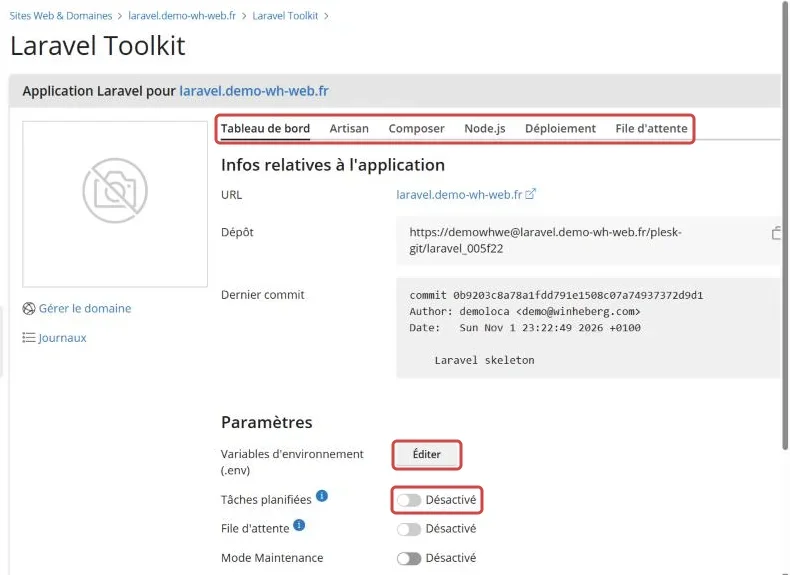
For a skeleton installation, the Dépôt field shows the address of the local Git repository created by Plesk, where you can push your code. The Journaux (Logs) link on the left displays the application logs.
5. Switch the application to production
The skeleton starts in development mode. Open the Artisan tab, type about in the php artisan field and confirm. The command shows the Environment as local, the Debug Mode as ENABLED and a localhost URL.
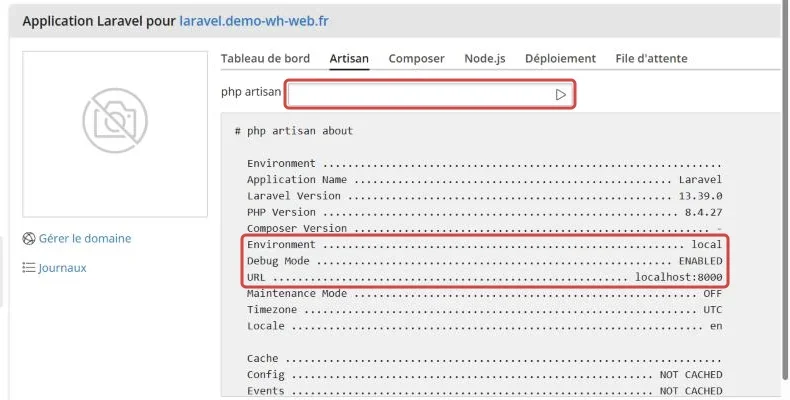
In debug mode, any error shows visitors a detailed page that may reveal your code, your paths and your settings. Turn it off before opening the website to the public.
Go back to the Tableau de bord and click Éditer (Edit) next to Variables d'environnement (.env) (Environment variables). The Modifier .env (Edit .env) editor opens.
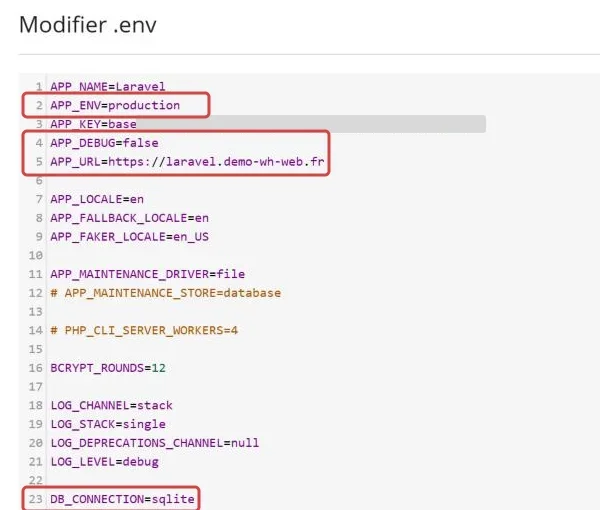
| Variable | Value |
|---|---|
APP_ENV |
production |
APP_DEBUG |
false |
APP_URL |
Your website address, for instance https://app.example.com |
Save, then run about again in the Artisan tab to check that the Environment shows production and the Debug Mode shows OFF.
6. Connect a database
The skeleton uses SQLite, a database stored in a single project file, with DB_CONNECTION=sqlite. It is enough for a small website. For MySQL or MariaDB, first create a database in Bases de données (Databases), Ajouter une base de données (Add Database), noting its full name, its user and its password.
In Modifier .env, replace the DB_CONNECTION=sqlite line with the block below. If the DB_HOST to DB_PASSWORD lines are already there as comments, starting with a #, replace them too so they are not duplicated.
DB_CONNECTION=mysql
DB_HOST=localhost
DB_PORT=3306
DB_DATABASE=full_database_name
DB_USERNAME=database_user
DB_PASSWORD=database_password
Then create the tables from the Artisan tab with the following command. The --force option is required in production, otherwise Laravel refuses to run migrations without confirmation.
migrate --force
7. Schedule Laravel tasks
If your application uses the Laravel scheduler, defined in routes/console.php, it must be called every minute. The Tâches planifiées (Scheduled tasks) and File d'attente (Queue) switches of the dashboard require SSH access to the hosting. When it is forbidden, as the Accès SSH (SSH access) line of the Paramètres d'hébergement (Hosting Settings) shows, they stay greyed out. Create the task directly in Plesk instead, it works without SSH.
From the domain Tableau de bord, Outils Dévelop. (Dev Tools) section, open Tâches planifiées (Scheduled Tasks), then click Ajouter une tâche (Add Task).
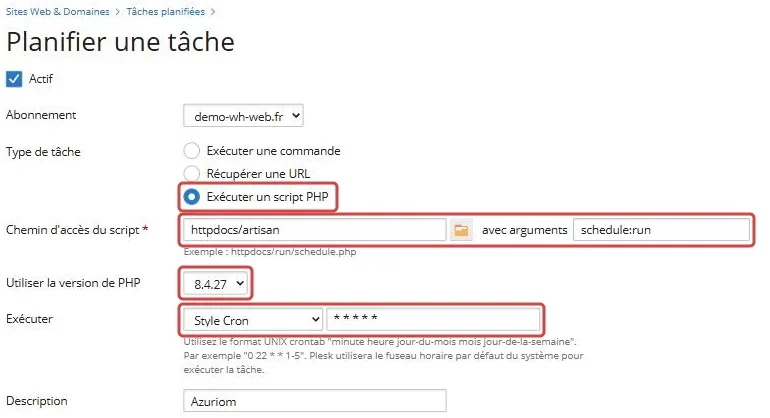
| Field on screen | Value |
|---|---|
| Type de tâche (Task type) | Exécuter un script PHP (Run a PHP script) |
| Chemin d'accès du script (Script path) | The application folder followed by /artisan, for instance app.example.com/artisan |
| avec arguments (with arguments) | schedule:run |
| Utiliser la version de PHP (Use PHP version) | The same version as the website |
| Exécuter (Run) | Style Cron (Cron style), with * * * * * |
The application folder is the one in Racine du document (Document root), without the trailing /public. You find it in the Hébergement et DNS (Hosting & DNS) tab, Hébergement (Hosting) entry.
If your application pushes jobs to a queue, add a second identical task with the queue:work --stop-when-empty argument. It processes pending jobs every minute, then stops.
8. Deploy your updates
The Déploiement (Deployment) tab sets how new code reaches production. In Manuel (Manual) mode, nothing changes on the website until you click Déployer (Deploy). In Automatique (Automatic) mode, deployment starts by itself on each new push to the local repository, or when the webhook is called for a remote repository.
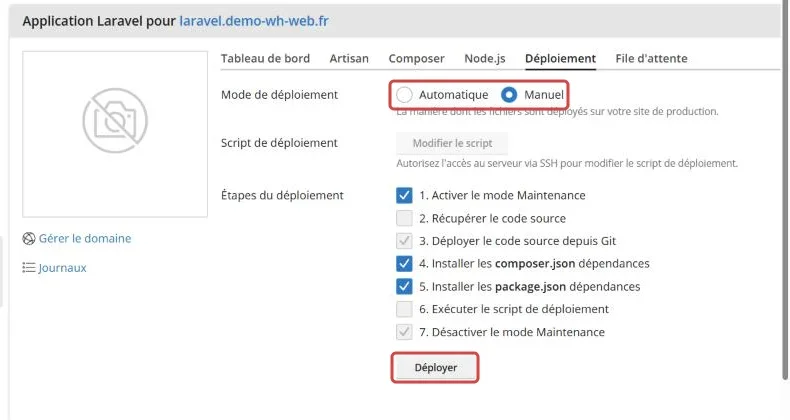
The Étapes du déploiement (Deployment steps) run in the order shown. Greyed out steps are mandatory, the others are ticked according to your project, for instance Installer les package.json dépendances (Install package.json dependencies) if your website builds its assets with npm. Editing the Script de déploiement (Deployment script) also requires SSH access.
After a deployment that adds migrations, run migrate --force from the Artisan tab.
9. Open your website
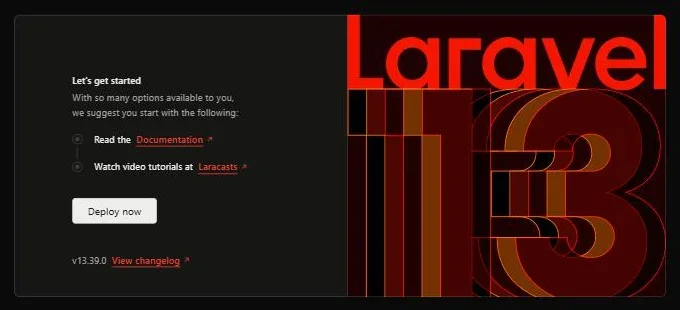
Open your domain in a browser. For a skeleton, the Laravel welcome page is displayed.
To serve the application over HTTPS, install the free certificate with our guide How to Generate a Let's Encrypt SSL Certificate for Your Website
Troubleshooting
❌ The website shows a 500 error without details
This is the normal behaviour in production, the error details go to the logs.
- Open the Journaux (Logs) link of Laravel Toolkit, or the
storage/logs/laravel.logfile in the file manager - If the message says
No application encryption key has been specified., runkey:generate --forcefrom the Artisan tab - If the error comes from the database, check the
DB_lines of the.envfile
❌ A change to .env is not applied
The configuration has been cached, Laravel no longer reads the .env file.
- Run
config:clearfrom the Artisan tab - If you use
optimizeduring your deployments, run it again after each.envchange
❌ The remote repository refuses the connection
Laravel Toolkit cannot authenticate with your Git service.
- For a private repository, check that you entered the SSH address,
git@..., and not the HTTPS one - Check that the key shown in Clé publique SSL is listed in the repository deploy keys
- Copy the whole key, from the leading
ssh-rsato the last character
❌ Migrations fail
Laravel cannot connect to the database or refuses to run the command.
- Add the
--forceoption, without it migrations do not run in production - An
Access deniedmessage points to a wrong user name or password in.env - Check that
DB_DATABASEholds the full database name, prefix included
Best practices
- Keep
APP_DEBUG=falseon the public website, and test your changes on a staging subdomain - Never commit the
.envfile, the.gitignoreshipped with Laravel already excludes it - Stay in Manuel deployment mode as long as you have no automated tests
- Keep the Activer le mode Maintenance (Enable maintenance mode) step ticked, your visitors see a waiting page rather than a half-updated website
- Export your database before any significant migration
- To give a developer access without sharing your account, follow our guide How to Create a User in Plesk
Need help?
If the installation fails or your application will not start on your hosting, open a ticket with our support from your client area, Technical department, filling in the Related Product field with the web hosting concerned. For questions about the framework itself, see the official Laravel documentation.
Your Laravel application runs in production, ready to welcome its first users 🚀