Context
You bought your domain name from an external registrar and your Winheberg web hosting from us. As long as the two do not talk to each other, typing your domain in a browser will not show your website, but your registrar's parking page or a resolution error.
Connecting them takes two moves. The domain must first exist in your Plesk panel, so the server knows which website to serve. Then, at your registrar, the DNS delegation must point to the Winheberg name servers, so the rest of the Internet knows who to ask for your website address.
This guide covers both steps, how to verify the delegation, the SSL certificate and the classic pitfalls, including losing email when the DNS zone is rebuilt too quickly. If you do not own a domain yet, you can also register it with us from our domain name page.
The Winheberg Plesk panel is displayed in French. Menu and button names are quoted below exactly as they appear on screen, followed by their English meaning.
Prerequisites
- A Winheberg web hosting plan with access to the Plesk panel
- A domain name already registered with an external registrar
- Access to that registrar's management interface, with the right to change the name servers
- A list of your current DNS records if the domain is already live, mail records in particular
Changing the name servers moves the whole DNS zone to Winheberg, not just the website. If your email is hosted elsewhere, its MX records must be recreated in Plesk before the switch, otherwise mail will stop arriving.
1. Add the domain in Plesk
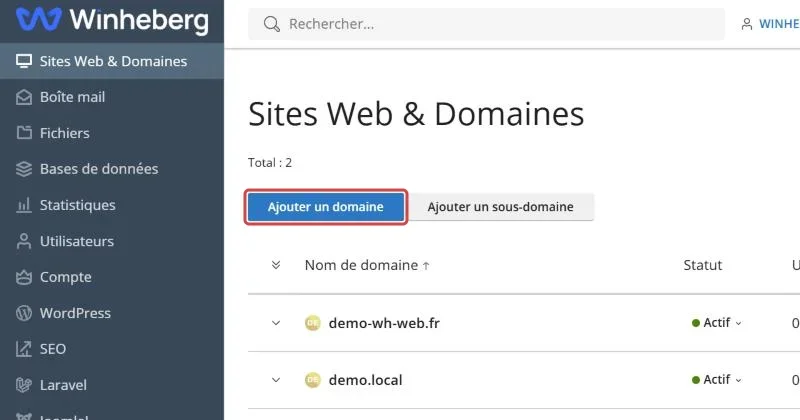
Log in to your Plesk panel, open Sites Web & Domaines (Websites & Domains) in the side menu, then click Ajouter un domaine (Add Domain).
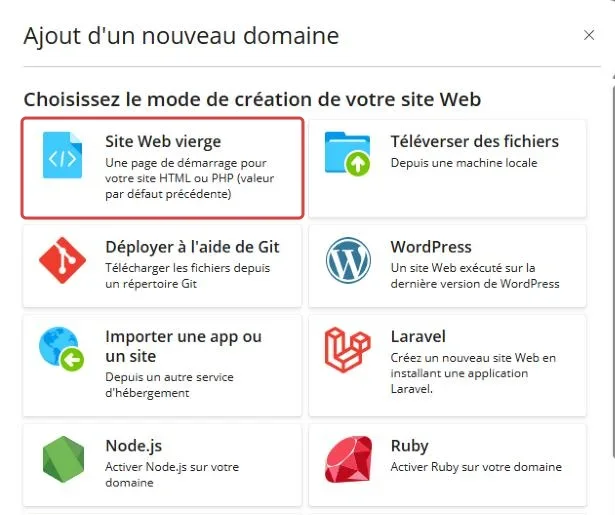
Plesk first asks how the website should be created. Pick Site Web vierge (Blank website), which prepares an empty space ready for your files.
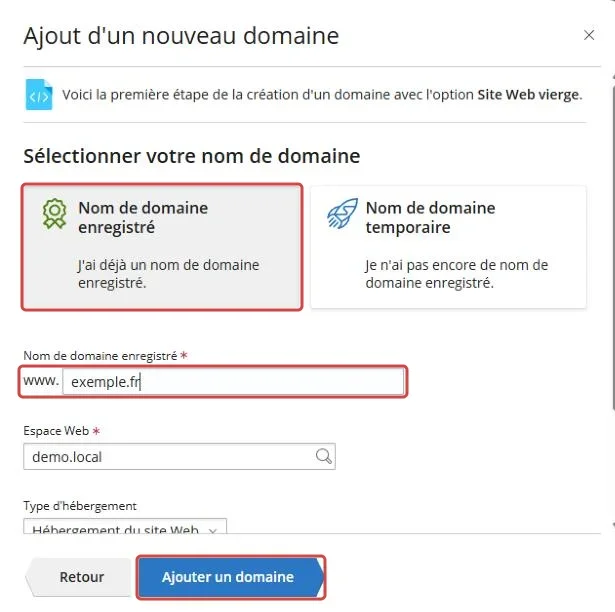
Then select Nom de domaine enregistré (Registered domain name) and type your domain in the field of the same name, without the www. prefix. If your account holds several subscriptions, the Espace Web (Webspace) field tells which one will host the domain.
Keep Activer un service DNS (Enable DNS service) ticked, it creates the zone the Winheberg name servers will serve. Clear Activer un service de messagerie (Enable mail service) if your email stays hosted elsewhere, the server will then not try to deliver it locally. Confirm with Ajouter un domaine.
Plesk creates the document root and a DNS zone for that domain. At this point the website exists on the server, but nobody on the Internet is sent to it yet.
Each plan includes a number of domains. You will find it under Compte (Account), by opening your subscription, Ressources (Resources) tab, on the Domaines (Domains) line. If the limit is reached, our team can point you to the right plan through a ticket with the Sales department.
2. Prepare the DNS zone before switching
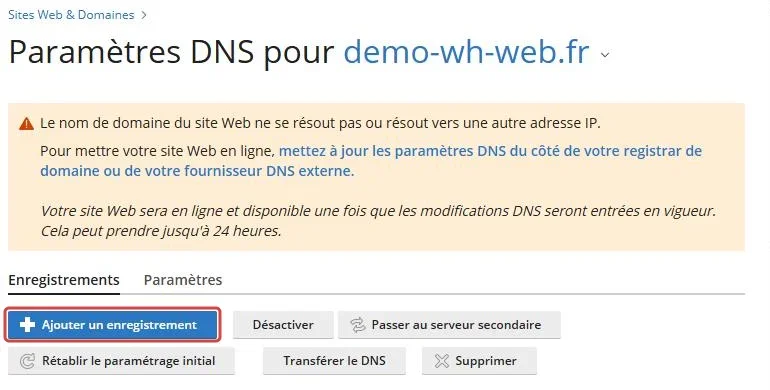
Open your domain from Sites Web & Domaines, then the Hébergement et DNS (Hosting & DNS) tab and the DNS entry. As long as the delegation is not done, Plesk shows Impossible de résoudre le domaine (Unable to resolve the domain) there, which is expected at this stage.
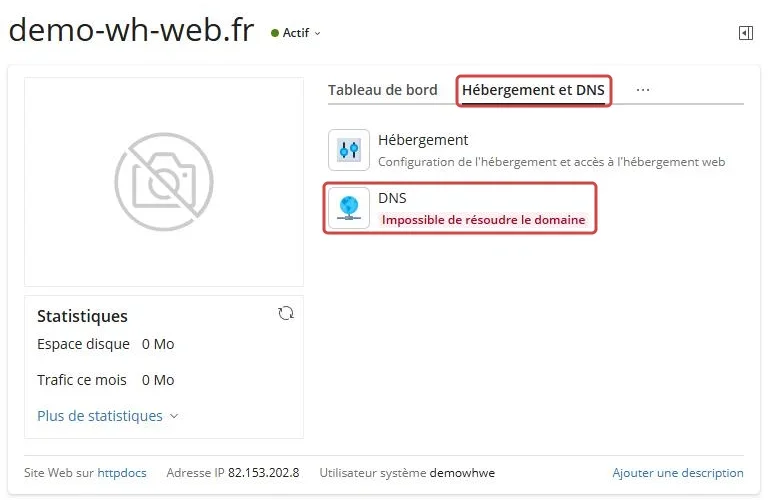
The Paramètres DNS (DNS Settings) page displays the zone Plesk has just generated, with records pointing to your hosting IP address. This is the moment to compare it with the zone currently live at your registrar, and to recreate with Ajouter un enregistrement (Add Record) everything that has to survive the switch.
| Type | What it carries |
|---|---|
| MX | Where your mail is delivered, to be copied if your email is hosted elsewhere |
| TXT | Your SPF, DKIM and DMARC records, along with third party service validations |
| CNAME | Subdomains delegated to an external service, such as a newsletter platform or a support tool |
| A and AAAA | Subdomains pointing to servers other than your Winheberg hosting |
Before touching anything, record your current zone type by type from a Linux or macOS terminal. Repeat the last command for every subdomain you use.
dig +short MX example.com @8.8.8.8
dig +short TXT example.com @8.8.8.8
dig +short CNAME www.example.com @8.8.8.8
3. Set the Winheberg name servers at your registrar
Log in to your registrar interface and open the name server management of your domain, often labelled DNS servers or nameservers. Replace the existing name servers with the three Winheberg ones.
| Rank | Name server |
|---|---|
| Primary | ns1.winheberg.net |
| Secondary | ns2.winheberg.net |
| Tertiary | ns3.winheberg.net |
Save, then let the change propagate. Your registrar passes the new delegation to the domain registry, which publishes it in turn.
If DNSSEC is enabled on your domain at your current registrar, disable it before changing the name servers. A signature that no longer matches the served zone makes the domain completely unreachable, including for visitors whose provider validates DNSSEC.
4. Verify the delegation
Plesk announces the website will be live within 24 hours. Depending on the lifetime announced by the old zone, some resolvers may however keep the old delegation for up to 48 hours. To know where you stand, query a public resolver directly.
dig +short NS example.com @8.8.8.8
The expected answer lists the three Winheberg servers. On Windows, the same check is done with the command below.
nslookup -type=ns example.com 8.8.8.8
Once the name servers are confirmed, check that the domain resolves to your hosting.
dig +short A example.com @8.8.8.8
The returned address must match the Adresse IP (IP address) shown at the bottom of your domain page in Plesk, in the 82.153.202.X range.
While propagation is under way, some visitors reach the old hosting and others the new one, which is expected. Avoid editing the website during that window, your changes could seem to vanish depending on the machine you look from.
5. Issue the SSL certificate
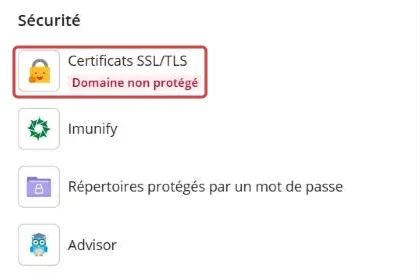
Once the domain resolves to your hosting, open the domain Tableau de bord (Dashboard). In the Sécurité (Security) section, the Certificats SSL/TLS (SSL/TLS Certificates) entry reads Domaine non protégé (Domain not secured) as long as no certificate is installed.
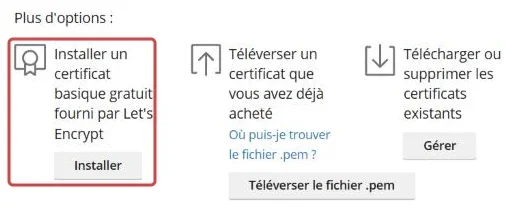
Open it, scroll down to Plus d'options (More options) and click Installer (Install) under Installer un certificat basique gratuit fourni par Let's Encrypt (Install a free basic certificate provided by Let's Encrypt).
Issuance checks that the domain really points to the server, so it will fail until the delegation is effective. Wait for step 4 to return the right address before starting.
The window that opens next and its options, such as www, mail or the wildcard certificate, are detailed in our guide How to Generate a Let's Encrypt SSL Certificate for Your Website
Once the certificate is in place, your domain is ready to host your website. To install it, follow the guide that fits your project, How to Host a WordPress Website on Plesk, How to Host a Laravel Website on Plesk or How to Deploy a Node.js Application on Plesk
Troubleshooting
❌ The domain still serves the old website
Resolution is cached at several levels, starting with yours.
- Compare the output of
dig +short NS example.com @8.8.8.8with the three Winheberg servers, as long as they do not show up the switch has not happened - Flush your machine DNS cache, the command is
ipconfig /flushdnson Windows - Test from a mobile connection through tethering, it uses different resolvers than your home router
- If the old zone announced a long record lifetime, only patience solves it
❌ The registrar rejects the name servers
Some registrars validate the declared servers before accepting them.
- Check the exact spelling, the servers live under
winheberg.netand not under your own domain - Enter the servers without a trailing dot if your registrar refuses one, and with a trailing dot if it requires one, both notations exist across interfaces
- Do not enter an IP address in the form, these servers are not internal to your domain and need no glue record
- If the registrar requires at least two servers, the three entries satisfy it
❌ Mail stops arriving after the switch
The served DNS zone is now the Plesk one, and it only contains what you put in it.
- Open the domain Paramètres DNS and check that your MX records are present
- Recreate the TXT records holding your SPF, DKIM and DMARC, an external mail provider needs them to keep sending
- If your email is hosted elsewhere, disable the mail service for that domain in Plesk so the server does not try to deliver mail locally
- Check the result with
dig +short MX example.com @8.8.8.8
❌ The Let's Encrypt certificate fails to issue
Let's Encrypt checks that the domain really points to your hosting before delivering the certificate.
- Check with
dig +short A example.com @8.8.8.8that the returned address is your hosting one - Wait for propagation to finish, a request started too early fails and has to be run again
- If your domain goes through an external proxy, disable it while the certificate is issued, then enable it again
Best practices
- Prepare the zone in Plesk before changing the name servers, the switch then becomes a few minutes formality
- Lower the record lifetime of the old zone a few days before the migration, propagation will be faster on the day
- Schedule the switch outside your busiest hours, a website answering from two places for a few hours is less noticeable at night
- Keep a copy of your old DNS zone for at least a month, it is the reference when a third party service stops working
- Check your subdomains one by one after the switch, those are the ones most often forgotten
- If a contractor handles the switch, give them an access limited to DNS management rather than sharing the owner account, with our guide How to Create a User in Plesk
Need help?
If the delegation does not propagate or your domain still does not reach your hosting after 48 hours, open a ticket with our support from your client area, Technical department, filling in the Related Product field with the web hosting concerned. Mention the domain name and the registrar holding it, our team will check the served zone on their side.
A properly delegated domain is the last step before never thinking about it again 🌐