Context
Azuriom is a free and open source game CMS, designed to build your server website and to grow with themes and plugins, such as a shop. It supports many games, including Minecraft, Minecraft Bedrock, Hytale, Garry's Mod, Rust or FiveM. If you do not have a server yet, have a look at our Minecraft and Hytale offers.
Written in PHP, it installs on your Winheberg web hosting without any SSH access. An official installer checks the requirements, downloads Azuriom, configures the database and creates your administrator account.
This guide covers the whole installation from Plesk, from the PHP setting to the scheduled task that runs the shop automatic features.
The Winheberg Plesk panel is displayed in French, and so is the Azuriom installer when your browser is in French. Menu, field and button names are quoted below exactly as they appear on screen, followed by their English meaning.
Prerequisites
- A Winheberg web hosting plan with access to the Plesk panel
- A domain already connected to the hosting, see our guide How to Connect an External Domain to Your Plesk Hosting
- Your choice of game and login mode, which cannot be changed after the installation
| Item | Requirement |
|---|---|
| PHP | 8.2 minimum, 8.4 or 8.5 recommended |
| PHP extensions | BCMath, Ctype, JSON, Mbstring, OpenSSL, PDO, Tokenizer, XML, XMLWriter, cURL and ZIP |
| Database | MySQL or MariaDB recommended |
| Web server | URL rewriting enabled and symlink support |
Azuriom installs at the website root, in httpdocs. If a website is already live on that domain, back it up before starting or install Azuriom on a subdomain.
1. Switch the website to PHP 8.4
From Sites Web & Domaines (Websites & Domains), open your domain. In the Tableau de bord (Dashboard), Outils Dévelop. (Dev Tools) section, click PHP. On the Paramètres PHP (PHP Settings) page, pick an 8.4 version in the Prise en charge de PHP (PHP support) list, then confirm with OK.
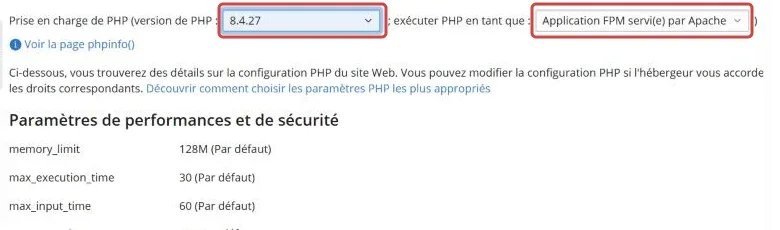
Plesk picks the Application FPM servi(e) par Apache (FPM application served by Apache) mode on its own, keep it.
2. Create the database
Open Bases de données (Databases) in the side menu, then click Ajouter une base de données (Add Database).
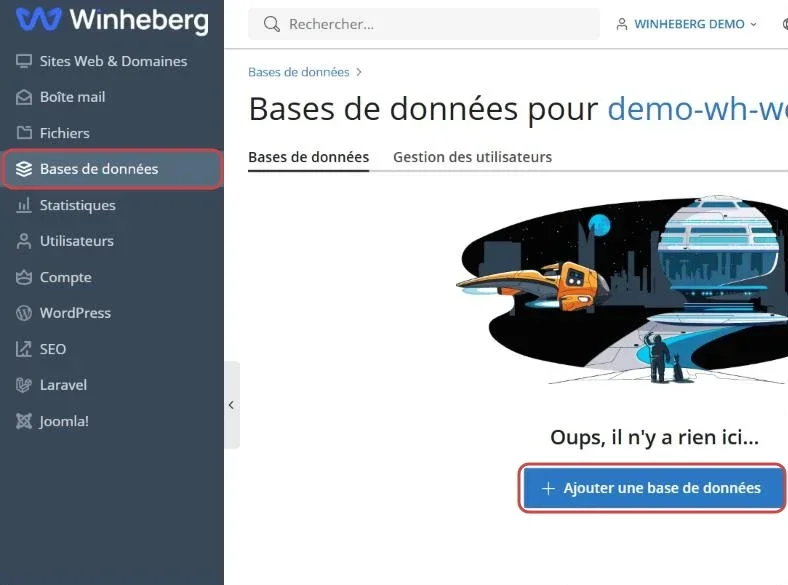
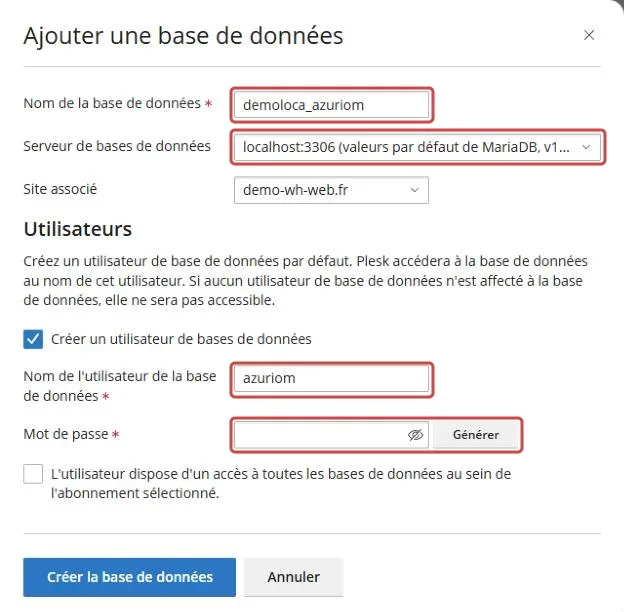
Complete the Nom de la base de données (Database name) after the prefix Plesk adds for your account, pick your domain in Site associé (Related site), then enter a Nom de l'utilisateur de la base de données (Database user name). Click Générer (Generate) to get a strong password, copy it, then confirm with Créer la base de données (Create database).
Keep this information at hand, the installer asks for it in step 6.
| Installer field | Value |
|---|---|
| Type | MySQL/MariaDB |
| Adresse (Host) | localhost |
| Port | 3306 |
| Base de données (Database) | The full name, prefix included |
| Utilisateur (User) | The user name created above |
| Mot de passe (Password) | The password generated by Plesk |
3. Upload the Azuriom installer
Open Fichiers (Files) in the side menu and go into httpdocs. Click +, then Importer le fichier via l'URL (Import file from URL).
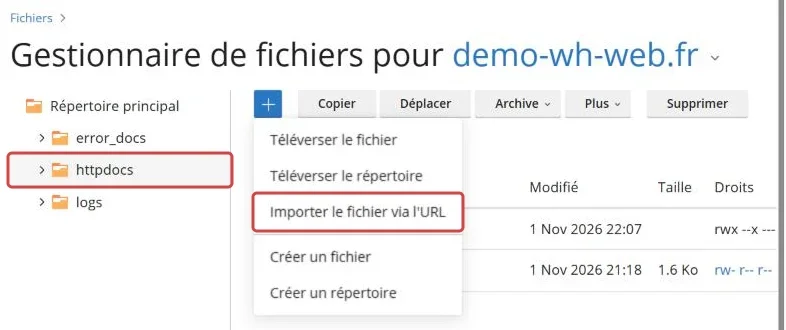
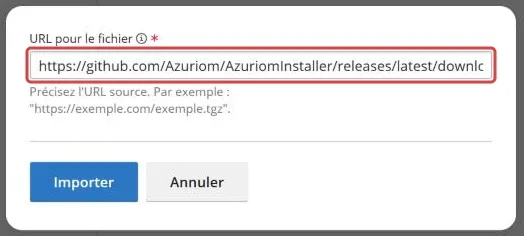
Paste the address of the official installer below, then click Importer (Import). Plesk fetches the AzuriomInstaller.zip file directly, without going through your computer.
https://github.com/Azuriom/AzuriomInstaller/releases/latest/download/AzuriomInstaller.zip
You can also download the installer from the Azuriom download page, then send it with Téléverser le fichier (Upload file).
4. Extract the archive
Tick AzuriomInstaller.zip, open the Archive menu and pick Extraire les fichiers (Extract files). Keep /httpdocs as the destination folder and confirm with OK.
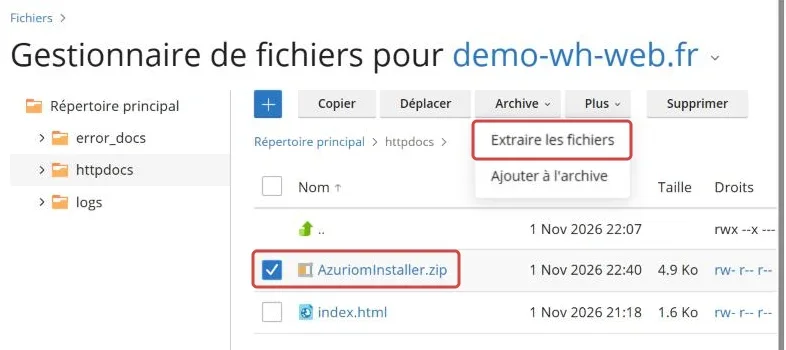
Extraction adds an index.php file, an .htaccess file and a public folder. You can then delete the AzuriomInstaller.zip archive.
The Azuriom documentation asks to set file permissions to 775. This is not needed on our web hosting plans, PHP runs as your subscription user and the installer accepts the default permissions.
5. Run the installer
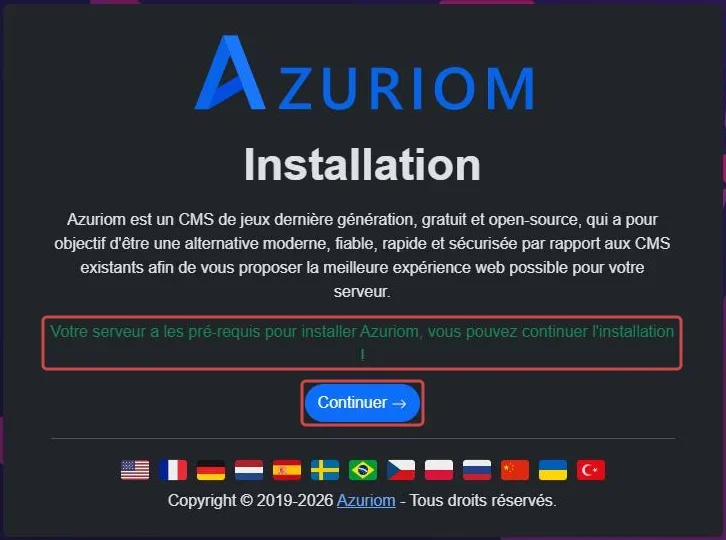
Open your domain in a browser. The installer checks your server and displays Votre serveur a les pré-requis pour installer Azuriom (Your server meets the requirements to install Azuriom). Click Continuer (Continue).
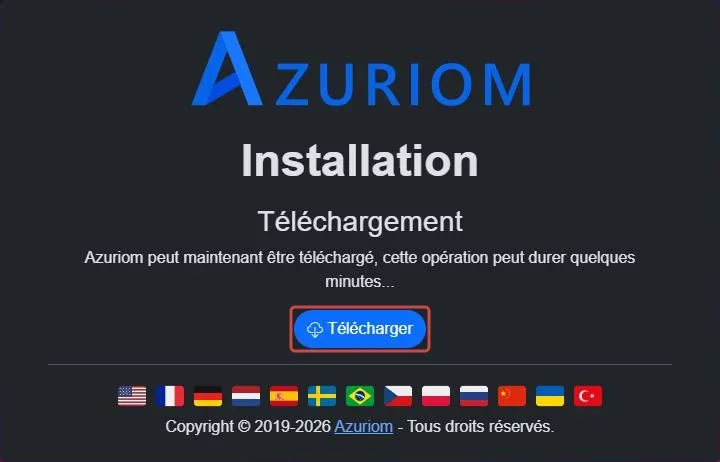
At the Téléchargement (Download) step, click Télécharger (Download). The installer fetches the latest Azuriom version, which can take a few minutes.
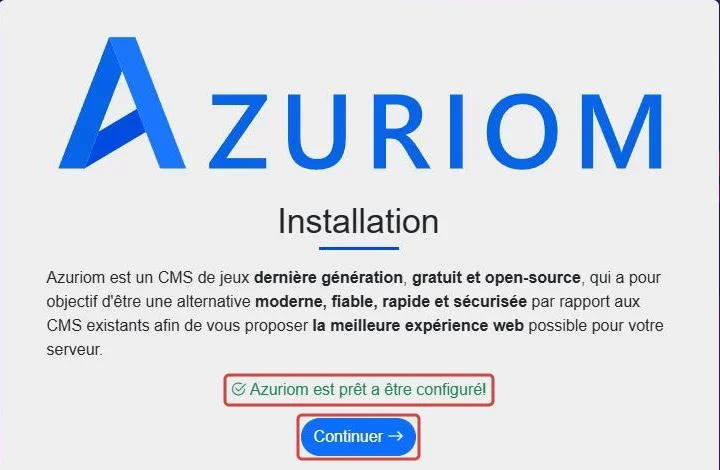
When the installer says Azuriom is ready to be configured, click Continuer.
6. Enter the database details
Pick MySQL/MariaDB in Type, then enter the information noted in step 2. Click Continuer.
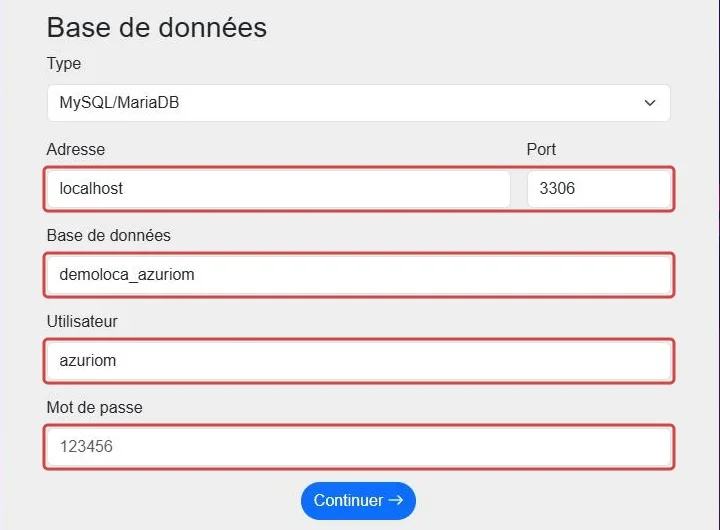
The installer also offers SQLite, PostgreSQL and SQLServer. The Azuriom documentation recommends MySQL or MariaDB, which is what your hosting provides.
7. Pick the game
Click your server game in the list, for instance Minecraft, Minecraft: Bedrock Edition, Hytale (Early Access), FiveM or Rust.
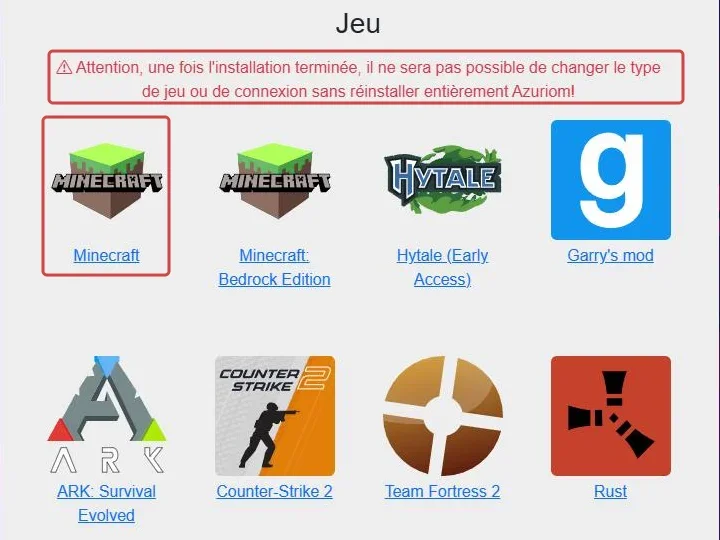
As the installer points out, the game type and the login mode cannot be changed once the installation is done, short of reinstalling Azuriom entirely.
8. Create the administrator account
The form depends on the chosen game. For Minecraft, first pick the website Langue (Language), then the login mode.
| Choice | What the installer asks for the admin account |
|---|---|
| Oui (Yes) | The administrator Minecraft UUID, login then goes through a Microsoft account that owns Minecraft |
| Non (No) | A Pseudo (Username), an Adresse E-Mail (Email address), a Mot de passe (Password) and its Confirmation du mot de passe (Password confirmation) |
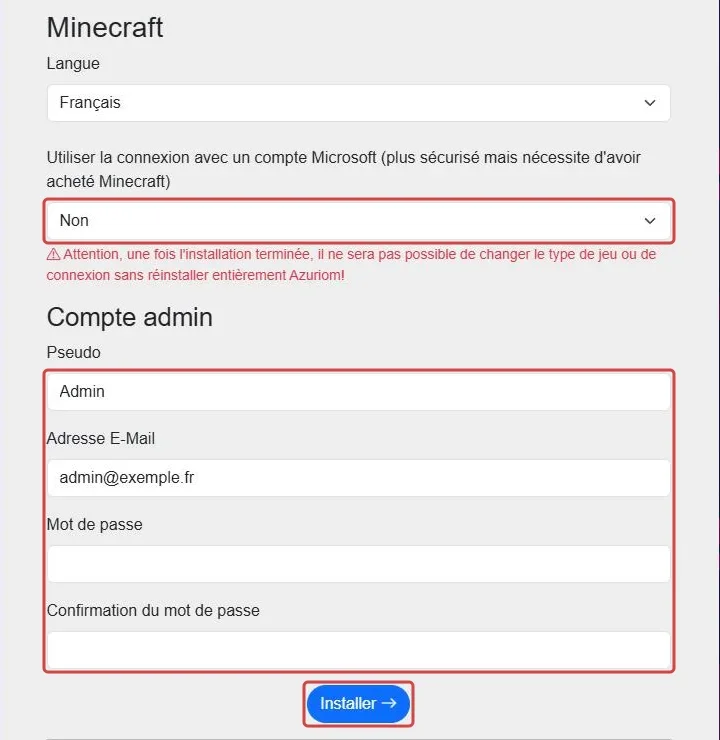
Click Installer (Install). Once the installation is done, your website shows its home page.
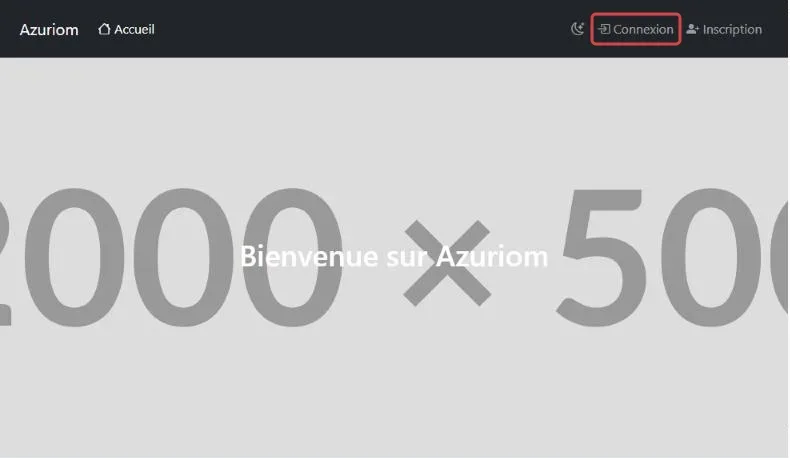
Click Connexion (Login) and sign in with the administrator account, then click your name at the top right to reach the administration dashboard.
9. Schedule the CRON task
Some Azuriom features, such as automatic renewal of shop subscriptions, need a task that runs every minute.
From your domain Tableau de bord, Outils Dévelop. section, open Tâches planifiées (Scheduled Tasks), then click Ajouter une tâche (Add Task). Fill in the form as shown below, then confirm with OK.
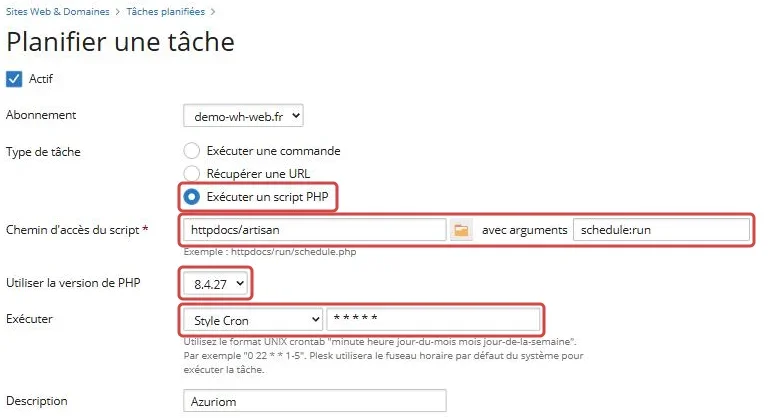
| Field on screen | Value |
|---|---|
| Type de tâche (Task type) | Exécuter un script PHP (Run a PHP script) |
| Chemin d'accès du script (Script path) | httpdocs/artisan |
| avec arguments (with arguments) | schedule:run |
| Utiliser la version de PHP (Use PHP version) | The same version as the website, for instance 8.4 |
| Exécuter (Run) | Style Cron (Cron style), with * * * * * |
| Description | Azuriom, to find it easily |
10. Enable the SSL certificate
To serve your website over HTTPS, install the free Let's Encrypt certificate from Certificats SSL/TLS (SSL/TLS Certificates) by following our guide How to Generate a Let's Encrypt SSL Certificate for Your Website.
Troubleshooting
❌ The home page works but other pages return a 404 error
URL rewriting does not apply, most often because an .htaccess file is missing.
- Check in the file manager that
.htaccessis present inhttpdocsand inhttpdocs/public - If you uploaded the files over FTP, enable hidden files in your client so they are transferred
- Extract the archive again with the Remplacer les fichiers existants (Replace existing files) box ticked
❌ Images are not displayed
The link between the storage folder and the public folder is missing or broken.
- Delete the
public/storagefolder if it exists, but never thestoragefolder at the root - Then open the
/admin/settings/storage/linkaddress of your website, logged in with your administrator account
❌ Uploading an image fails
By default PHP limits the size of an uploaded file to 2 MB, the upload_max_filesize value shown in Paramètres PHP.
- Resize the image before uploading it, as Azuriom recommends to keep the website fast
- Compress it into a light format such as WebP
❌ The database credentials have changed
Azuriom reads its credentials from the .env file at the website root.
- Open
httpdocs/.envin the Plesk code editor and fix the database values - Then delete the
bootstrap/cache/config.phpfile if it exists
Best practices
- Choose the game and login mode before starting the installation, they are final
- Stay on PHP 8.4 or 8.5, the versions recommended by Azuriom
- Store the database credentials in a password manager
- Delete the
AzuriomInstaller.ziparchive once the installation is done - Resize your images before uploading them to the website
- To let a team member handle files or the database without sharing your login, follow our guide How to Create a User in Plesk
Need help?
If the installation gets stuck on your hosting, open a ticket with our support from your client area, Technical department, filling in the Related Product field with the web hosting concerned. For questions about the CMS itself, its themes and plugins, see the official Azuriom documentation or join its Discord.
Your server website is ready to welcome your players 🎮