Context
On a Minecraft Java server, operator status (op) unlocks administration commands, such as changing game mode, kicking a player or stopping the server. The whitelist restricts access to a list of approved players, which is handy for a server among friends or a test phase before opening to the public.
This guide shows you how to op yourself from the Console of the Winheberg gaming panel, set the operator level, then enable and manage the whitelist. It also covers the ops.json and whitelist.json files, as well as the special case of cracked servers.
When a player who isn't on the whitelist tries to join, they get this message.
You are not white-listed on this server!
Prerequisites
- An active Minecraft Java server at Winheberg
- Access to the gaming panel at
https://panel.winheberg.com/ - The exact username of each player involved, with the correct upper and lower case
The commands in this guide are the vanilla Minecraft ones. They work the same way on Spigot, Paper or Purpur, but a permissions plugin can add its own rules on top of op status.
1. Op yourself from the Console
Log in to the gaming panel, select your server, then open the Console tab. The server must be running.
In the input field at the bottom of the Console, type the following command, replacing Steve with your username, then press Enter.
op Steve
In the panel Console, commands are typed without the leading /. In game, in the chat, the same command is written /op Steve.
If everything went well, the Console shows the following confirmation.
System chat: Made Steve a server operator
On a Paper server, the Console prefixes command replies with System chat:.
The player doesn't need to be online when you run the command. Once you're op, you can use administration commands directly in game, with the /.
2. Remove op status
To remove a player's operator rights, use the deop command from the Console.
deop Steve
The Console confirms the removal.
System chat: Made Steve no longer a server operator
3. Set the operator level
Each op has a permission level, from 1 to 4. The higher the level, the more sensitive the commands the player can use.
| Level | Name | Main access | Example commands |
|---|---|---|---|
| 1 | Moderator | Bypass spawn protection | None in particular |
| 2 | Gamemaster | Gameplay commands and command blocks | gamemode, tp, give, time, weather, difficulty |
| 3 | Admin | Player management | kick, ban, op, deop, whitelist |
| 4 | Owner | All commands, server management | stop, save-all |
The level granted by the op command is set by the op-permission-level property in the server.properties file. Its default value is 4, the highest level.
To change it, stop the server, open the Files tab, then click server.properties. Find the matching line and enter the level you want.
op-permission-level=4
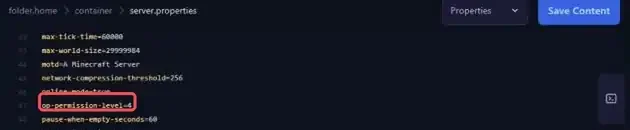
Save the file with the Save Content button, then restart the server.
op-permission-level only applies to players opped after the change. Existing operators keep the level stored in ops.json. To change their level, run deop then op again, or edit the file's level field as explained below.
4. Enable and manage the whitelist
All whitelist commands are typed in the Console tab, without /. When used in game, they require op level 3.
Start by adding the approved players, yourself in particular, then turn the whitelist on.
whitelist add Steve
whitelist add Alex
whitelist on
The table below sums up the available commands and the message returned by the Console, without the System chat: prefix added by Paper.
| Command | Effect | Confirmation message |
|---|---|---|
whitelist on |
Turns the whitelist on | Whitelist is now turned on |
whitelist off |
Turns the whitelist off | Whitelist is now turned off |
whitelist add <username> |
Adds a player | Added <username> to the whitelist |
whitelist remove <username> |
Removes a player | Removed <username> from the whitelist |
whitelist list |
Shows the approved players | There are X whitelisted player(s) followed by the usernames |
whitelist reload |
Reads the whitelist.json file again |
Reloaded the whitelist |
Here is the result in the Console after op Steve, whitelist add Steve and whitelist list.

If the whitelist is already on, whitelist on changes nothing and the Console replies System chat: Whitelist is already turned on.
As with op, players don't need to be online to be added or removed.
Operators can always join the server while the whitelist is on, even if they aren't listed in it.
The whitelist state is stored in server.properties, on the white-list line. The whitelist on command sets this value to true for you.
white-list=true

On version 26.3, the server.properties file generated when the server is created contains white-list=true by default. A server created from scratch on this version therefore starts with the whitelist on, so add your players before inviting them. An updated server keeps the value already in its file. The changes in this version are covered in our article Minecraft Wilderness Bound (26.3), Everything the Update Changes.
5. Kick removed players with enforce-whitelist
By default, removing a player from the whitelist doesn't kick them if they're already online. They're only blocked the next time they try to join.
To kick players who aren't on the whitelist right away, stop the server, open server.properties in Files, and set the following line to true.
enforce-whitelist=true
After a restart, when the whitelist is on and gets reloaded, for example with whitelist reload, online players who aren't on it are kicked.
6. Understand ops.json and whitelist.json
The op and whitelist commands save their data in two files at the root of the server, visible in the Files tab.
The ops.json file holds the list of operators.
[
  {
    "uuid": "00000000-0000-0000-0000-000000000000",
    "name": "Steve",
    "level": 4,
    "bypassesPlayerLimit": false
  }
]
| Field | Purpose |
|---|---|
uuid |
The player's unique identifier |
name |
The player's username |
level |
Op level, from 1 to 4 |
bypassesPlayerLimit |
With true, the player can join even when the server is full |
The whitelist.json file follows the same principle, with only the uuid and name fields.
[
  {
    "uuid": "00000000-0000-0000-0000-000000000000",
    "name": "Alex"
  }
]
Prefer commands over manual editing. They fetch the player's correct UUID automatically, while a typo in a JSON file can stop it from being read. If you edit whitelist.json by hand while the server is running, type whitelist reload to apply the changes. For ops.json, stop the server before editing it, then start it again.
7. Cracked servers (online-mode=false)
Both files identify players by their UUID, not just their username. A player's UUID differs depending on the server mode. In official mode (online-mode=true), it comes from Mojang. In cracked mode (online-mode=false), it's calculated locally from the username.
If you switch an existing server to cracked mode, the entries already in ops.json and whitelist.json no longer match the players. Once the server is running in cracked mode, run op and whitelist add again for each player involved, so their new UUID gets saved.
In cracked mode, anyone can join with any username they like, including an operator's. The whitelist alone therefore doesn't protect your admin access. Set up local authentication as described in our guide How to Allow Cracked Players on a Minecraft Server.
If you run into trouble
❌ "You are not white-listed on this server!" when joining
- Check with
whitelist listthat the player's username is in the list - Check the exact spelling of the username, including upper case
- If the server switched to cracked mode after the player was added, remove and add the player again to save their new UUID
- If you edited
whitelist.jsonby hand, typewhitelist reloadin the Console
❌ "That player does not exist"
- The username you entered doesn't match any Minecraft account, check its spelling
- In official mode, the player needs a valid Minecraft Java account to be added
❌ "Nothing changed. The player already is an operator"
- The player is already op, nothing else is needed
- To change their level, run
deopthenopagain after changingop-permission-level, or edit thelevelfield inops.jsonwith the server stopped
❌ "Unknown or incomplete command. See below for error"
This message is followed by the command you typed, with a <--[HERE] marker where the server stops understanding it.
- Check the spelling of the command and its arguments, a single typo is enough to trigger this message
- In the Console, type the command without the leading
/ - In game, if you're op, your level may be too low for this command, see the level table above and the
levelfield of theops.jsonfile
❌ A player removed from the whitelist stays connected
- This is the default behavior while
enforce-whitelistis set tofalse - Set
enforce-whitelist=trueinserver.properties, restart, then typewhitelist reload - You can also kick them directly with
kick <username>from the Console
Best practices
- Add yourself to the whitelist or op yourself before typing
whitelist on, so you don't lock yourself out - Keep level 4 for people you trust, level 2 is often enough for an event host or a builder
- Remove op status from players who no longer need it with
deop - Run
whitelist listregularly to check who still has access to the server - On a cracked server, don't rely on the whitelist alone and set up local authentication
Need help?
If a command doesn't behave as expected or a player stays blocked despite the whitelist, our team is here. Open a ticket in the Technical department from your client area, fill in the Related Product field with the server in question, and include the command you used along with the message shown in the Console.
Your Minecraft server is now under your control and reserved for the players you chose 🎮