Context
Your The Isle server Evrima has been delivered by Winheberg and you want to customize it, with your own name, a password, RCON or your administrators. Configuration happens in two places on the gaming panel, the Startup tab for the main settings and the Game.ini file for everything else.
This guide explains what each one holds and, above all, how they interact. That is where most people get caught out, a value changed in the wrong place is reset on the next restart.
Prerequisites
- An active The Isle Evrima server on your Winheberg gaming panel
- Access to the gaming panel (
https://panel.winheberg.com/) - The SteamID64 of each player you want to make an administrator, if you want to add any
1. Set the main settings in Startup
Open your server on the gaming panel, then the Startup tab in the side menu. The Variables section holds the server settings, as text fields or False / True switches.
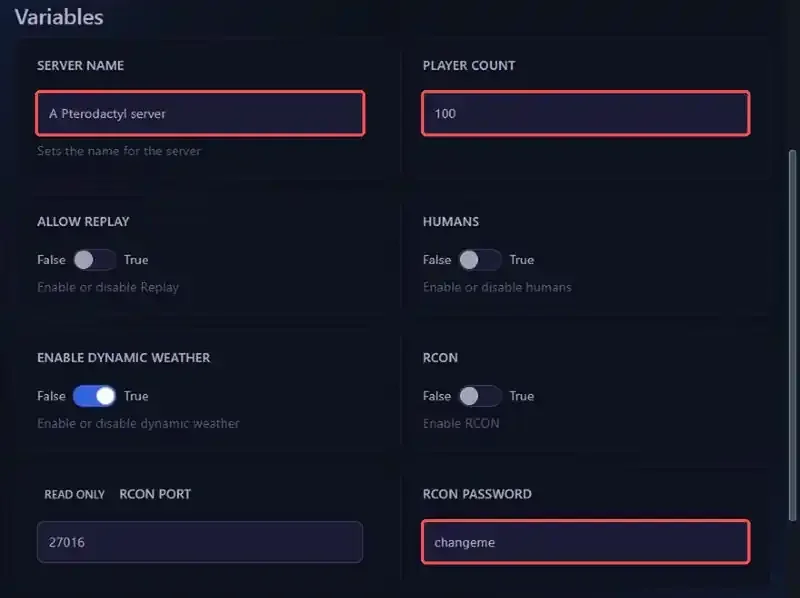
Each variable is linked to a Game.ini key.
| Startup variable | Game.ini key | Purpose |
|---|---|---|
SERVER NAME |
ServerName |
Server name, 70 characters maximum |
PLAYER COUNT |
MaxPlayerCount |
Maximum number of players |
SERVER PASSWORD (switch) |
bServerPassword |
Turns the password on or off |
SERVER PASSWORD (text field) |
ServerPassword |
Server password, 20 characters maximum |
HUMANS |
bEnableHumans |
Turns humans on or off |
ENABLE DYNAMIC WEATHER |
bServerDynamicWeather |
Turns dynamic weather on or off |
ALLOW REPLAY |
bAllowReplay |
Turns Replay on or off |
RCON |
bRconEnabled |
Turns RCON on or off |
RCON PASSWORD |
RconPassword |
RCON password |
RCON PORT |
RconPort |
RCON port, assigned by the panel |
ENABLE QUEUE |
bQueueEnabled |
Turns the queue on or off |
QUEUE PORT |
QueuePort |
Queue port, assigned by the panel |
AUTO UPDATE |
none | Updates the server on every restart |
The password takes two steps. Set the SERVER PASSWORD switch to True, then type the password in the text field with the same name. As long as the switch stays on False, the text in the field is ignored.
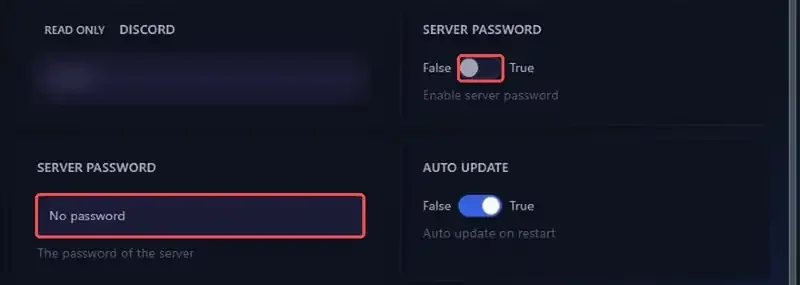
The default RCON password is changeme. If you turn RCON on, replace it with a long, unique password before restarting, otherwise anyone who knows this default value can administer your server.
The RCON and queue ports are marked READ ONLY because they match the ports reserved for your server. You can find them in the Network tab.
2. Understand how Startup writes Game.ini
On every start, the panel writes all the keys from the table above into Game.ini, using the Startup values. The file is located here.
/TheIsle/Saved/Config/LinuxServer/Game.ini
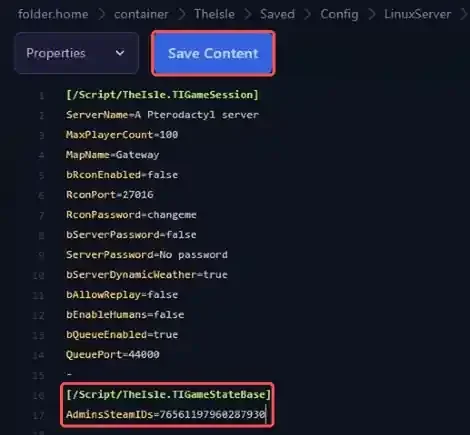
Right after delivery, it looks like this.
[/Script/TheIsle.TIGameSession]
ServerName=A Pterodactyl server
MaxPlayerCount=100
MapName=Gateway
bRconEnabled=false
RconPort=27016
RconPassword=changeme
bServerPassword=false
ServerPassword=No password
bServerDynamicWeather=true
bAllowReplay=false
bEnableHumans=false
bQueueEnabled=true
QueuePort=44000

[/Script/TheIsle.TIGameStateBase]
AdminsSteamIDs=
The ports shown in this example differ from one server to another.
A key managed by Startup (for example ServerName or MaxPlayerCount) that you change directly in Game.ini goes back to the Startup value on the next restart. For these keys, always use the Startup tab.
On the other hand, a key that is not in Startup and that you add by hand to Game.ini is kept across restarts. That is the case for AdminsSteamIDs.
3. Edit Game.ini for everything else
For anything Startup does not offer, such as administrators, edit the file directly.
- Stop the server with the Stop button
- Open the Files tab, then the
TheIsle/Saved/Config/LinuxServerfolder - Click
Game.inito open it in the editor
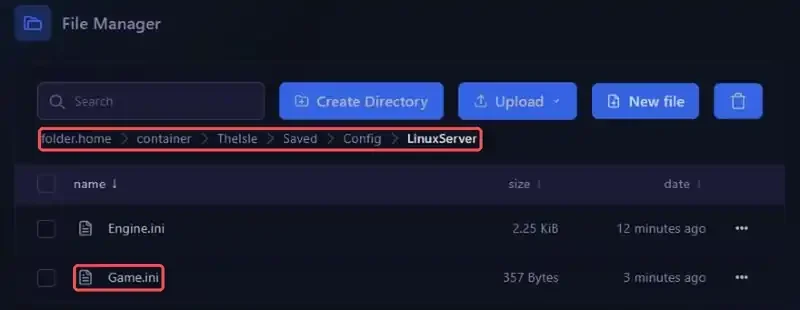
Each key must stay under its section. Game settings go under [/Script/TheIsle.TIGameSession], player lists such as administrators go under [/Script/TheIsle.TIGameStateBase]. To make a player an administrator, enter their SteamID64 (a 17-digit number starting with 7656).
[/Script/TheIsle.TIGameStateBase]
AdminsSteamIDs=76561197960287930
Then click Save Content and restart the server with Start.
Prefer working on your PC with a text editor? See our guide “How to Connect to Your Gaming Server via SFTP”.
Before editing the file, take a backup from the Backups tab. Our guide “How to Create and Restore a Backup of Your Gaming Server” walks you through it.
The folder also contains an Engine.ini file. It holds the Epic Online Services credentials used by the server, leave it as it is.
4. Check that the configuration is applied
Once the server has restarted, open Game.ini again from the Files tab. The Startup values should be there, along with the keys you added by hand. If a value is not what you expected, the key is managed by Startup, fix it in that tab.
If you run into trouble
❌ My Game.ini changes disappear on restart
- Check whether the key is in the table from step 1. If it is, Startup rewrites it on every start, change it in the Startup tab
- Check that you clicked Save Content before restarting
- Check that you edited the file in the
TheIsle/Saved/Config/LinuxServerfolder, not a file with the same name elsewhere
Need help?
If your server no longer starts after a change, or if a setting does not behave as expected, our support team is here to help. Open a ticket from your client area https://billing.winheberg.com, Technical department, selecting your The Isle server in the Related Product field.
Your The Isle server is ready to welcome your players, with settings that suit you 🎮