Context
An update gone wrong, a file deleted by mistake or a hacked website can be fixed in minutes when a recent backup exists. Without one, everything has to be rebuilt.
On your Winheberg web hosting, our team backs up your subscription automatically and keeps these backups over a rolling 7 days. The Plesk backup manager also lets you create your own, download them, schedule them and restore all or part of your website.
This guide covers these four uses, with the settings to know before restoring.
The Winheberg Plesk panel is displayed in French. Menu, field and button names are quoted below exactly as they appear on screen, followed by their English meaning.
Prerequisites
- A Winheberg web hosting plan with access to the Plesk panel
1. Open the backup manager
Open your domain from Sites Web & Domaines (Websites & Domains), then click Sauvegarder et restaurer (Back Up and Restore) in the Fichiers et bases de données (Files & Databases) section of the Tableau de bord (Dashboard).
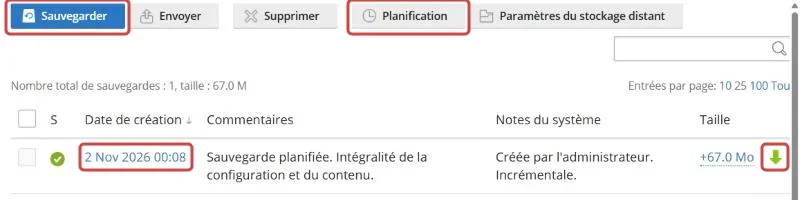
The list shows each backup with its Date de création (Creation date), Commentaires (Comments), Notes du système (System notes) and Taille (Size). The automatic backups of our team carry the Sauvegarde planifiée (Scheduled backup) and Créée par l'administrateur (Created by the administrator) mentions.
These automatic backups cover the last 7 days, the oldest are deleted as new ones come. To keep an older version, create your own backup and download a copy, as described in steps 2 and 3.
2. Create a backup
Before a significant update, create your own restore point. Click Sauvegarder (Back Up).
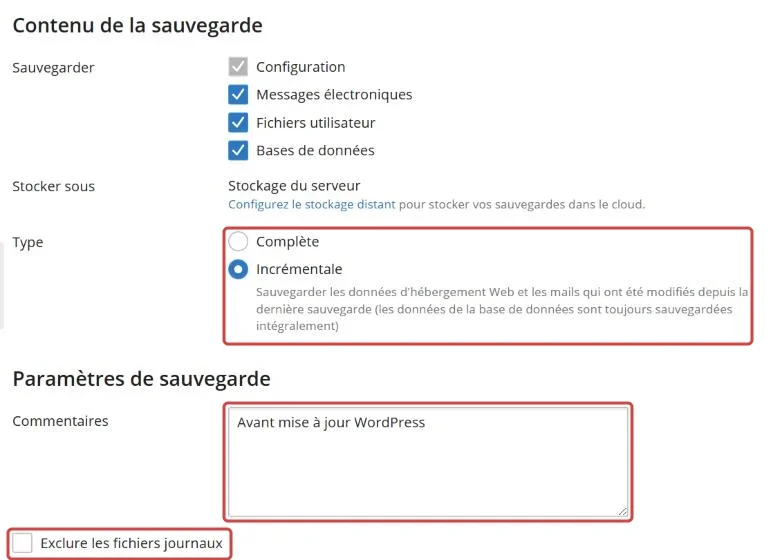
| Setting | Advice |
|---|---|
| Sauvegarder (Back up) | Keep Configuration, Messages électroniques (Mail messages), Fichiers utilisateur (User files) and Bases de données (Databases) ticked |
| Stocker sous (Store in) | Stockage du serveur (Server storage) |
| Type | Complète (Full) for a standalone backup before a risky operation, Incrémentale (Incremental) to only back up files and mail changed since the last one, databases always being backed up in full |
| Commentaires (Comments) | A note to find it again, for instance "Before WordPress update" |
| Exclure les fichiers journaux (Exclude log files) | Tick it, logs make the backup heavier with no use for a restore |
Confirm with OK. The backup shows in the list once finished.
3. Download a copy to your computer
In the list, click the download icon next to a backup. Keeping a copy outside the server protects you even if the hosting itself has a problem.
The Envoyer (Upload) button does the opposite, it adds a previously downloaded backup to the list, so you can restore it.
4. Restore a backup
Click the date of the backup to restore. The restore page opens.
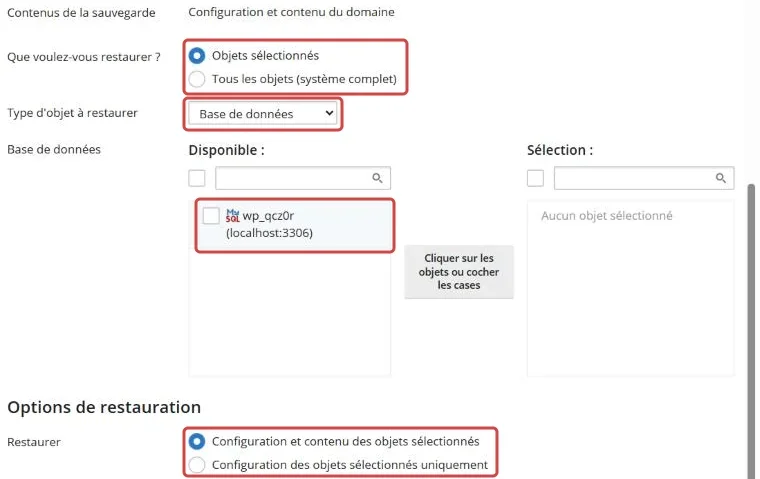
In Que voulez-vous restaurer ? (What do you want to restore?), keep Objets sélectionnés (Selected objects) to only restore a part, then pick the Type d'objet à restaurer (Type of object to restore).
| Object type | Typical use |
|---|---|
| Base de données (Database) | Undo an update that changed the data |
| Sites | Put a whole website back in its previous state |
| Zone DNS (DNS zone) | Undo a change to the DNS records |
| Fichiers de domaines (Domain files) | Recover one or more specific files |
Click the objects to restore to move them into the Sélection (Selection). In Options de restauration (Restore options), keep Configuration et contenu des objets sélectionnés (Configuration and content of the selected objects), then click Restaurer (Restore).
Restoring replaces the current state of the chosen objects with the one from the backup. Content added since, such as new orders or new posts, is lost for these objects. Create a backup of the current state before restoring.
5. Schedule your own backups
For automatic backups at the time of your choice, click Planification (Scheduling) in the manager.
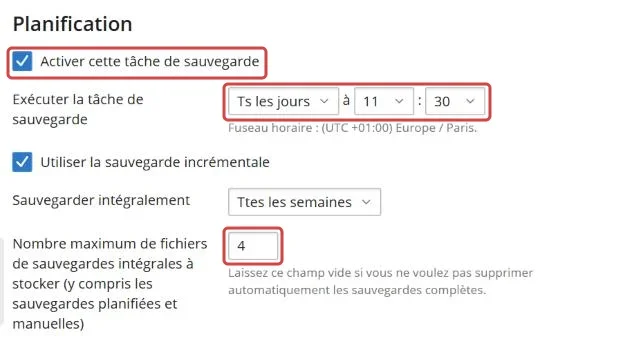
Tick Activer cette tâche de sauvegarde (Activate this backup task), choose the frequency and time in Exécuter la tâche de sauvegarde (Run the backup task), then the Nombre maximum de fichiers de sauvegardes intégrales à stocker (Maximum number of full backup files to store). Beyond this number, which also counts your manual backups, the oldest are deleted. Confirm with Enregistrer (Save).
With Utiliser la sauvegarde incrémentale (Use incremental backup), only changes are backed up each day, and a full backup is made again at the frequency chosen in Sauvegarder intégralement (Full backup). Backups thus stay light.
Best practices
- Create a full backup, with a clear comment, before every significant update
- Regularly download a copy to your computer or to external storage
- Limit the number of backups kept, they take up space on the server
- Test a restore from time to time, of a single file for instance, to make sure your backups are usable
- After a hack, pick a backup from before the intrusion, see our guide What to Do If Your Website Is Hacked on Plesk
Need help?
If a restore fails, open a ticket with our support from your client area, Technical department, filling in the Related Product field with the web hosting concerned. Mention the date of the backup and the objects you wanted to restore.
Your website can go back in time at any moment, with nothing to rebuild 💾